

Projection Mapping With AI: My End-to-End Workflow (2025)
Contents
A practical pipeline for capturing, aligning, generating, and projecting AI-assisted visuals — ending with a Raspberry Pi playback loop.
tl;dr — The Key Steps
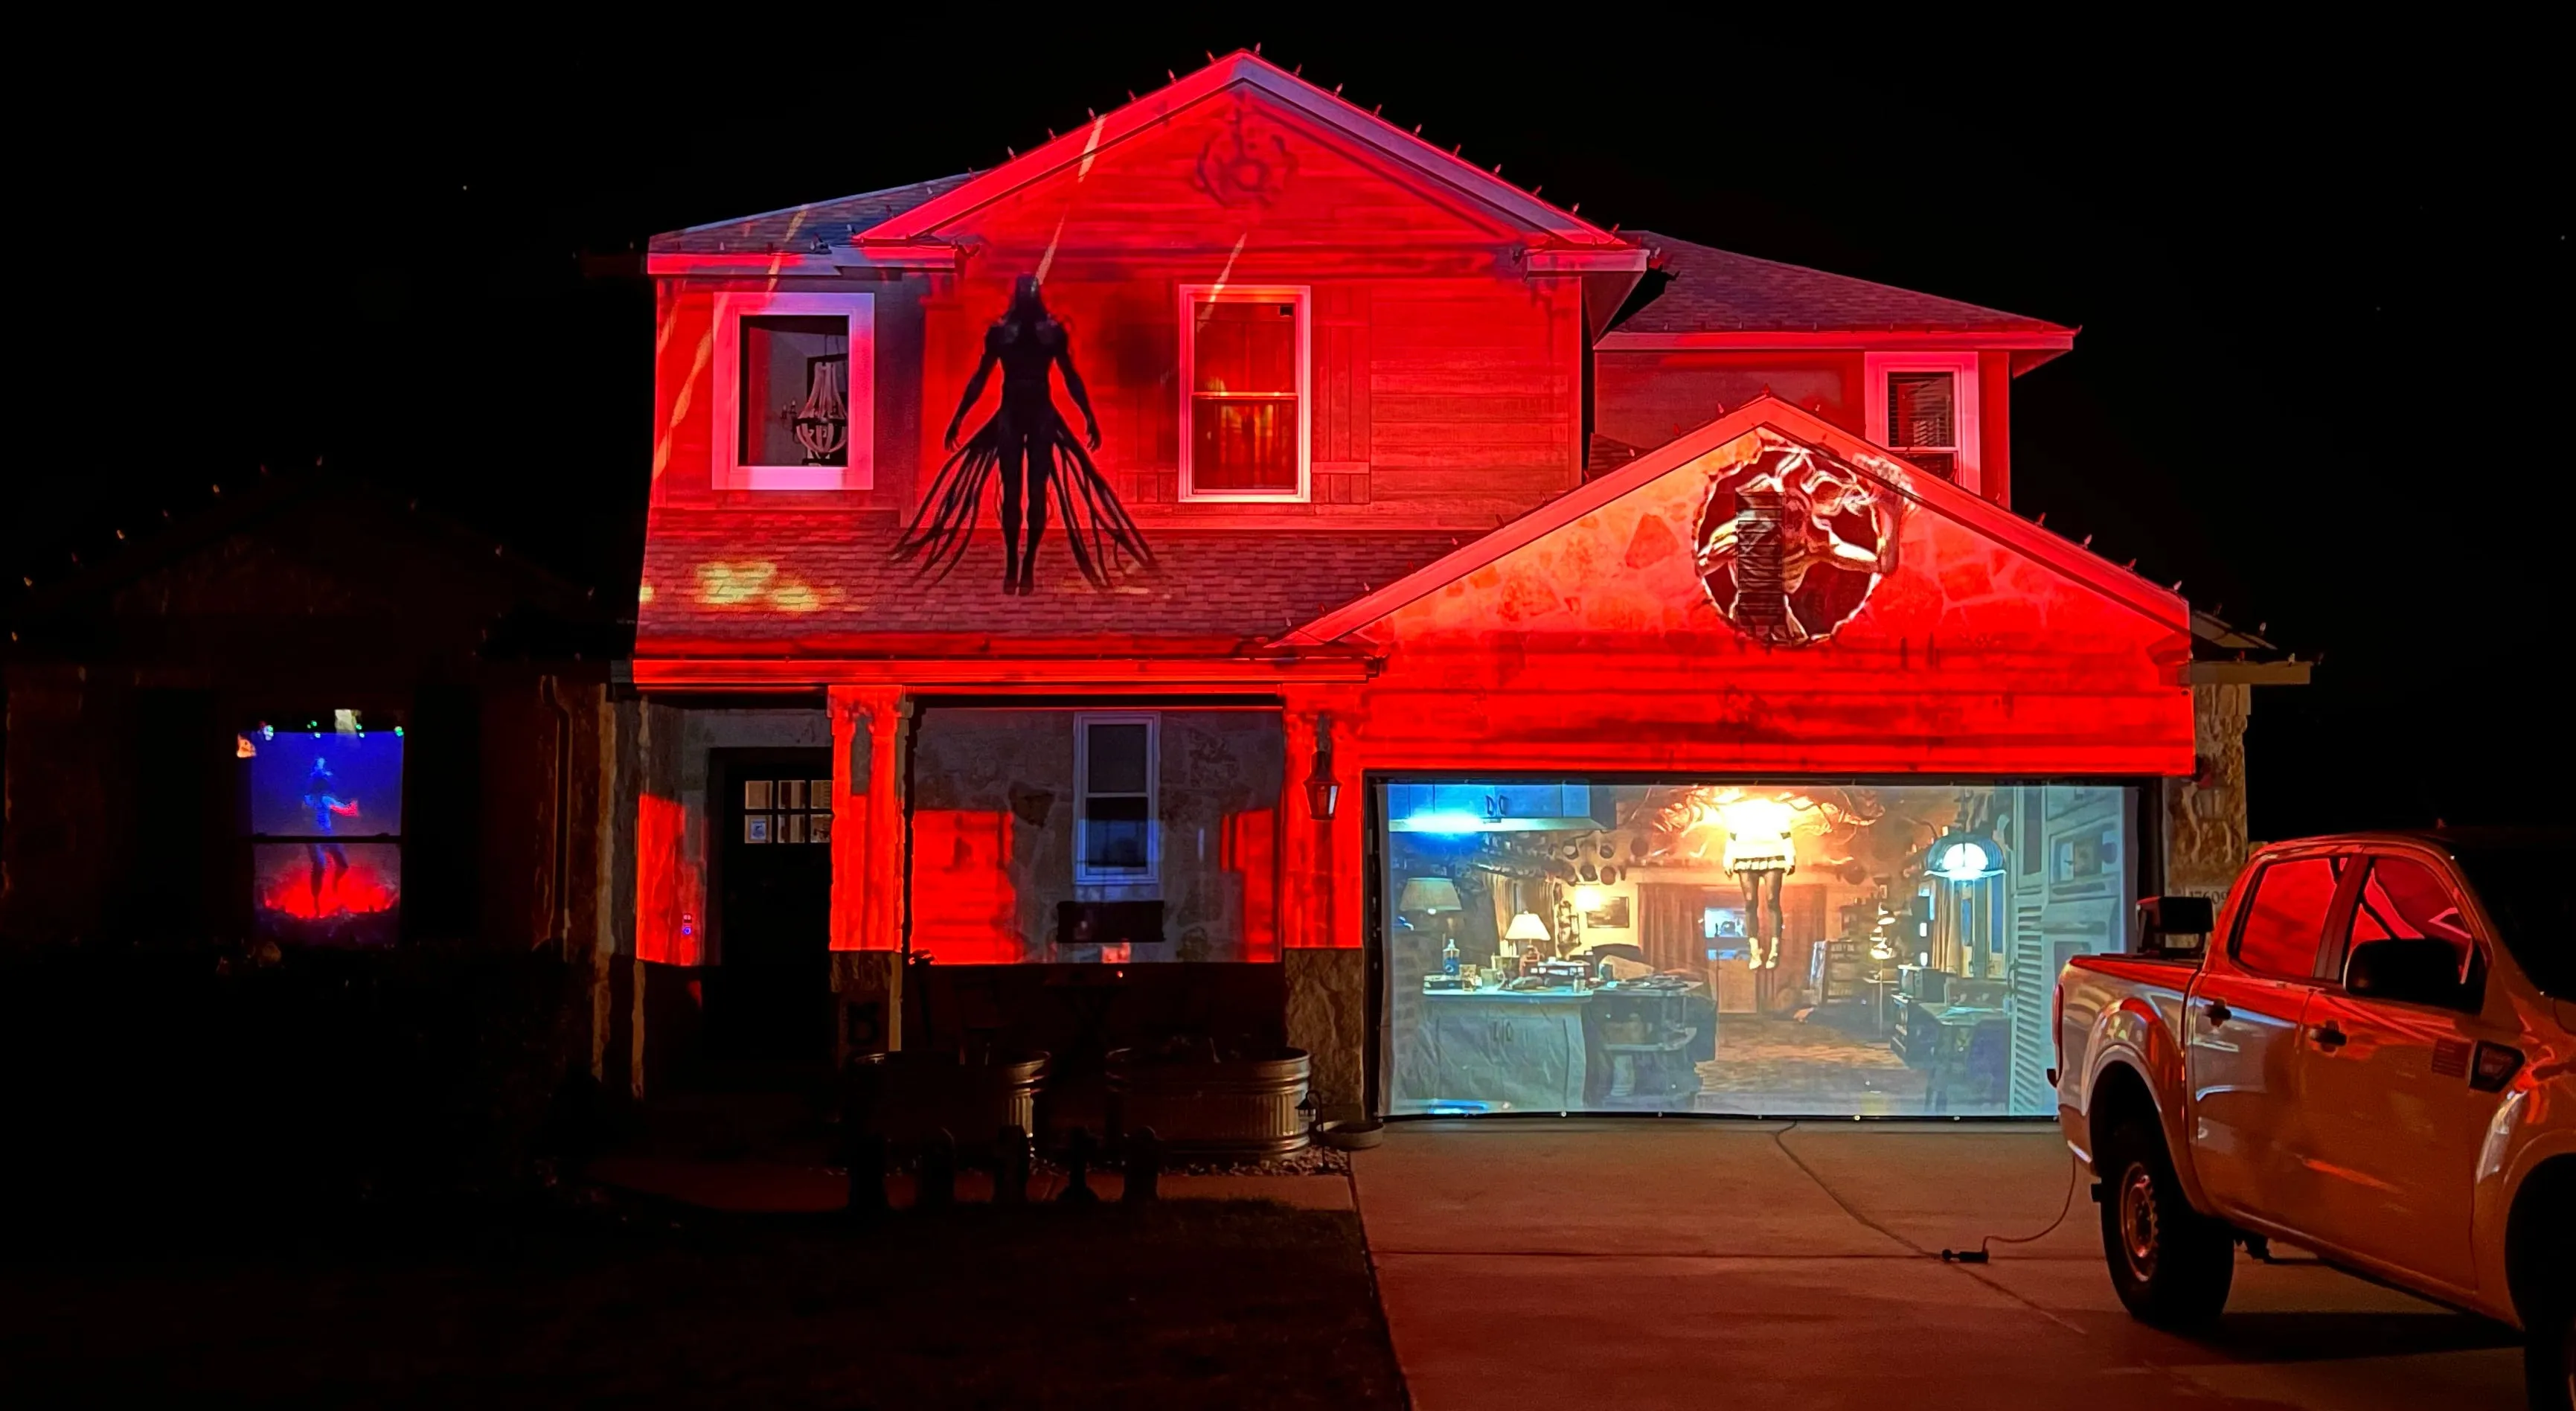
Watch the result — See the finished Halloween projection.
- Capture Images — Create a Structure Reference image (photo taken during daylight) and Projection Boundary image (photo taken at night, white frame to identify projection area).
- Generate Images — Scene Base Image (styled to theme) and Alignment Image (B/W highlighting key edges of structure to aid in projection alignment).
- Align & Lock Projection — Place Alignment Image on facade and Lock transform in LumaMap.
- Animate the Scene — In Veo 3 (if stable) or in CapCut (composite animations over Scene Base Image).
- Export & Play — Final video played on Raspberry Pi + mpv loop.
Key Terms
- Structure Reference Image (aka “Reference Image”) — Daylight photo taken from the projector location. Provides geometry and visual context to guide AI.
- Projection Boundary Image (aka “Canvas Capture”, “White-frame photo”) — Night photo with a full-white projection. Clearly shows the exact area the projector covers.
- Alignment Image (aka “Structural Outline”) — High-contrast black-and-white image (generated via Stable Diffusion Control Structure) emphasizing edges of walls, roofline, windows, and doors. Used to verify and fine-tune alignment on the real surface.
- Scene Base Image — The stylized, on-brand visual we’ll animate (directly in an AI video model or later in an editor like CapCut).
- Inspiration Images — A small set of images that define the theme, palette, motifs, and texture language. Used to build a reusable “profile” for Stable Diffusion Control Structure (SDCS).
Components
Affiliate links: Links to Amazon are affiliate links. As an Amazon Associate I earn from qualifying purchases, at no extra cost to you.
Software & Services
- ChatGPT — concept and technical planning
- Google Images — inspiration assets
- Stable Diffusion Control Structure (SDCS) — image generation and structural control
- Google Gemini — generates theme profiles (YAML) for SDCS
- sdcs-wrapper — my CLI to apply SDCS profiles to input images
- LumaMap — simple alignment & playback for stills (good for quick tests)
- CapCut (or any NLE) — motion layers and finishing
Projectors
- Epson Pro EX9220 — 3600 lm, 1920×1200, throw ratio 1.38–1.68
- Goiaey GO2 — 2000 lm, 1080p, throw ratio ~1:1
Mounting & Rigging
If you want a semi-permanent mounting solution, a chain-link fence post works great. I put mine two feet into the ground with a PVC pipe as a ground sleeve. This means I can take the pole out while I’m not using the setup. At the top of the pole I used a chain-link floor flange. This is normally used to mount the pole to the ground but I’m using it to transition from the pole to the projector mount. I have an older projector mounted to the pole so I needed an older style projector mount.
A lot of newer projectors use a 1/4”-20 thread screw which means you could get away with using a t-nut and a bolt to connect the floor flange to the projector.
- 8’ × 1-5/8” 16-gauge chain-link fence post
- 2” × 5’ SCH40 PVC pipe
- 12” × 48” concrete form tube + 50 lb fast-setting concrete
- 7’ × 16’ white shade cloth w/ grommets (projection surface for garage door). Note: buy the right size for your garage.
- 130lb neodymium disc magnet (for securing cloth/rigging)
- Chain-link post floor flanges
- Low-profile universal projector mount with adjustable arms
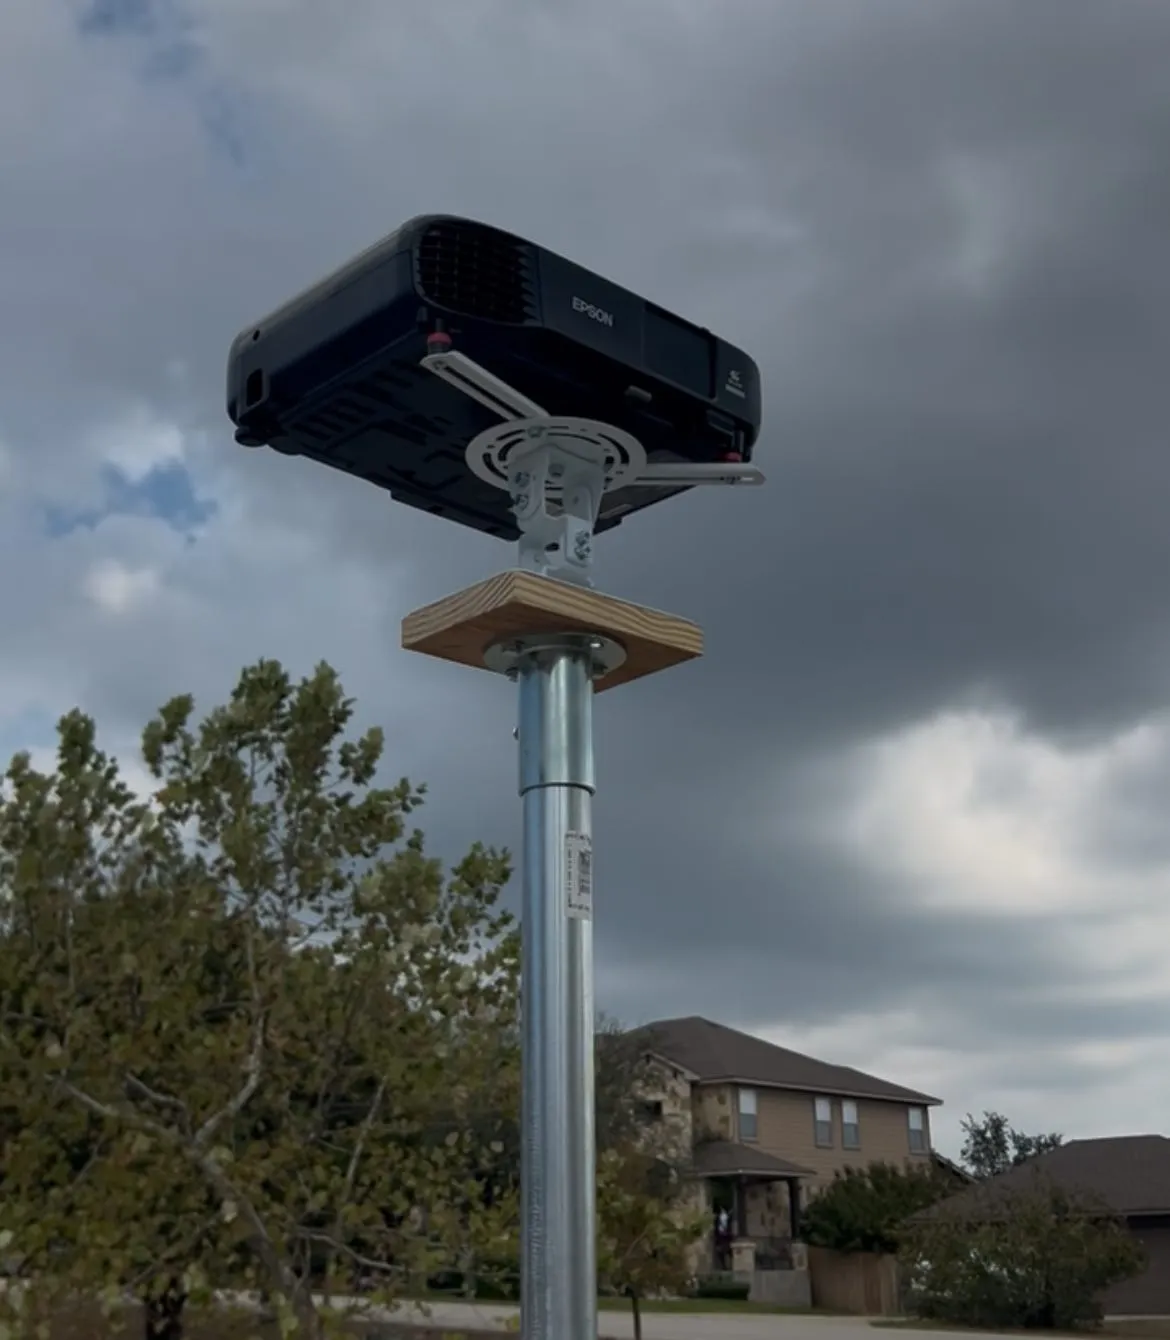
Mounting for projector on chain-link fence pole
Tip: Before buying hardware, estimate your throw distance vs. image width using the projector’s throw ratio so you know you can fill the facade you want.
Planning (theme → profile)
Ideate with ChatGPT
“Give me 5 Halloween themes that are relevant this year. Focus on motifs that read well on light stone and stucco.”
Collect Inspiration Images
Build a small mood board: textures, motifs, characters, architectural treatments that match your facade. Pinterest works well for this if you are collaborating with other people.
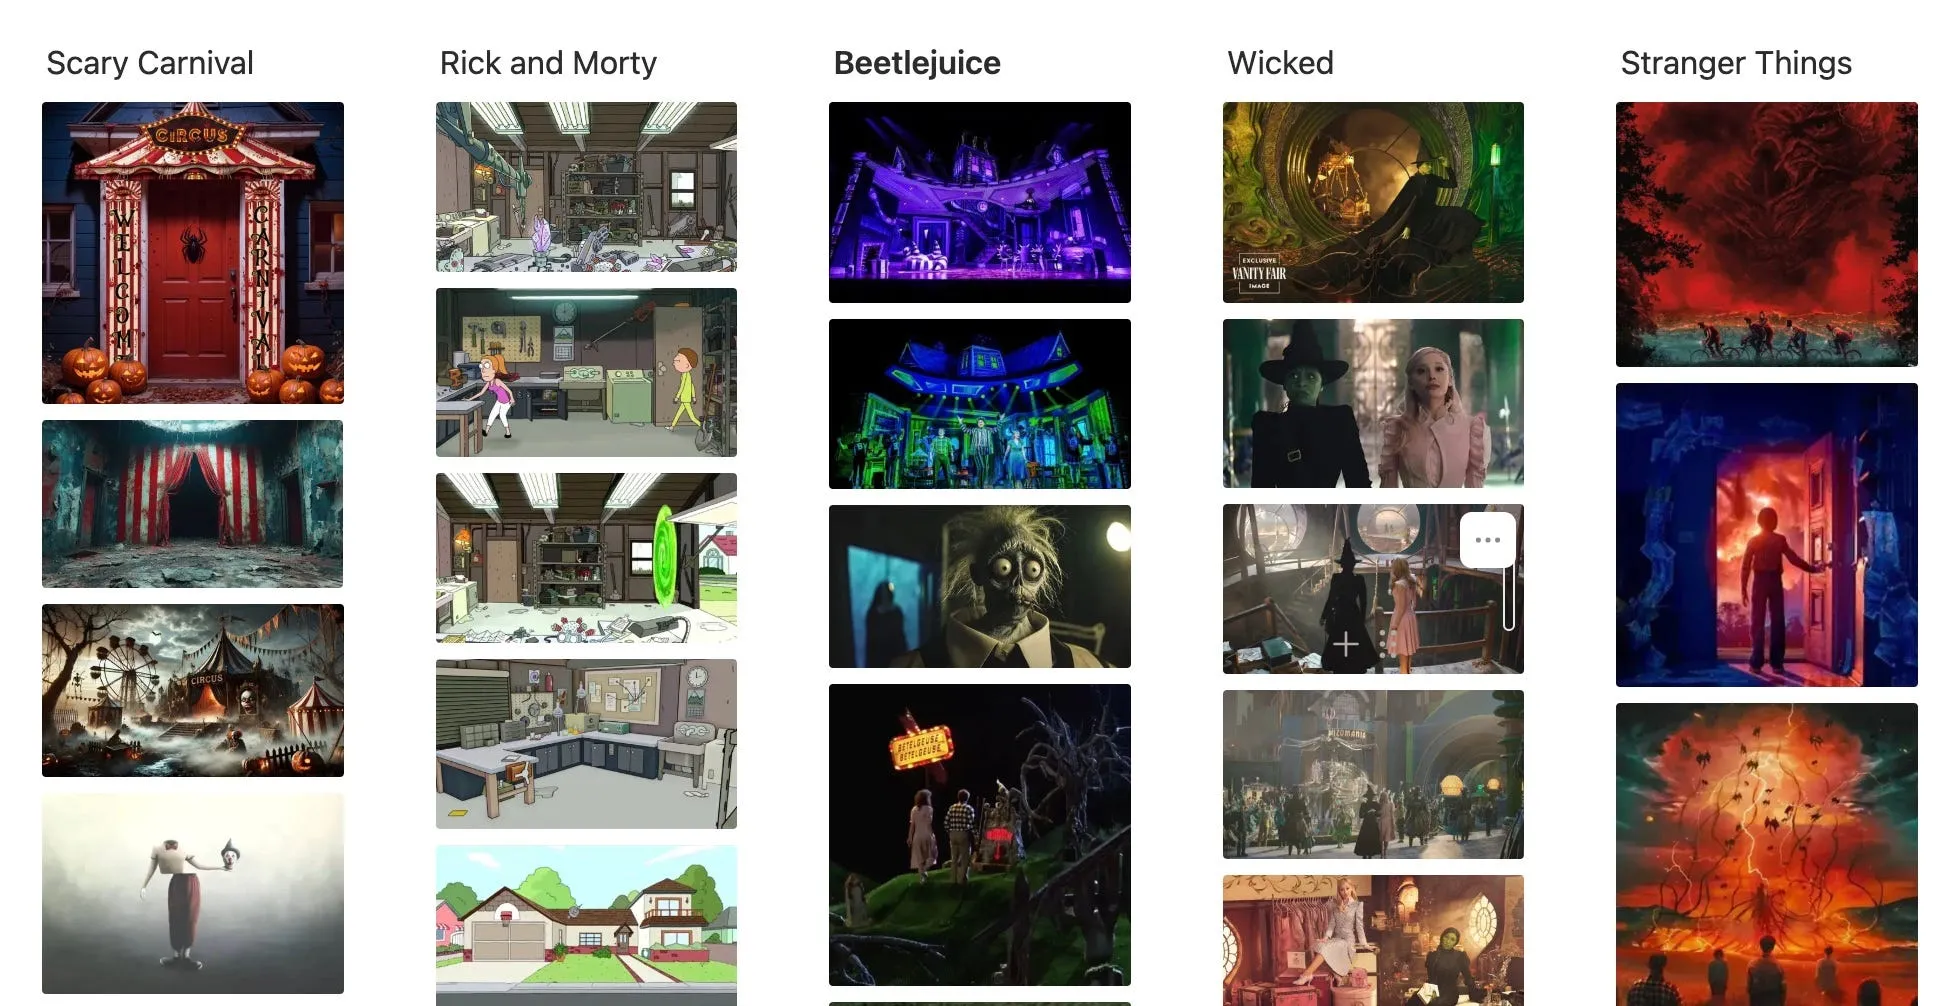
Mood Board — Halloween 2025
Create a Theme Profile (YAML) with Gemini
Upload a few inspiration images to Gemini and ask it to output a single YAML profile for SDCS (prompt, negative prompt, control strength, style preset, output format).
- Keep the prompt verbose and concrete (composition, materials, lighting, mood).
- Keep the negative prompt comprehensive (block low-quality traits and off-theme elements).
- Default
control_strength: 0.8,style_preset: cinematic|photographic,output_format: jpeg.
Gemini Prompt for Theme Profile:
You are an AI assistant, and I need your help to create highly detailed configuration profiles for a Stable Diffusion API.
Your task is to analyze the reference image(s) I provide and generate a single, complete YAML configuration file that can be used to create a new, very similar image. You must follow these specific formatting rules for all of your responses.
Your output must be only a YAML configuration file, structured exactly like this template:

```yaml
# Profile configuration for [A brief, descriptive title of the scene]
prompt: "A single, highly-detailed, photorealistic, and extremely verbose string. This description must be meticulous.
You must describe all key subjects, the position of every major element, the environment, all textures (e.g., 'vintage floral wallpaper', 'worn plaid fabric', 'wet biomechanical vines'), the lighting (e.g., 'primary light from multi-colored string lights', 'eerie blue backlight', 'intense crimson red glow'), the atmosphere ('nostalgic', 'eerie', 'ominous'), and the overall artistic style ('cinematic', 'horror', 'Stranger Things aesthetic').
Be as specific as possible to leave no room for misinterpretation."
negative_prompt: "A single string of comma-separated keywords. This must always include a base set of 'blurry, low quality, noisy, grainy, cartoon, anime, illustration, painting, sketch, ugly, deformed, watermark, text, signature'. You must also add specific negative keywords that are the *opposite* of the prompt's main subjects and mood. For example, if the prompt is 'dark, night, horror', the negative prompt must also include 'bright, daytime, cheerful, happy, clean, modern'."
control_strength: 0.8
style_preset: "cinematic"
output_format: "jpeg"
```

Key Instructions to Always Follow:
* prompt: The description must be as long and verbose as possible. It is the most important part.
* negative_prompt: Must be a comprehensive list to block common errors and unwanted themes.
* control_strength: You must always include this field. The default value must be 0.8. Do not change it unless I explicitly ask you to.
* style_preset: You must always include this field. Default to cinematic or photographic, whichever best fits the image.
* output_format: You must always include this field, and its value must always be jpeg.
My first request is to describe the image(s) I have attached to this message. Please analyze them and generate the YAML profile now.
Designing the Scene
Capture the Structure Reference Image
- Daylight or golden hour.
- Shoot from the same location you’ll place the projector.
- Capture more of the building than the final projection — extra context helps AI.
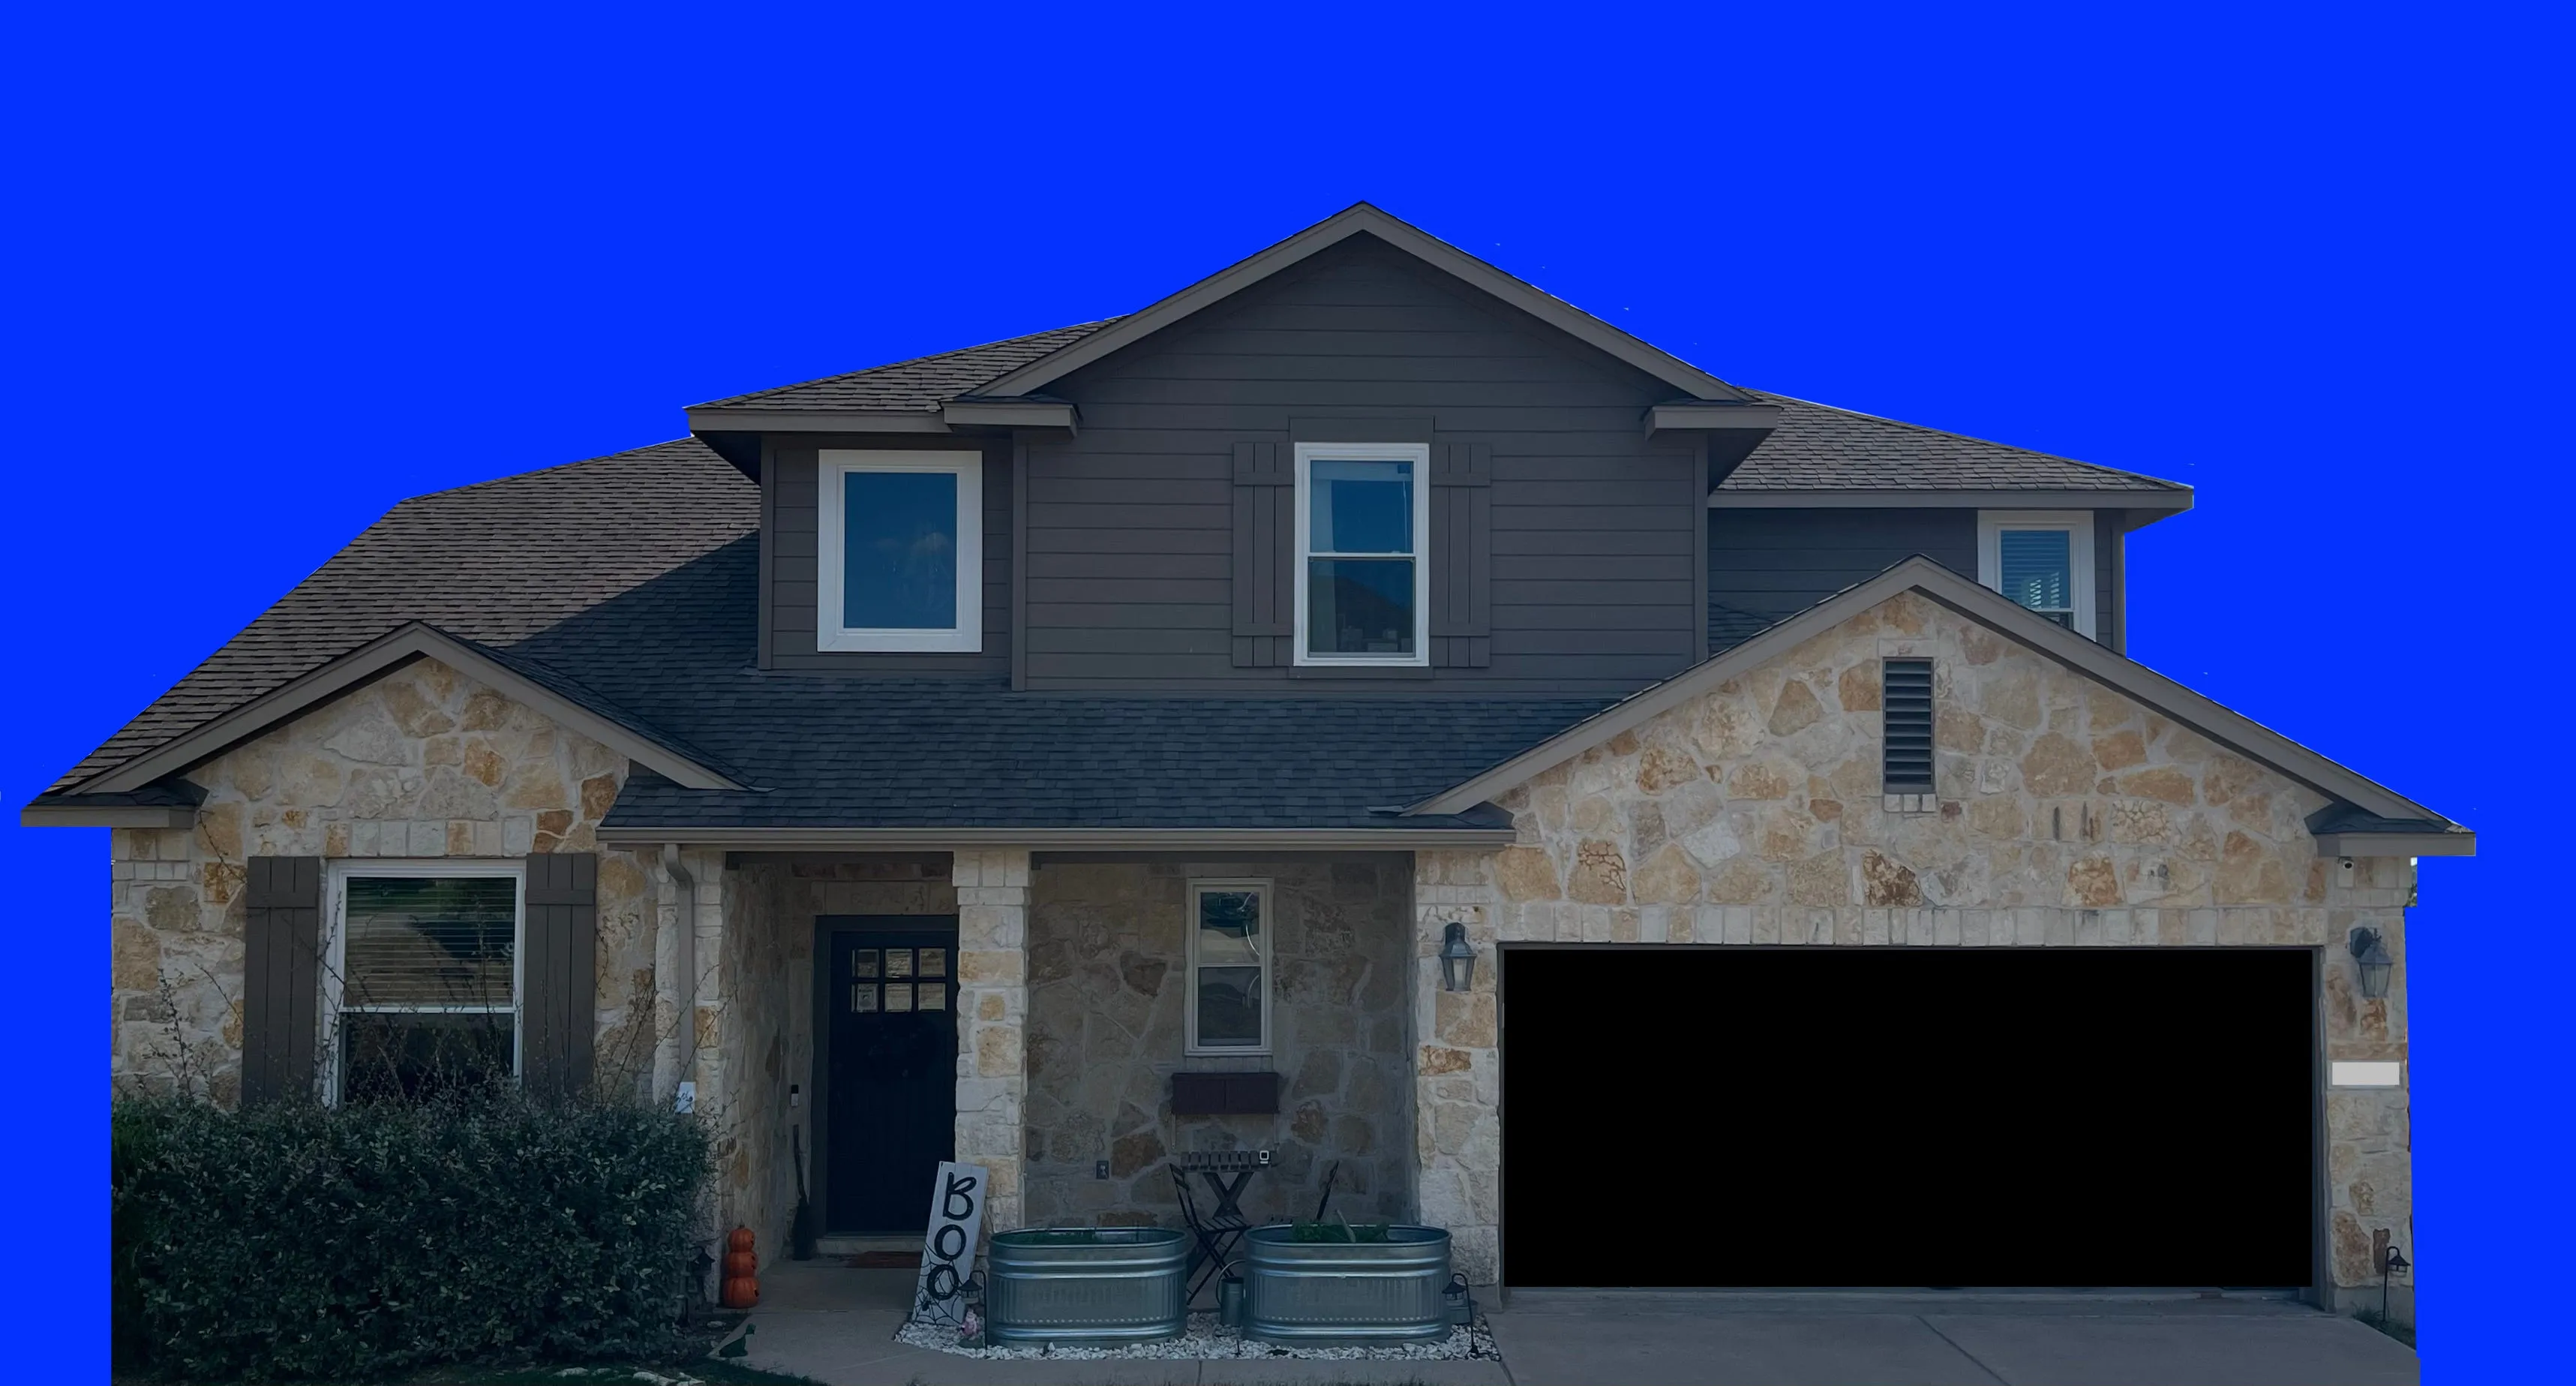
Structure Reference Image — Masking is optional but improves results
Generate the Scene Base Image
- Use
sdcs-wrapperwith your theme profile derived from Gemini. - This becomes the hero still you’ll animate (either in-AI or later in CapCut).
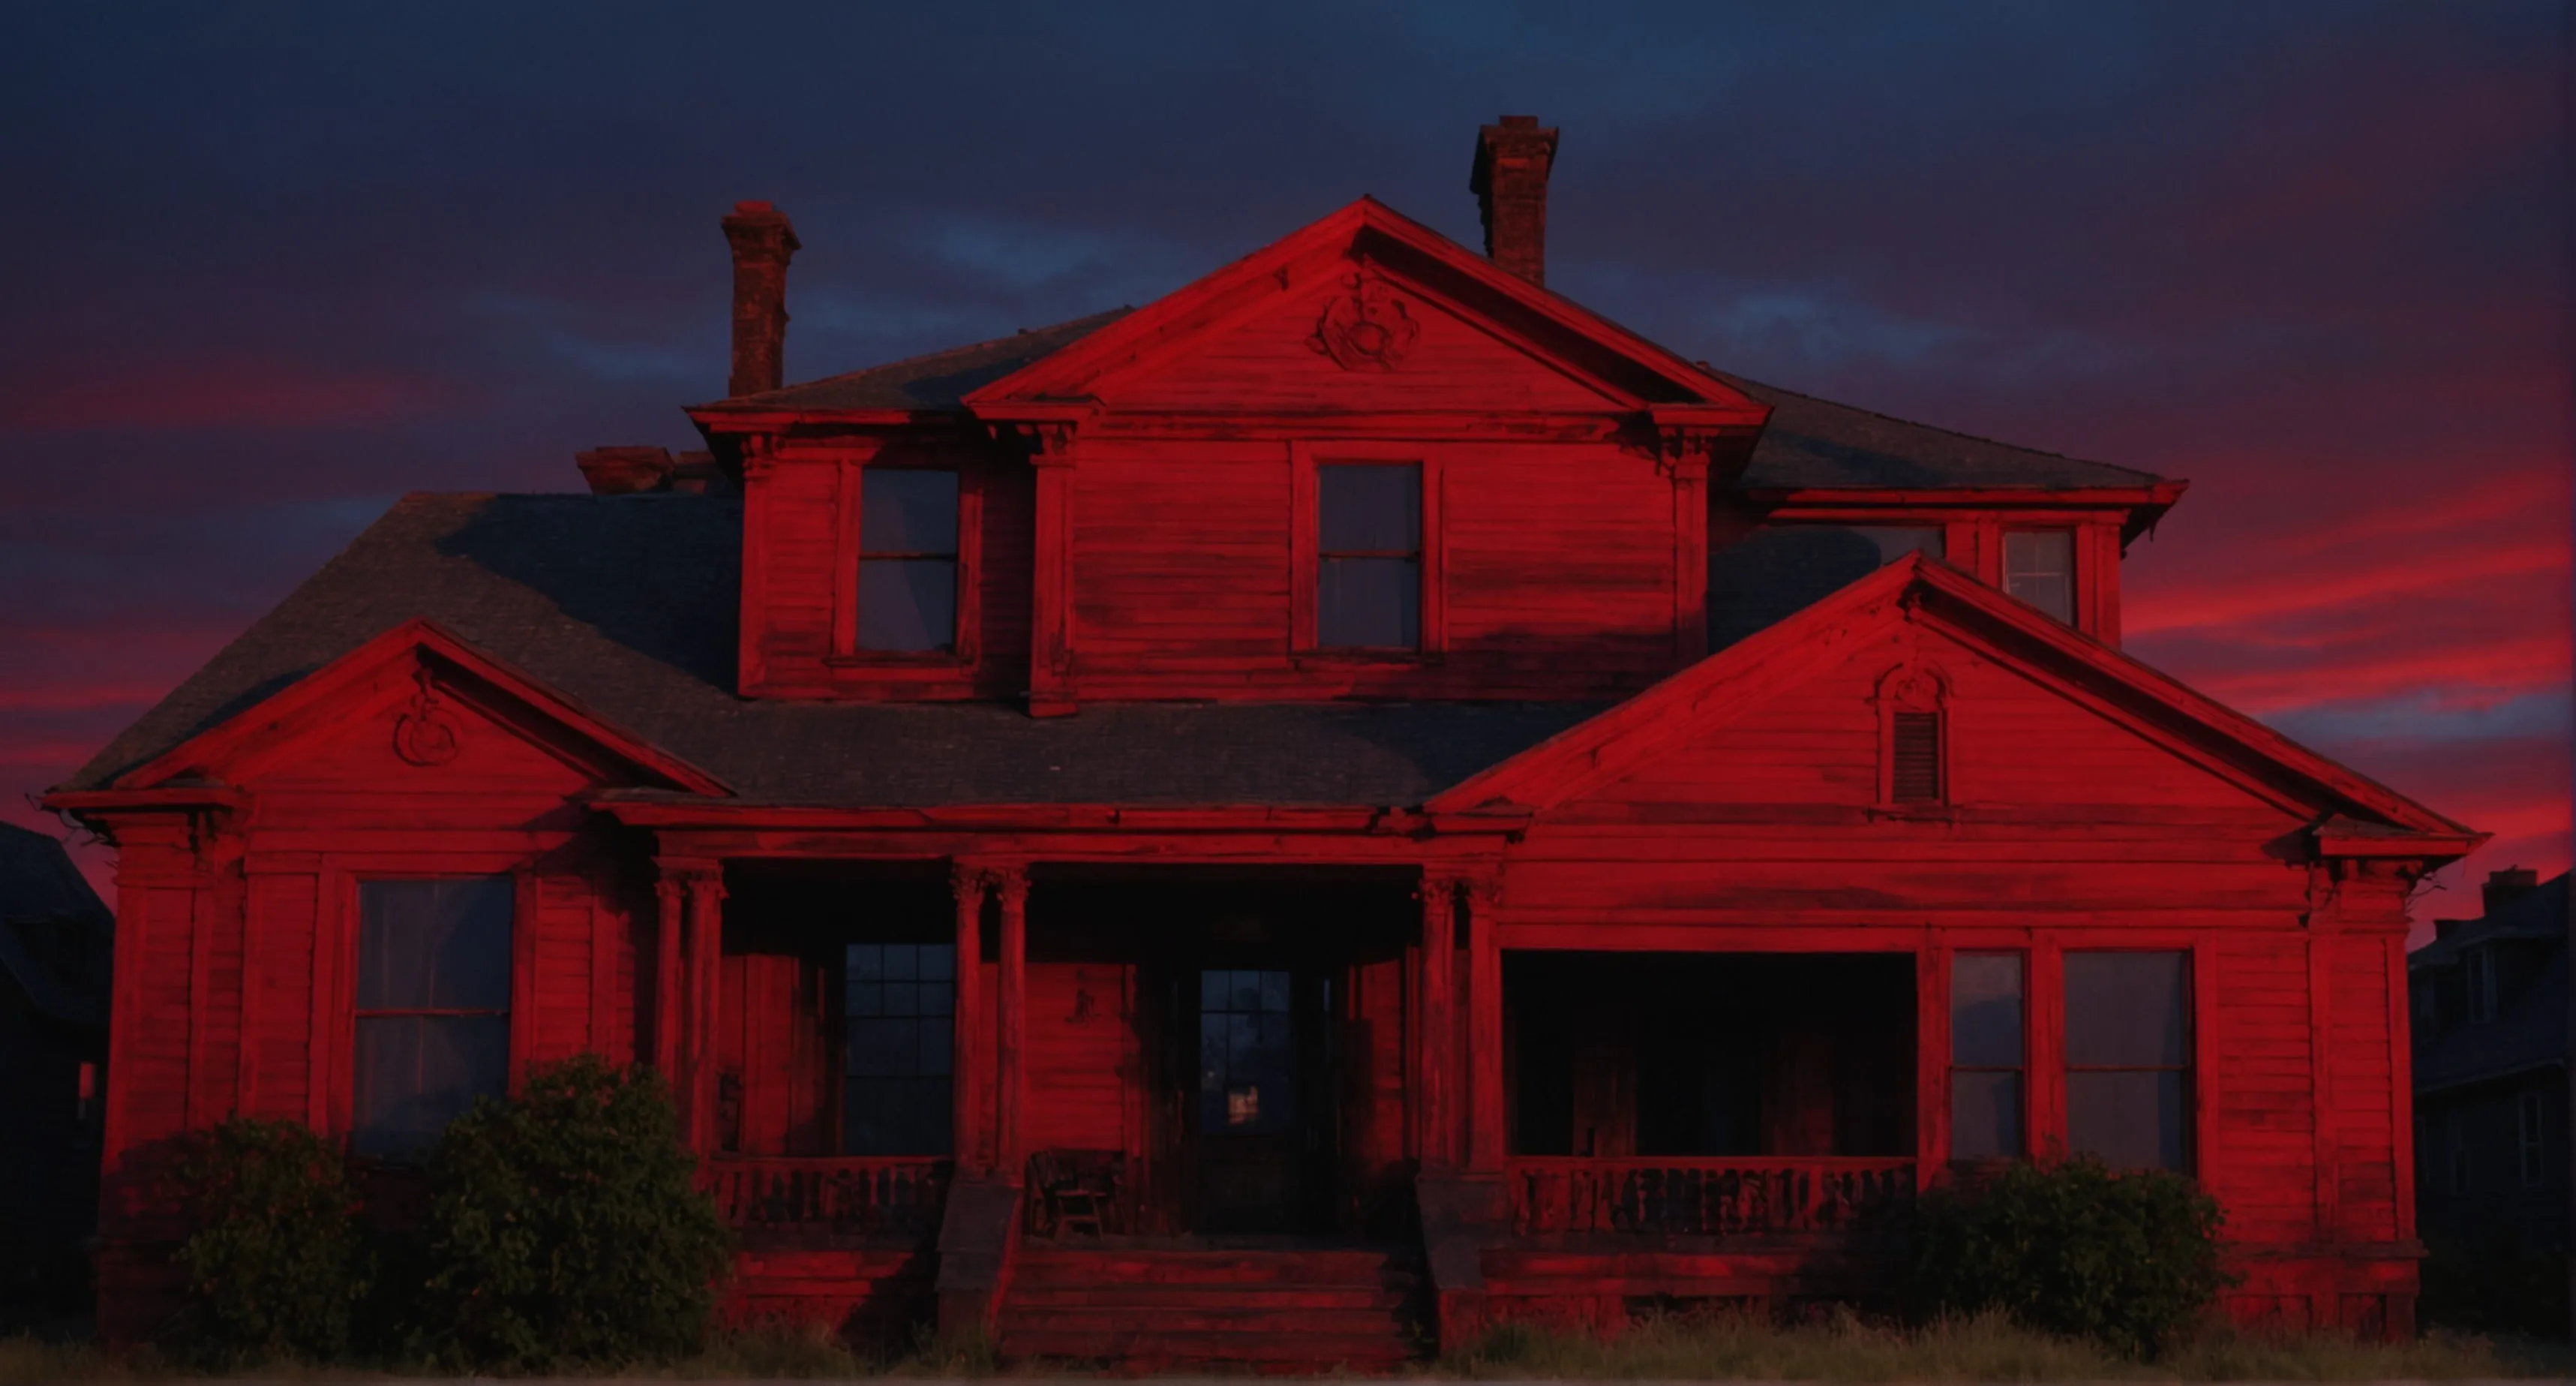
Scene Base Image — Themed as Vecna’s House from Stranger Things
Generate the Alignment Image
- Use a profile that forces bold, high-contrast edges (no color).
Example profile for Alignment Image:
# Profile configuration for creating alignment image
prompt: "Transform this image into bold, high-contrast black and white with thick outlines, clean architectural edges (walls, roofline, windows, doors), flat white fill, no color, and minimal shading. Technical schematic feel."
negative_prompt: "color, gradients, shading, noise, blur, low quality, text, logo, watermark, people, figures, background clutter"
control_strength: 0.95
style_preset: "photographic"
output_format: "jpeg"
Download the alignment profile. Open the file on GitHub and use Download raw file, or clone the repository to use it with the wrapper.
Reusable profiles are maintained in the projection-mapping repository, so the downloads have one source of truth.
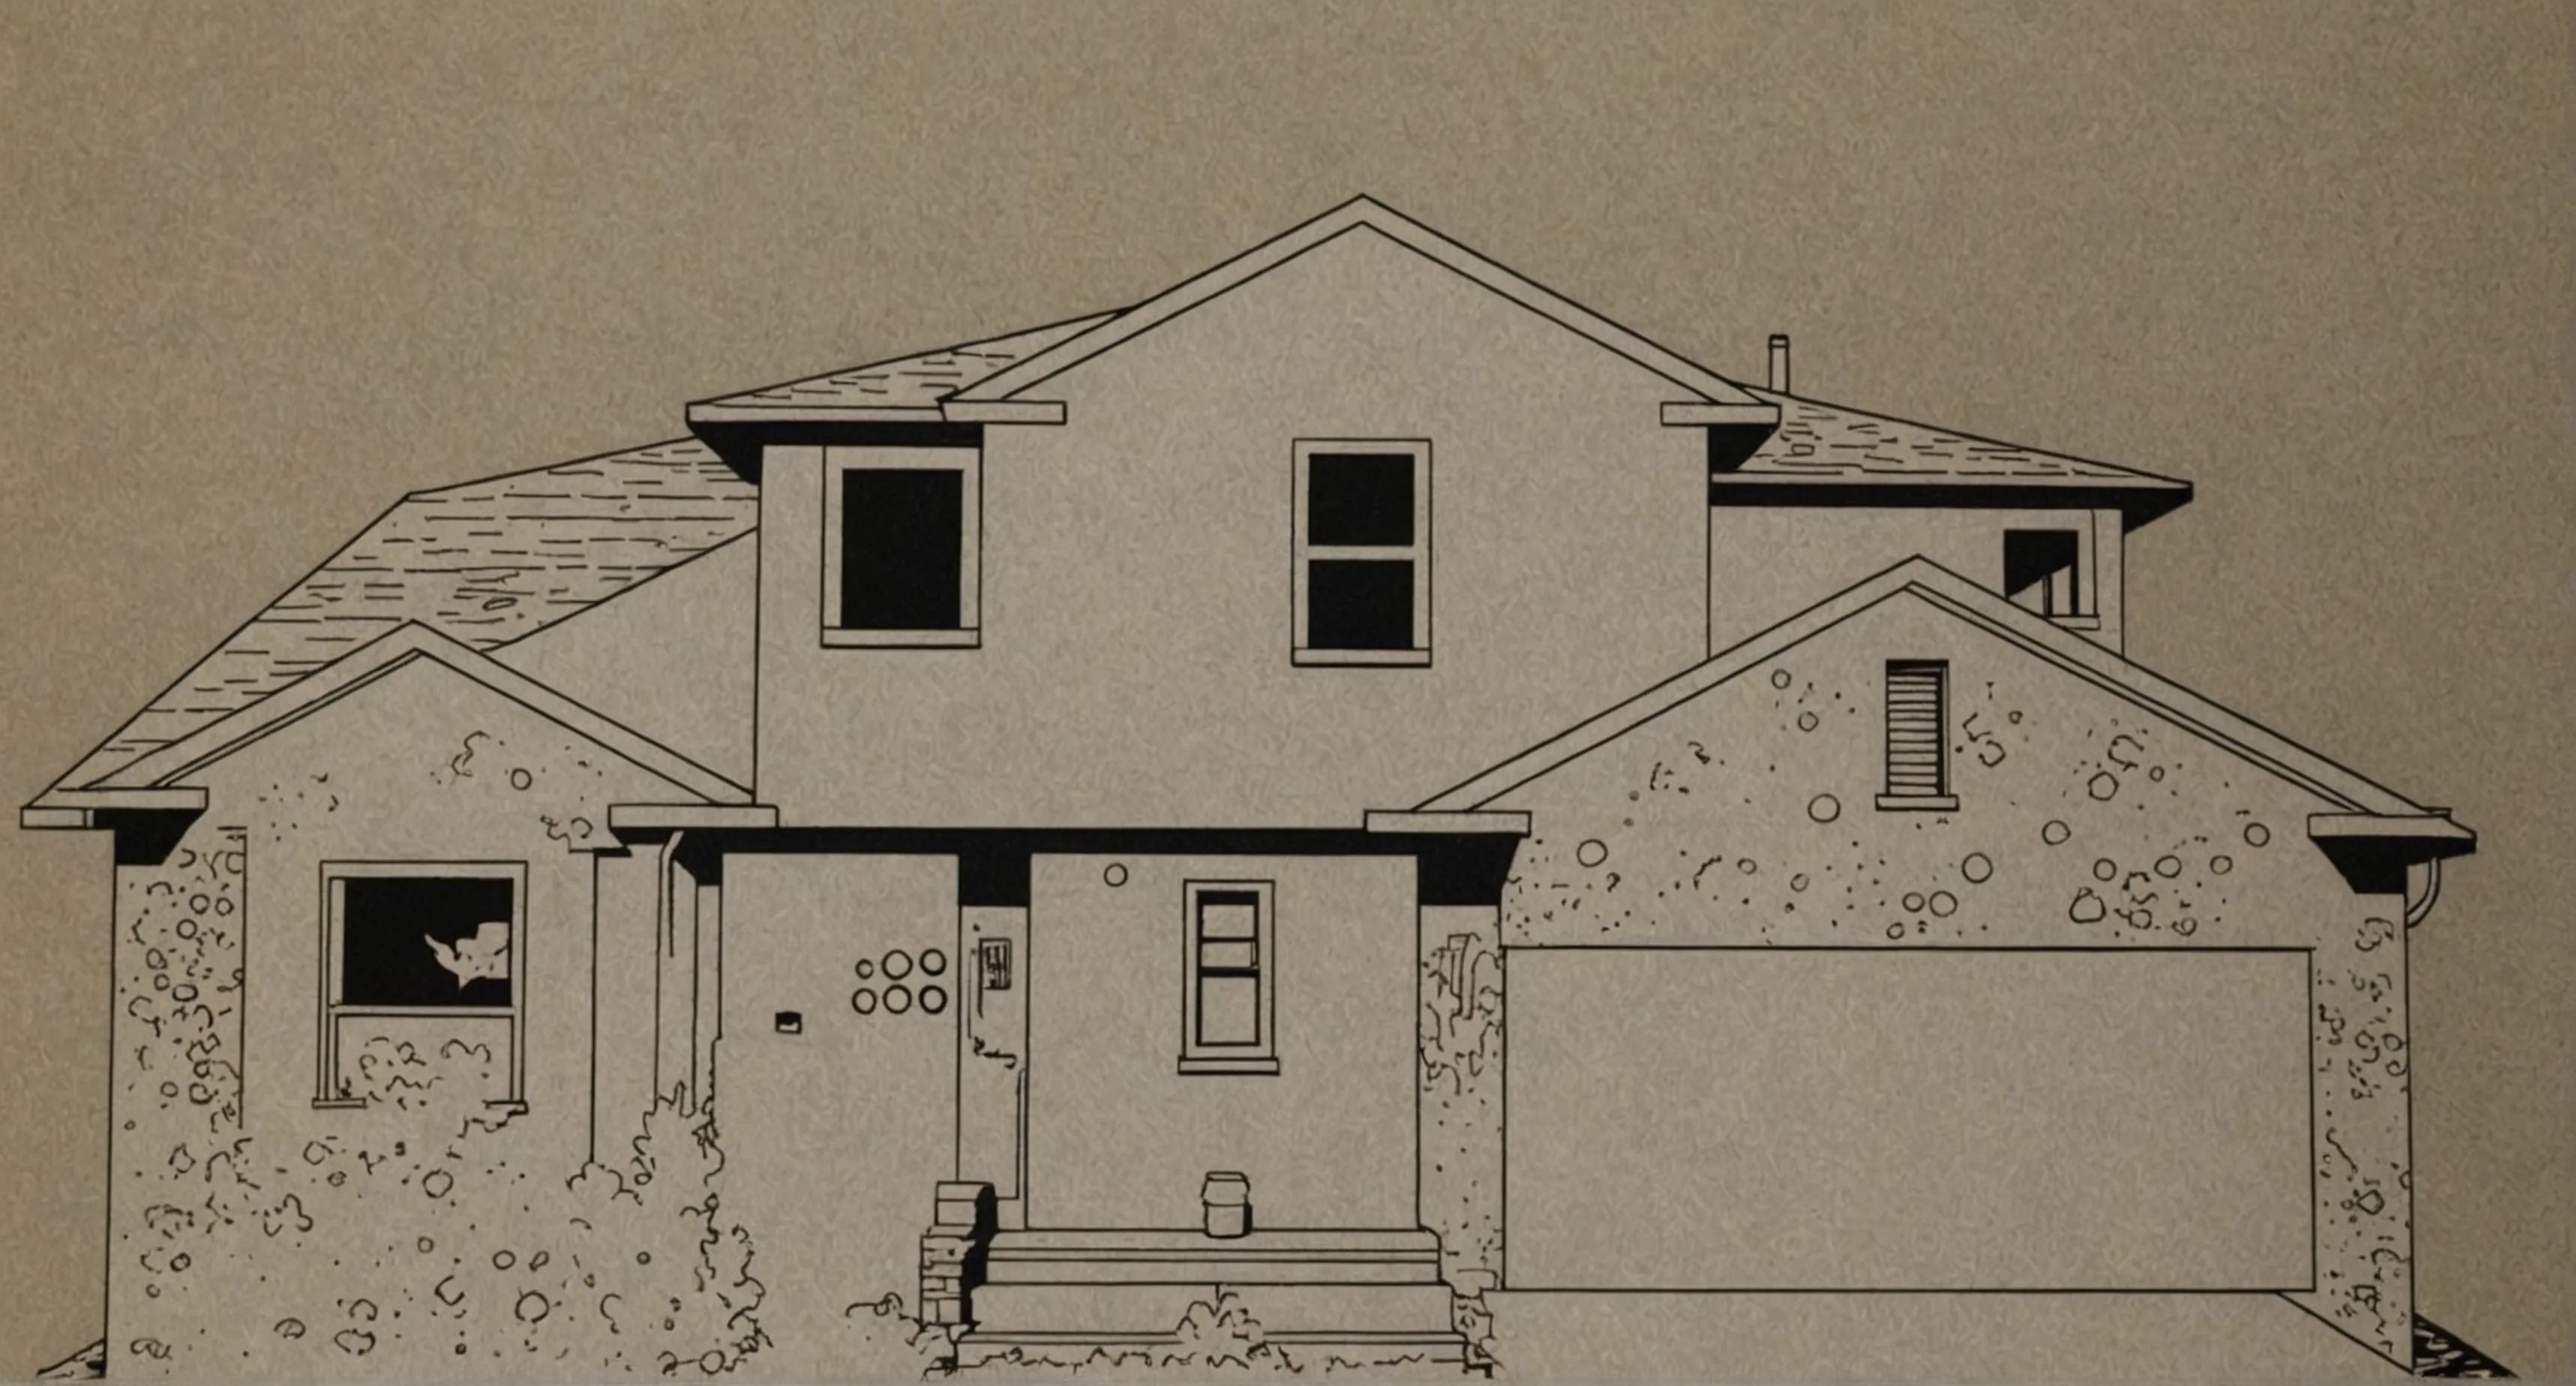
Alignment Image — Emphasizing edges
Why two images? The Alignment Image gives you crisp edges to match on the facade; the Scene Base Image looks good once mapped. You lock the geometry once, then swap content without re-doing alignment.
(Optional) AI Video Experiments
Veo 3 can generate animated shots, but it may drift (camera moves) even when instructed not to. Preface your prompts with:
STATIC SHOT // NO CAMERA MOVEMENT
The camera must be completely fixed and stationary. NO pan, NO zoom, NO dolly, NO tilt, and NO change in perspective. The camera is fixed to a pole in concrete.
STATIC ARCHITECTURE
All architectural elements and structures must remain completely static and unchanged throughout the video.
PERMITTED MOVEMENT
Characters, objects, and environmental/atmospheric elements (lighting, shadows, weather, fog) may move.
---
If the AI video model won’t respect a locked camera, animate in CapCut instead:
- Use your Scene Base Image as the bottom layer.
- Render separate foreground animations on green or transparent background and key/compose them over the base.
- Mask (black-out) any areas you never want projected.
Export from the editor at your projector resolution (or higher).
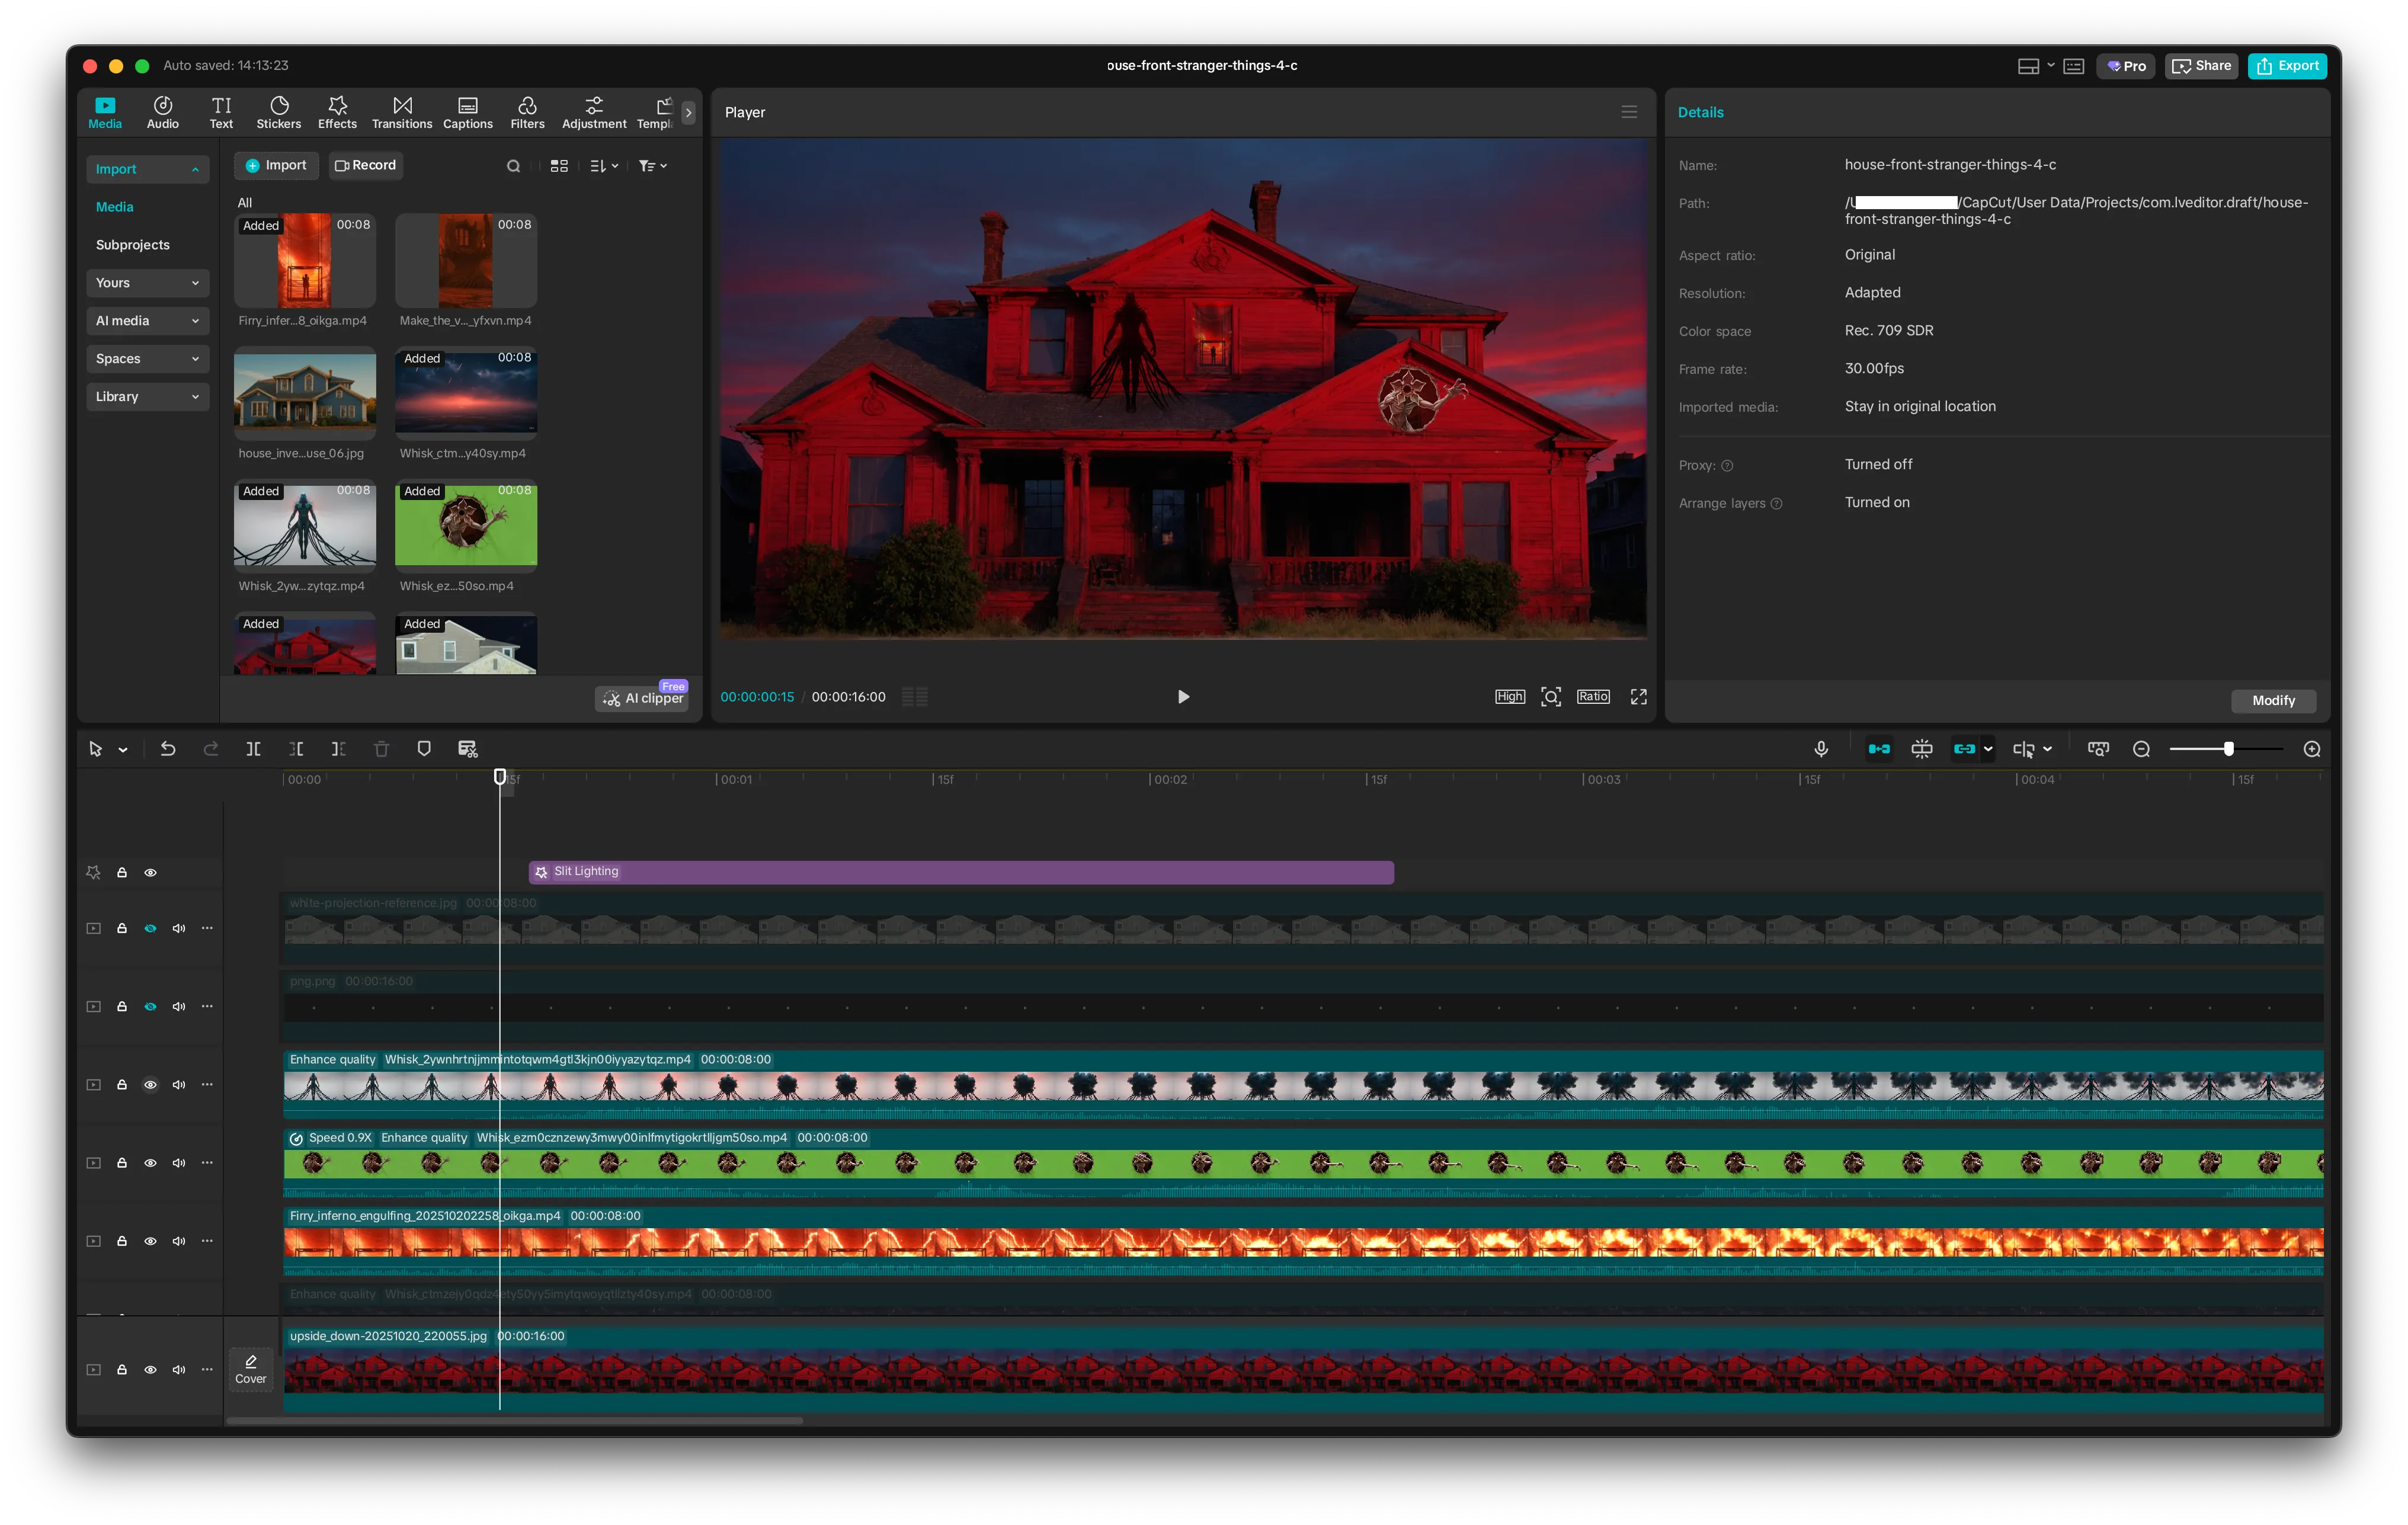
CapCut — Asset layering
Projection Alignment
- Wait for darkness (earlier if your projector is very bright).
- Reset projector settings, max brightness, no keystone.
- Send a full-white frame (LumaMap has a tool for this).
- Physically position the projector so the white area neatly covers the target surface.
- Mount the projector (tripod, pipe, ceiling mount, etc.).
- Capture the Projection Boundary Image: a photo of the illuminated area from the projector location.
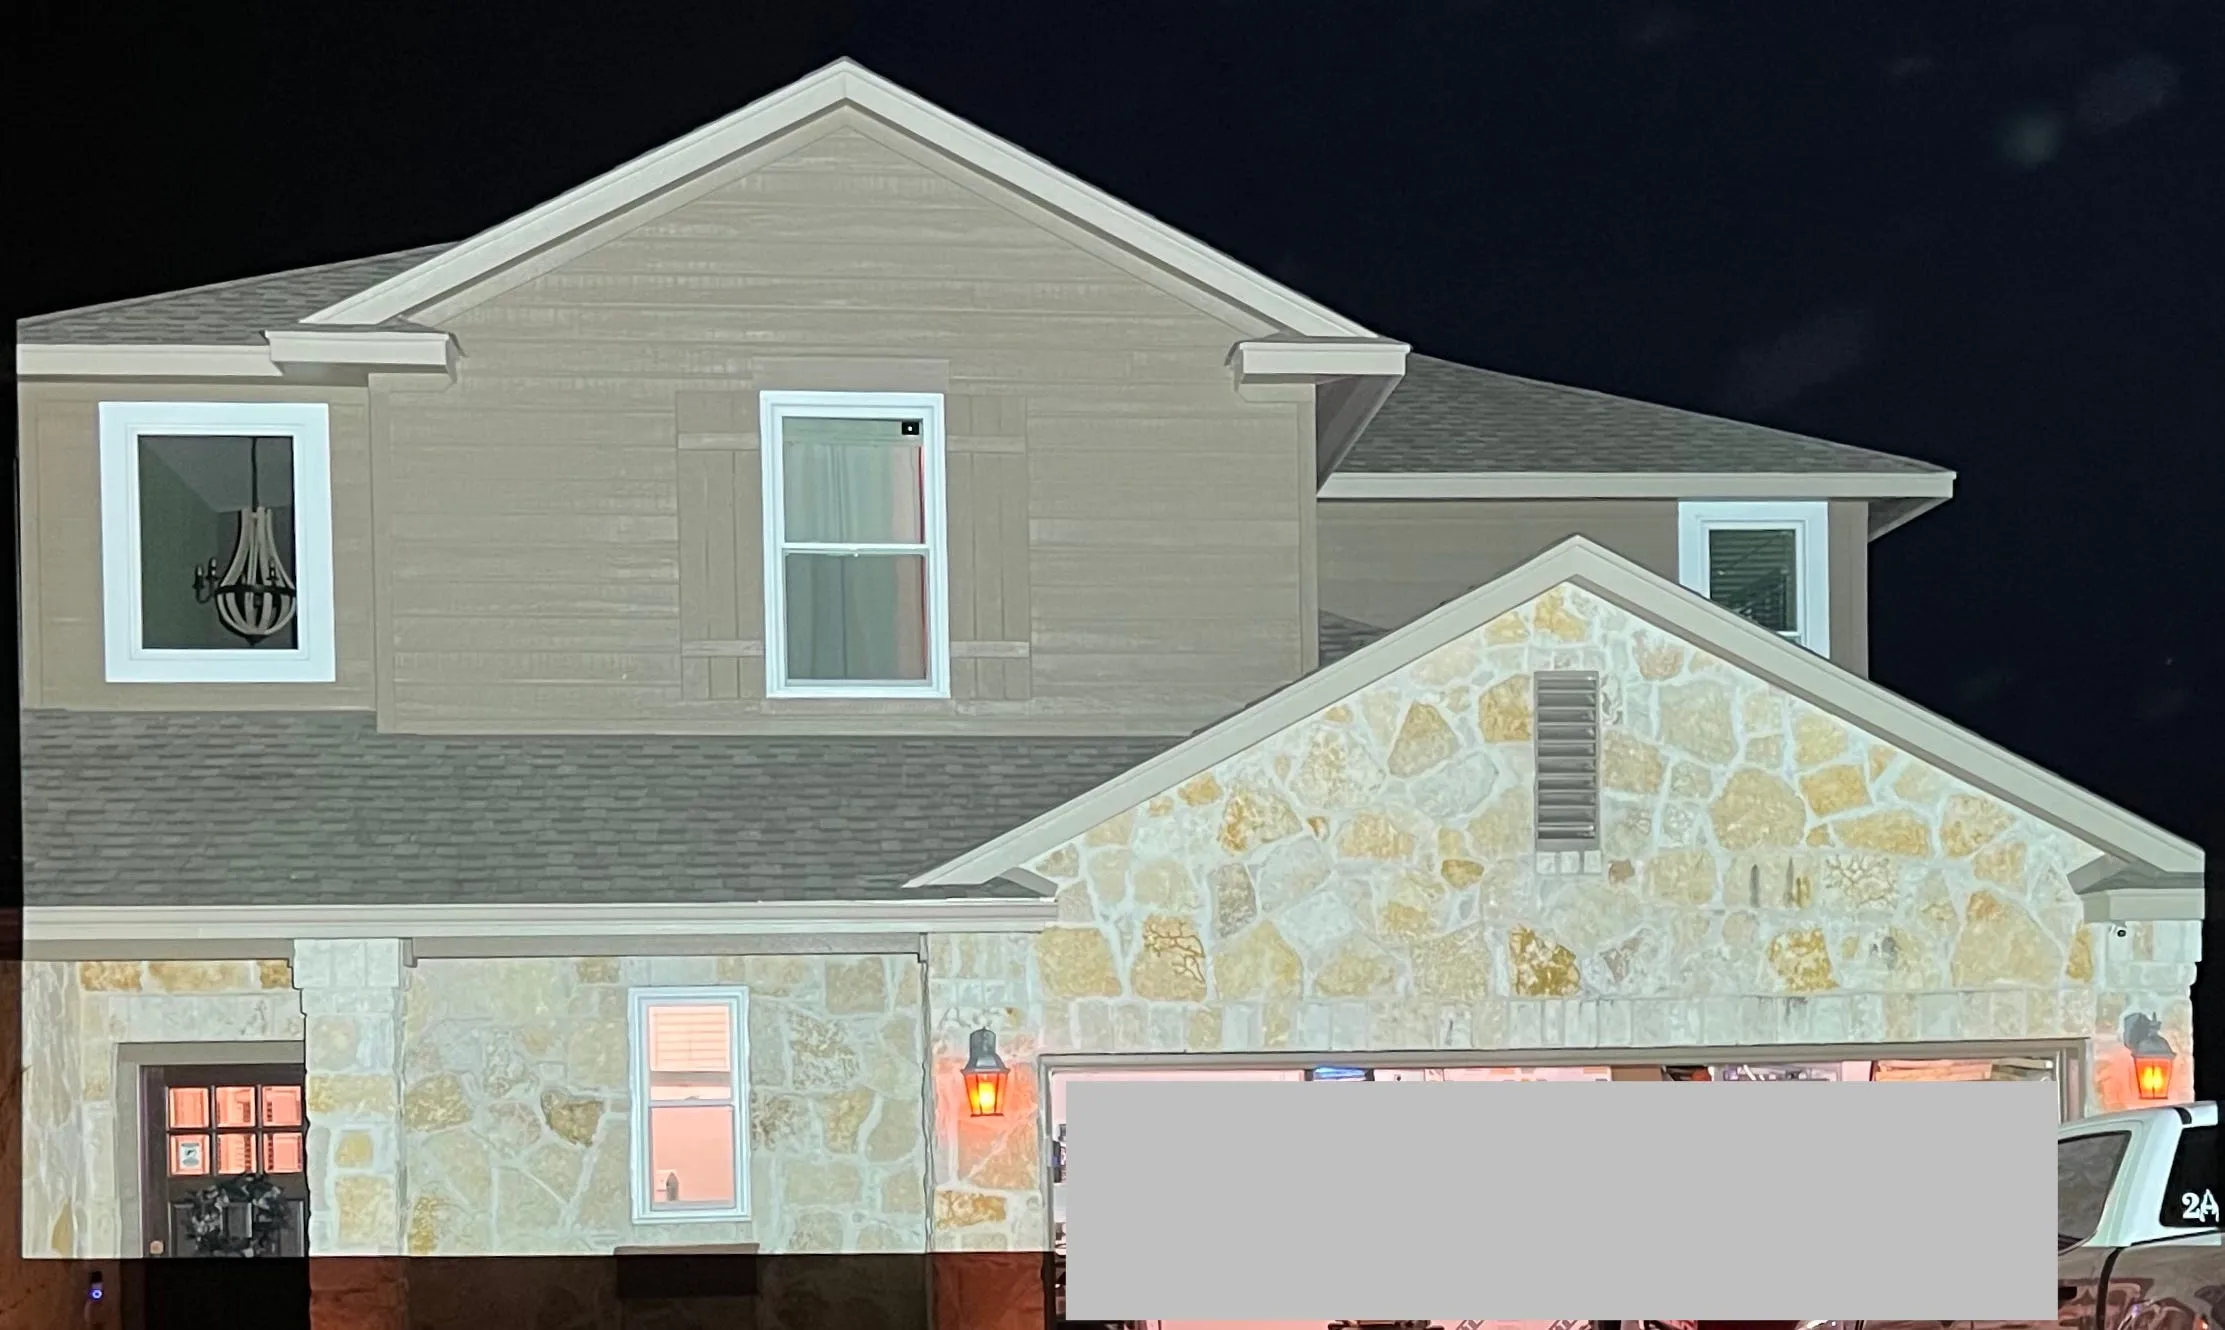
Projection Boundary Image (gray area added for privacy)
Place, Align, Lock in LumaMap
- Load the Alignment Image into LumaMap.
- Use the Projection Boundary Image as a visual reference to roughly place the Alignment Image on canvas.
- Fine-tune alignment by eye, using edges (roof, windows, door frames) as hard references. Tip: Add a grid overlay or flash white/black to check edge bleed.
- Lock the alignment once edges are crisp and stable.
- Swap in your Scene Base Image or animated video and verify fit. The need for minor adjustments is normal; do not keystone on the projector — adjust the mapping instead.
- Save your alignment/project.
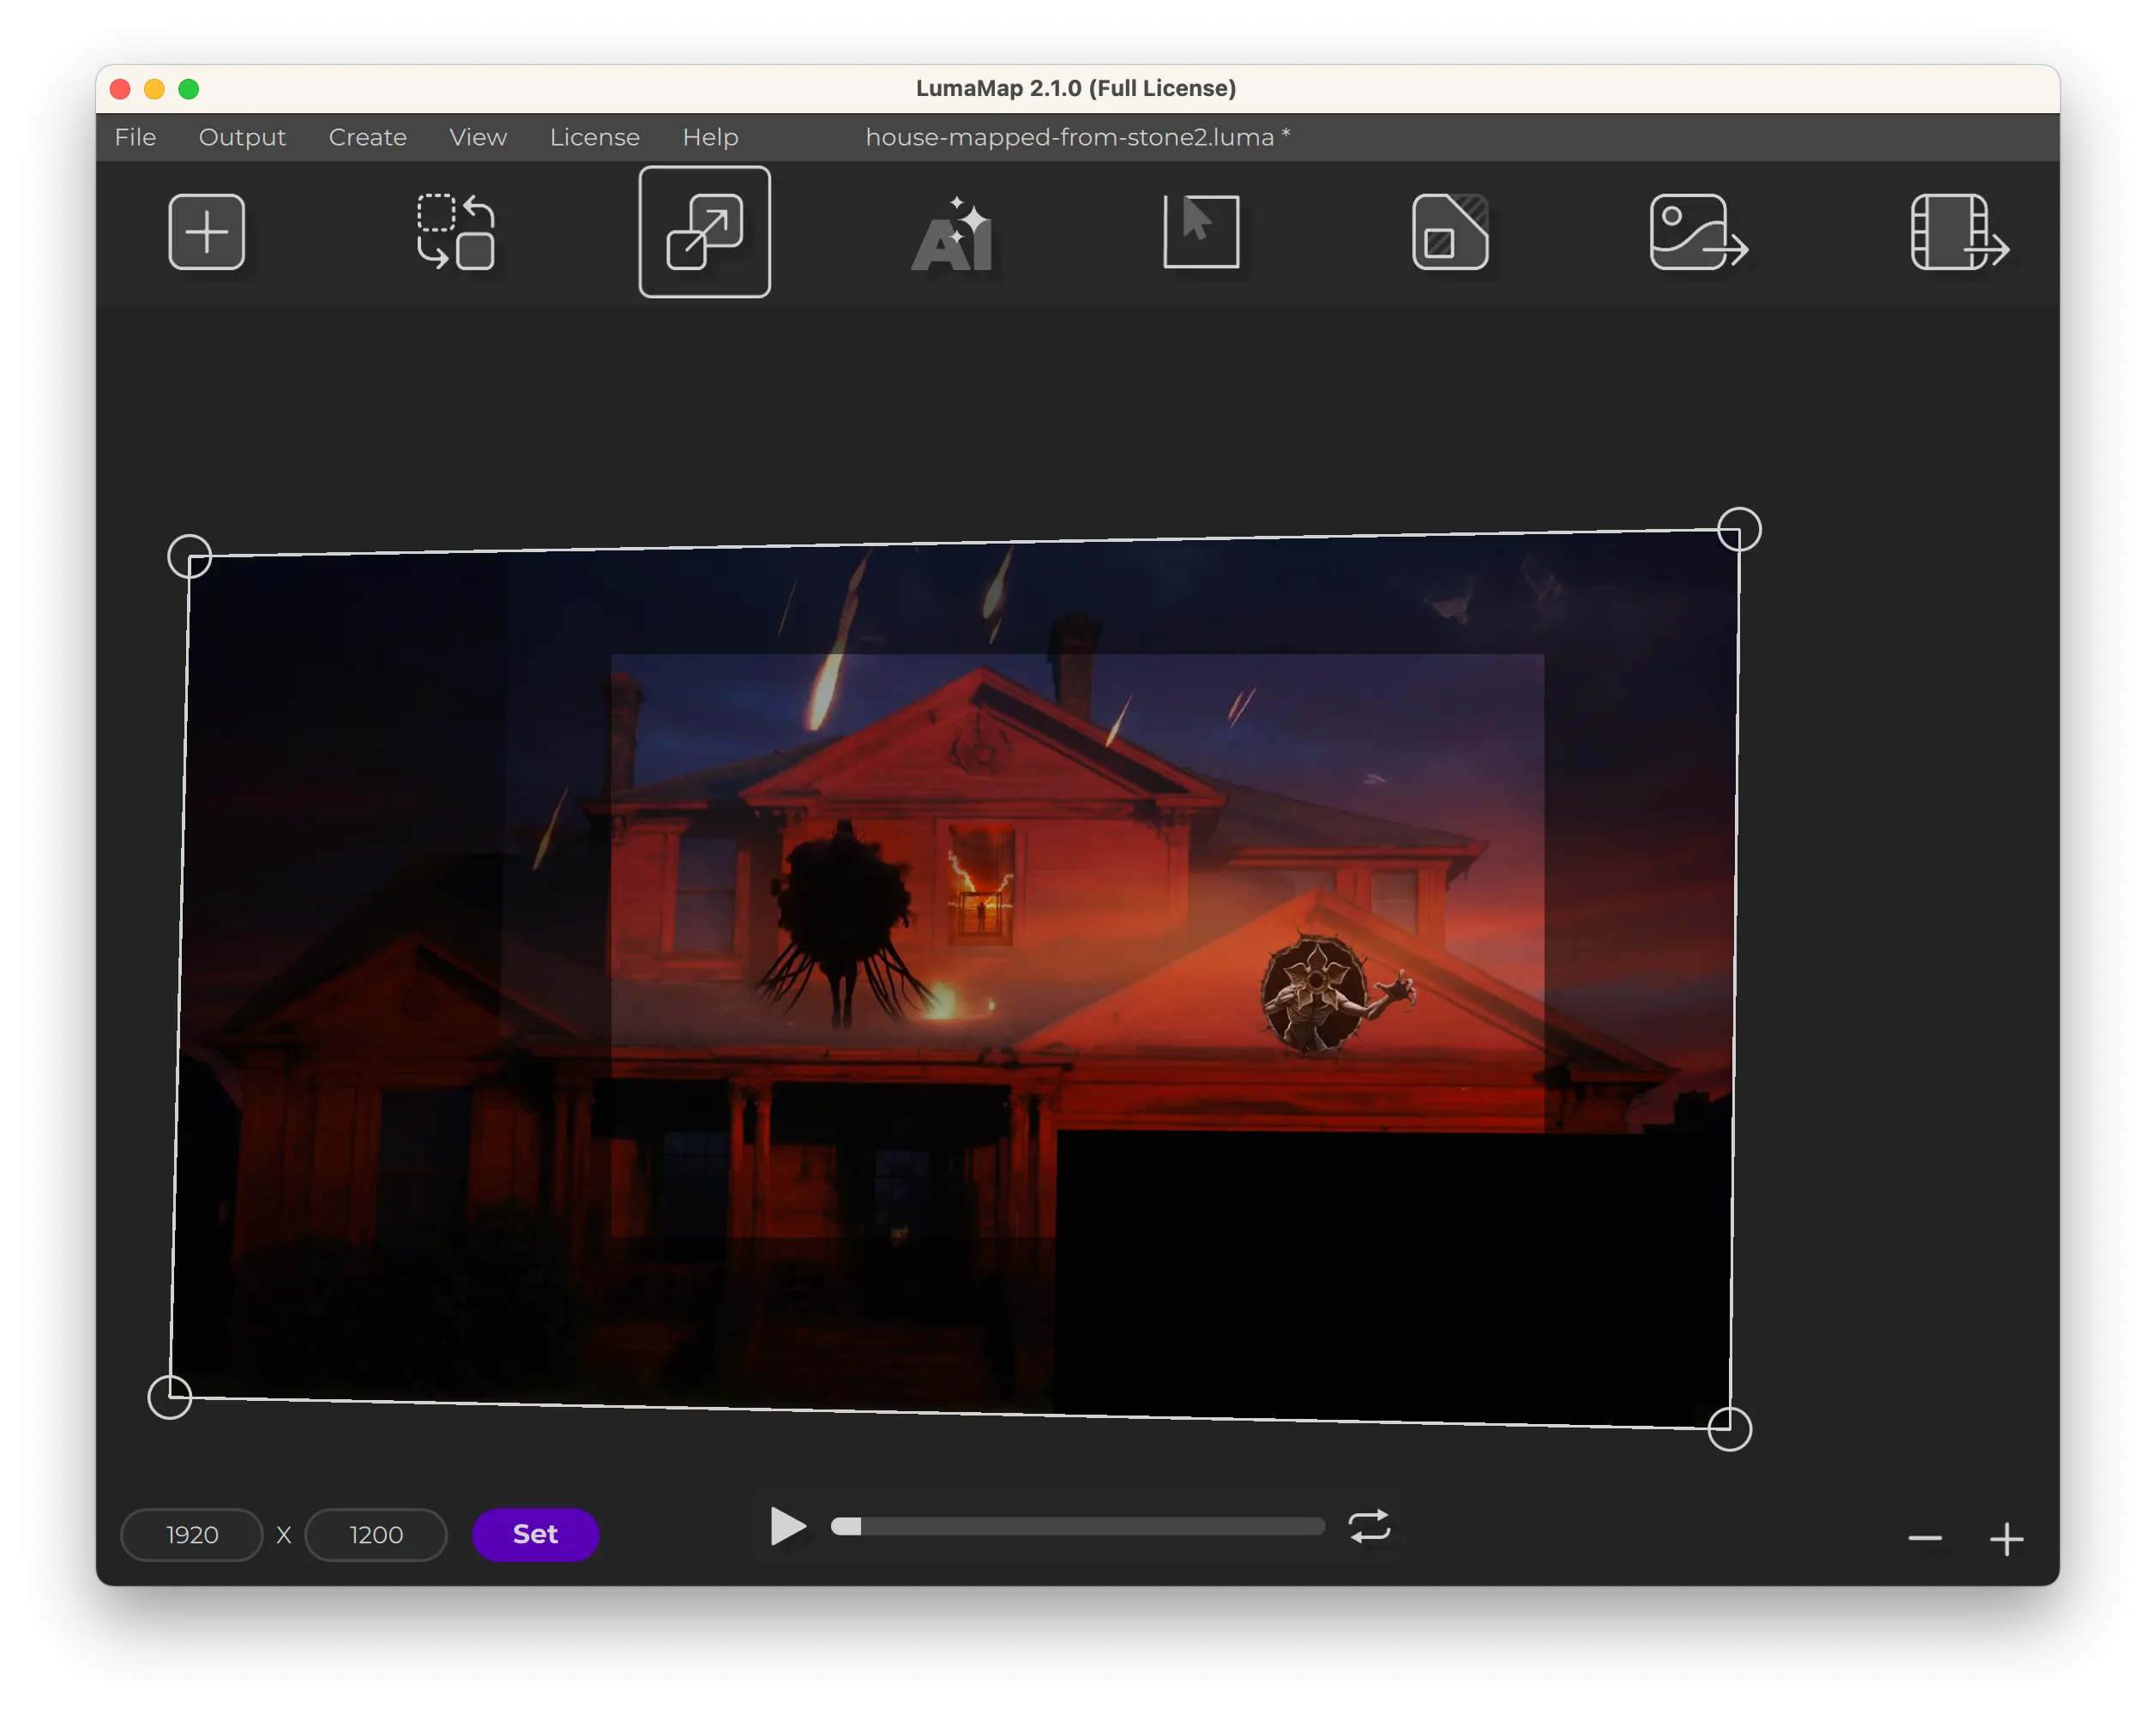
LumaMap Scene Alignment
Playback Improvements (beyond LumaMap)
LumaMap is perfect for stills and quick tests, but long video loops can stutter on some machines. For rock-solid playback:
Export your video from LumaMap.
Note on exclusion zones: LumaMap includes them in image exports, not video. Workaround: Export your video normally. Export a blank image that does contain the exclusions. In CapCut, stack the blank image on top of your video and use it as a mask layer. (There are lossless/ffmpeg alternatives, but this is the fastest.)
Raspberry Pi setup (mpv)
-
Copy your video to
/home/pi/videos/loop.mp4. -
Test playback:
mpv --fs --no-osd --really-quiet --hwdec=auto --loop-file /home/pi/videos/loop.mp4 -
If running over SSH:
sudo -u pi DISPLAY=:0 mpv --fs --no-osd --really-quiet --hwdec=auto --loop-file /home/pi/videos/loop.mp4 -
Create a systemd service:
sudo nano /etc/systemd/system/videoloop.serviceWith the following contents:
[Unit] Description=Seamless Video Loop (MPV) After=multi-user.target [Service] User=pi ExecStart=/usr/bin/mpv --fs --no-osd --really-quiet --hwdec=auto --loop-file /home/pi/videos/loop.mp4 Restart=always StandardOutput=null StandardError=null [Install] WantedBy=multi-user.target -
Enable the service so it starts at boot:
sudo systemctl daemon-reload sudo systemctl enable videoloop.service -
Reboot to confirm it loads as expected.
Note: If you are having performance issues, try updating
/boot/firmware/config.txt(/boot/config.txton Raspberry Pi OS releases before Bookworm) with the following (remember to make a backup first):
hdmi_force_hotplug=1
hdmi_group=1
# 1080p60
hdmi_mode=16
hdmi_drive=2
disable_overscan=1
gpu_mem=256
Note: The
hdmi_*settings above are options for the legacy display driver. Raspberry Pi OS Bookworm and later use the KMS driver by default, which ignores most of them, so they may have no effect on a current install.
Note: For older Raspberry Pis, consider videolooper.de — lean and purpose-built but doesn’t work with most recent versions of Raspberry Pi.
Important Notes
- Don’t keystone on the projector. Fix geometry in the mapping tool; hardware keystone compounds errors.
- Tripod discipline. Any position change between white-frame capture and alignment will cost time.
- Bright, light-biased art wins. Dark art disappears outdoors; stay high-key unless your surface is very bright.
- Match projector resolution. Export at exact output res to avoid resampling blur.
- Mask early. Black out areas you never want projected (windows, neighbor walls, trees).
- Protect your gear. If you don’t have an outdoor projector you will want to build or buy a projector enclosure.
Demo
Next steps
To try this workflow, start with a reference image of the surface you want to project onto, then follow the planning, scene-design, and alignment steps above. Use the projection-mapping repository for the project’s maintained files and documentation.
Revisions
- October 4, 2026 — Added practical next steps for readers. Added a direct video jump link and linked the repository-maintained alignment profile.
- October 3, 2026 — This article has been updated. Detailed revision notes will be recorded here from this point forward; earlier changes are not itemized.