

How I Turned My House Into a Simpsons Treehouse of Horror Special With AI and Projection Mapping
Contents
- From Ghosts in a Window to an Animated House
- Why The Simpsons?
- Designing One Show Across the Entire House
- The Hardware: Two Projectors, Two Different Approaches
- Building a Repeatable Outdoor Projector Mount
- Building the Weather-Resistant Projector Enclosure
- Ventilation: The Part I Underestimated
- The Garage: Rear Projection on a Budget
- Creating the AI-Generated Animations
- Running Generative Video on AWS
- Compositing the Final Show Locally
- Playing the Show Without Specialized Hardware
- How Much Did It Cost?
- What Worked and What Didn’t
- What I’d Do Differently Next Time
- The Bigger Lesson: Projection Mapping Is Becoming More Accessible
- Next steps
- Resources
- A Note About AI Models and Intellectual Property
Building a two-projector Halloween show with AI-generated animation, a homemade weather-resistant enclosure, AWS GPUs, Python, and a few lessons learned the hard way.
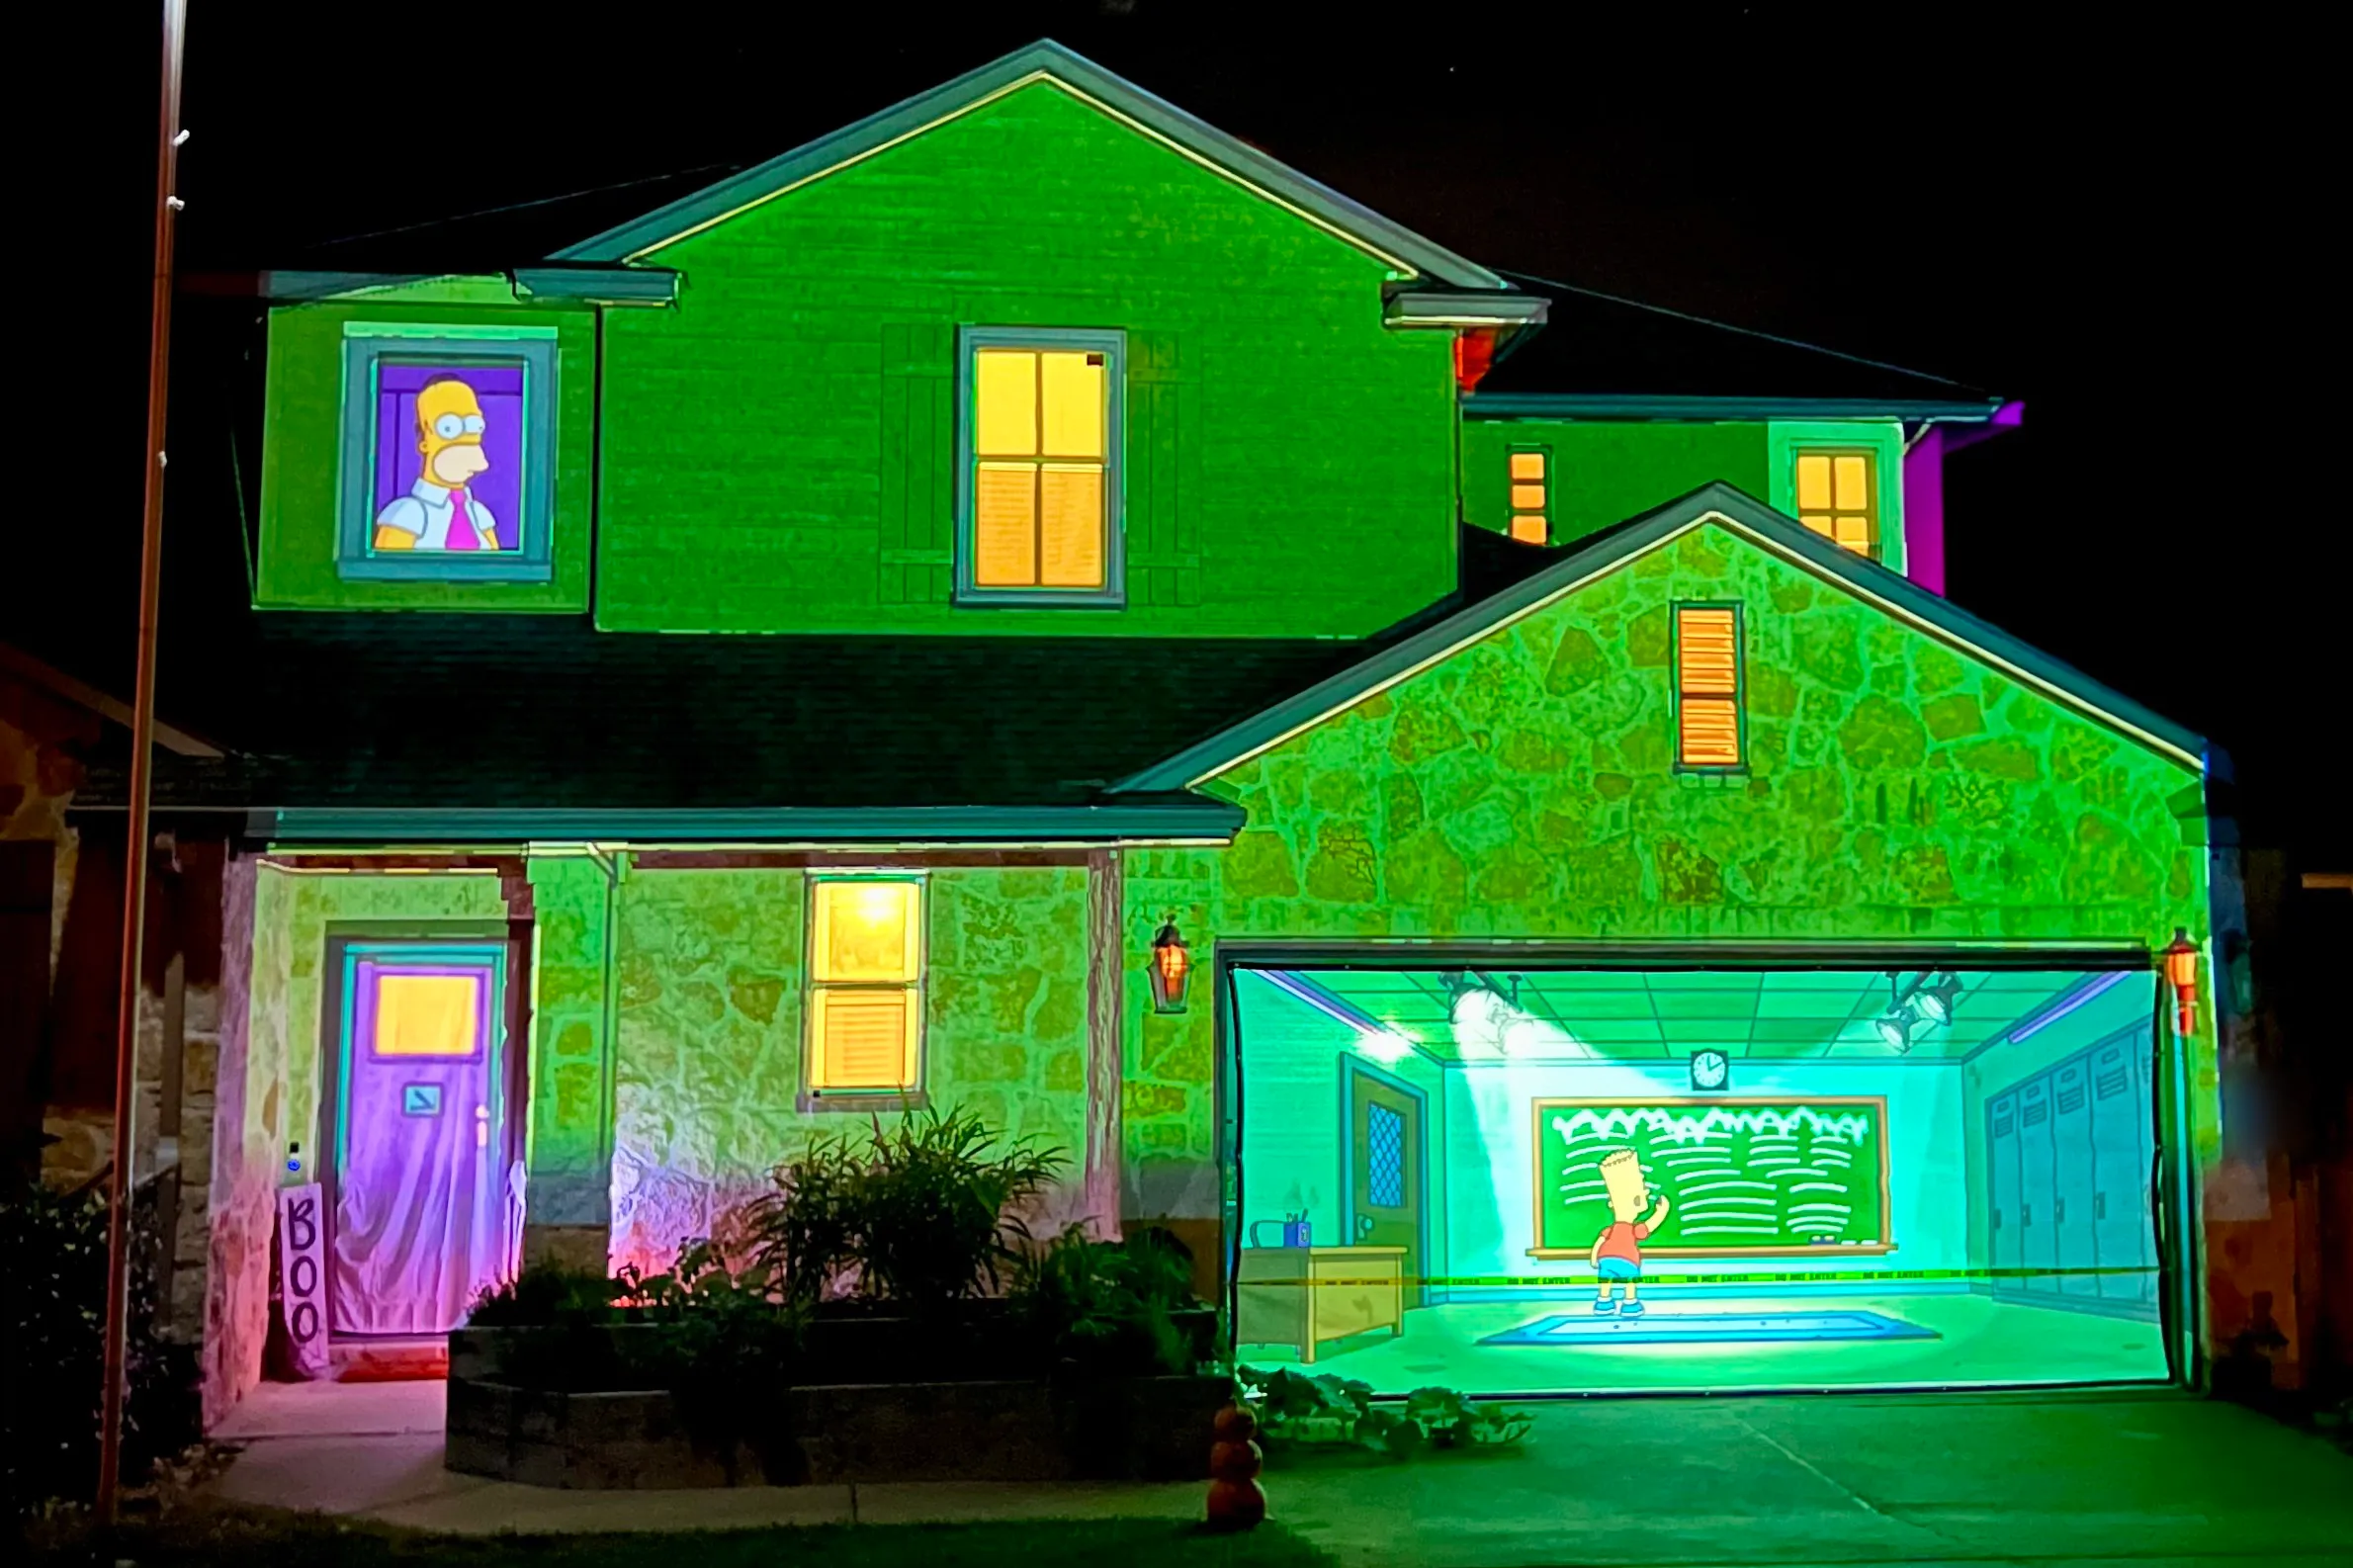
Every Halloween, I try to find a new way to transform my house into something unexpected. In 2026, I turned it into an animated Simpsons Treehouse of Horror special, with characters appearing in windows, climbing across the roof, and performing scenes behind the garage door.
The show used two projectors, a Raspberry Pi, an old mini PC, a homemade outdoor enclosure, and AI-generated animations running on rented GPU hardware.
The most surprising part was the cost: generating 170 video clips cost only about $41 in metered GPU compute.
That number doesn’t include the projectors, construction materials, storage, or all the creative experimentation that went into the project. But it demonstrates how accessible generative video has become when you’re willing to assemble the workflow yourself.
The hardest part was keeping the animations aligned with a real building and making them work together as one show instead of a collection of separate effects.
It also found an audience well beyond my neighborhood. I shared six videos of the project as it came together, and together they’ve drawn 2.6 million views as of November 2026. The two most watched were a mid-project progress video and the first test with both projectors running. I also talked about the project on Four Finger Discount, a podcast about The Simpsons.
This article covers how I did it, what worked, what didn’t, and what I’d recommend if you’re interested in building something similar.
From Ghosts in a Window to an Animated House
My projection-mapping experiments started a few years ago with something much simpler: ghost silhouettes projected onto a sheet covering a window. There was no elaborate mapping workflow, no custom infrastructure, and no AI. I was experimenting with the basic idea of making an ordinary part of my house appear to contain something supernatural.
By Halloween 2025, I’d moved on to projecting across much larger portions of the house.
Halloween 2025: Stranger Things
My 2025 display was primarily inspired by Stranger Things. I wanted something recognizable and relevant that would also work with the architecture of my house. The series’ glowing red environments, dark supernatural imagery, and high-contrast effects translated particularly well to projection.
Those vibrant reds were forgiving. Even when the image alignment wasn’t perfect, the result could still look convincing because the artwork was atmospheric rather than architecturally precise.
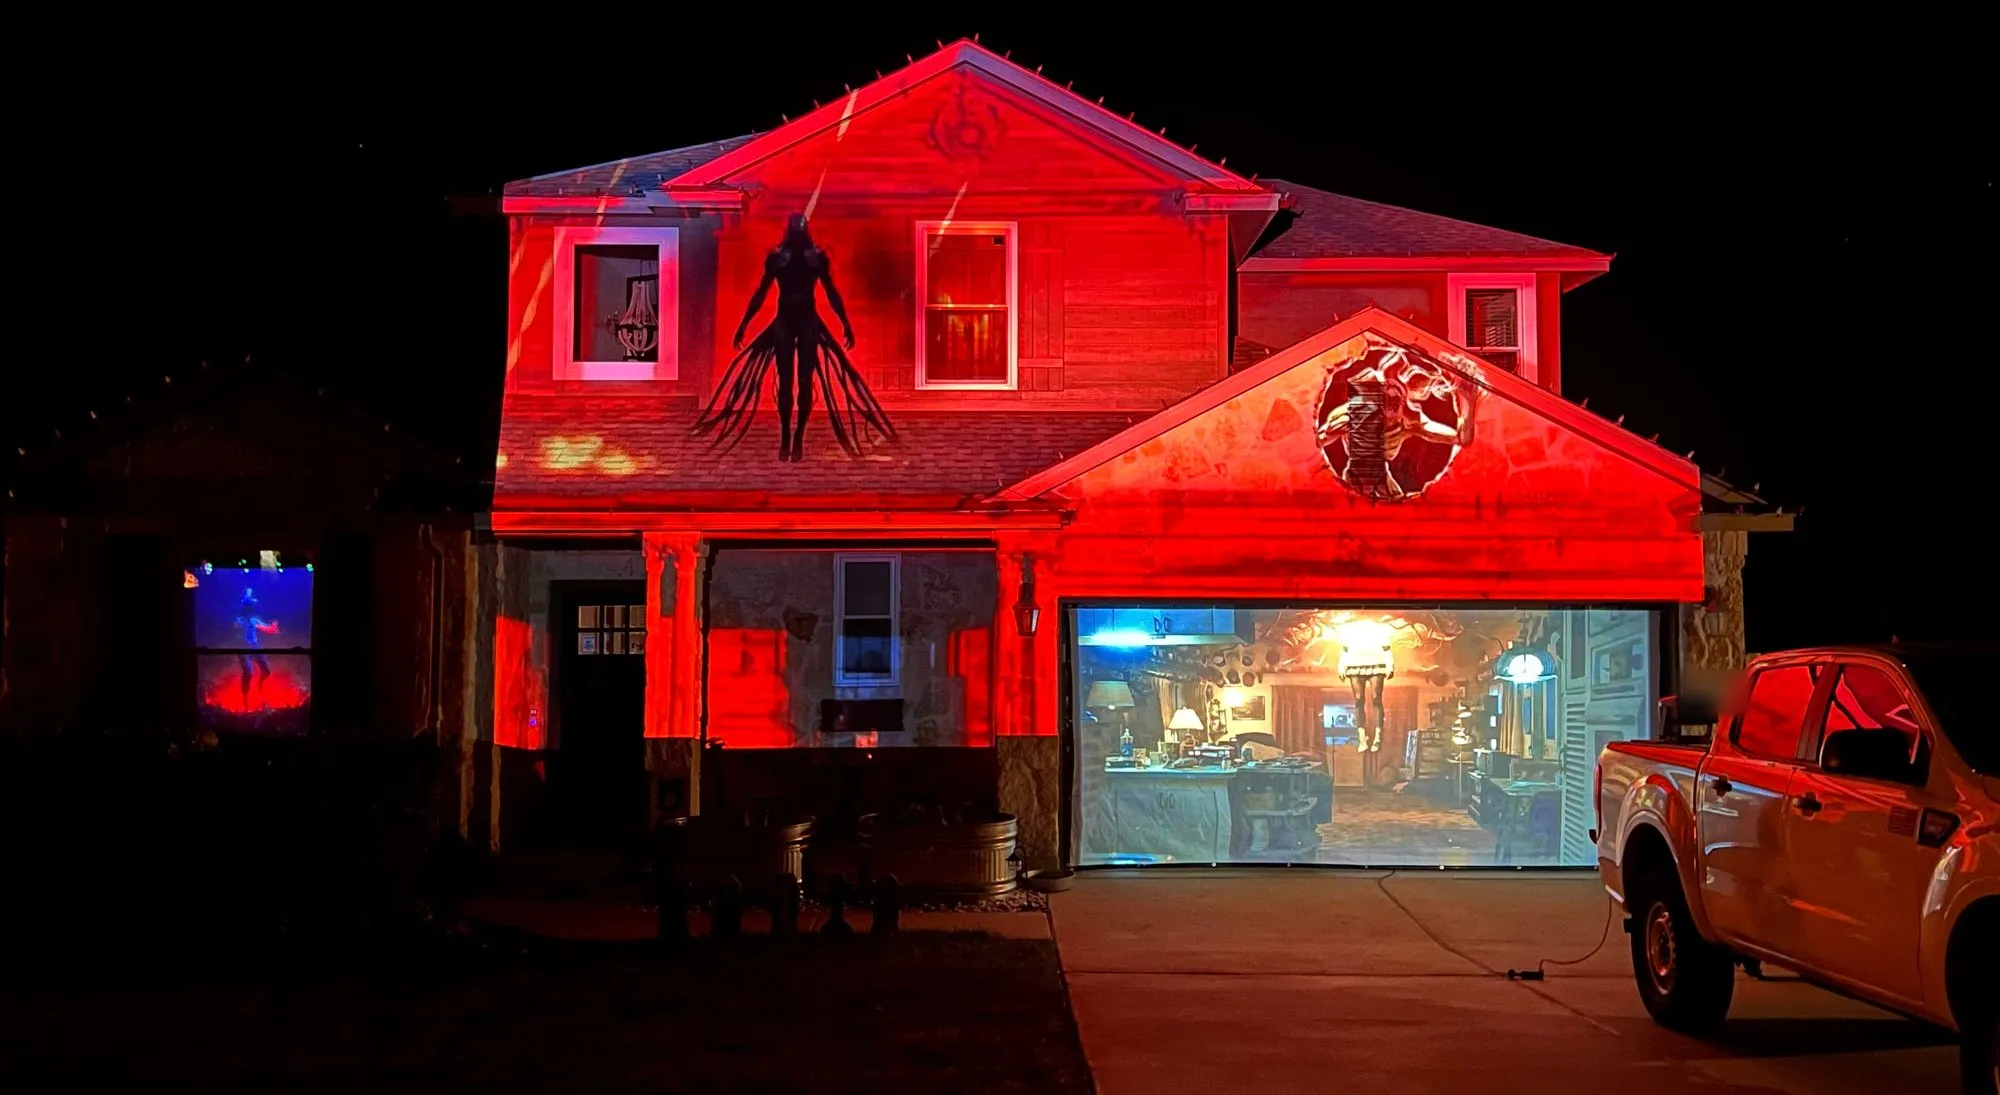
Halloween 2025: the Stranger Things display.
My approach was mostly to look at each part of the house independently and ask: What would look cool here? A window might become a portal. A section of siding might contain something supernatural. The effects didn’t necessarily need to relate to each other.
That worked, but I eventually realized I was thinking too small.
Christmas 2025: Discovering Storytelling
During the following Christmas season, I experimented with three different projections. I started with Grinch-themed animations. Then, on Christmas Eve, I created a sequence where Santa and his reindeer traveled between windows while the Grinch followed behind, stealing presents.
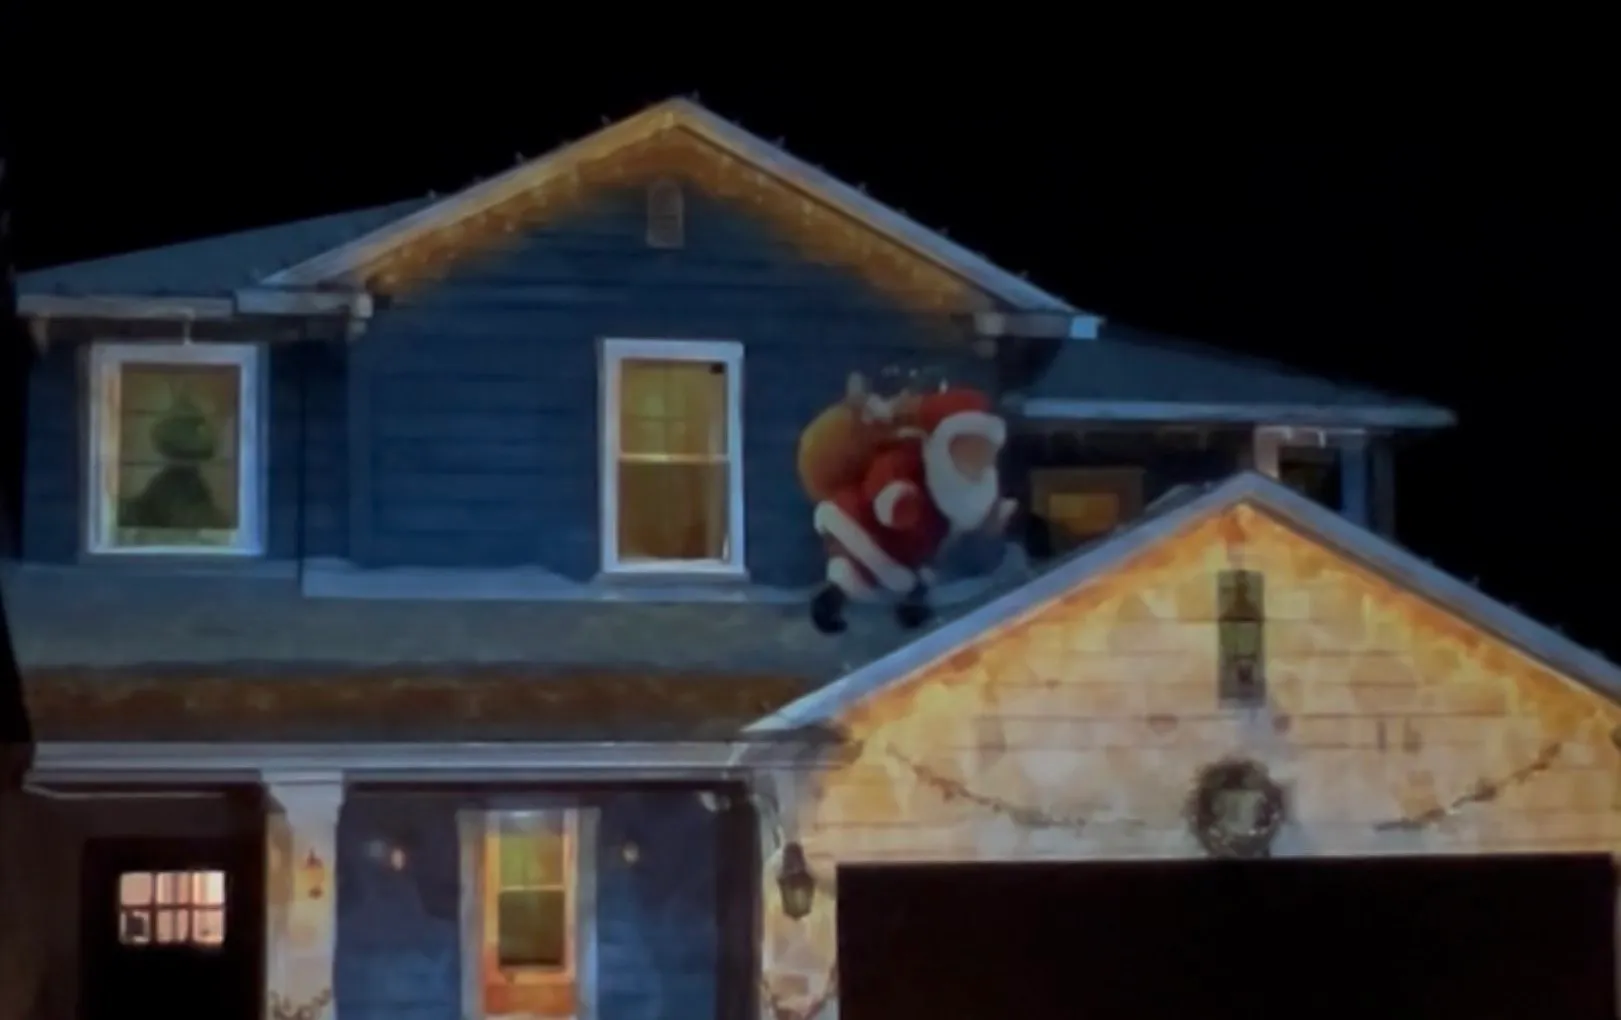
Christmas 2025: the Grinch in one window and Santa on the roof.
This time there was a progression: characters moved between parts of the house, and their actions related to what had happened elsewhere. That experience changed how I approached projection mapping.
Instead of treating each window or wall as an independent display, I started thinking of the entire house as a single canvas.
It also taught me something about the audience. I live in a fairly rural neighborhood. Halloween traffic is concentrated around October 31, but during December, people drive around the neighborhood looking at Christmas decorations throughout the season.
For Christmas, I can experiment with evolving animations and give people reasons to come back. For Halloween, I generally have one night to make an impression. So for 2026, I decided to put my effort into one big elaborate show.
Why The Simpsons?
I considered several concepts: Scream, Resident Evil, a decayed Derry house from IT, and Minions & Monsters. But I kept returning to The Simpsons, specifically Treehouse of Horror, and so did the family and friends I showed the concepts to.
There were a few reasons. First, the visual style works extremely well for projection. The bold outlines, bright colors, and relatively simple shapes hold up when projected across siding, windows, stone, and other imperfect surfaces.
Second, Treehouse of Horror has an enormous collection of recognizable Halloween scenes and characters. I could create something spooky without necessarily making it too frightening for younger trick-or-treaters.
Finally, the show’s visual language made it possible to transform the entire exterior into something that looked like it belonged in Springfield. Instead of simply projecting a character onto a wall, I could make the house itself look animated.
The challenge was finding the right balance between preserving my house’s real architecture and transforming its appearance. Early AI-generated concepts tended to fail in one of two ways: they preserved so much of the original house that the result felt like a recoloring, or they invented windows, doors, and rooflines that didn’t exist.
For projection mapping, the second failure is particularly problematic. You can’t project a convincing architectural feature into a location where the building provides no corresponding physical surface.
The final design used mint-green walls, a teal roof, purple doors, and yellow windows. Those colors created the cartoon appearance while remaining compatible with the real building.
Outline or Photo?
I generated the facade the same way as in 2025: Stable Diffusion’s structure control restyles an input image while keeping its shapes. The question was which image to give it.
I started with a photo of the house taken from the projector’s position. Even from the same spot, the photo had a fisheye effect, and the alignment problems it caused couldn’t be fixed with simple four-point correction.
So instead, I projected a plain white screen onto the house and drew a projected outline around the roof, the house’s edges, the windows, and the doors. Drawing it through the projector itself, rather than tracing a camera’s view, gave me much more precise alignment.
That outline became the input for the final plate. With the control strength at 0.95, the model followed its edges closely, so every window, door, and roofline landed on the real one. It still got a few things wrong, so the last fixes were edits to the image itself rather than new generations: an empty room painted into the main stage window, the front and garage doors recolored purple, and a stray sun removed from the sky.
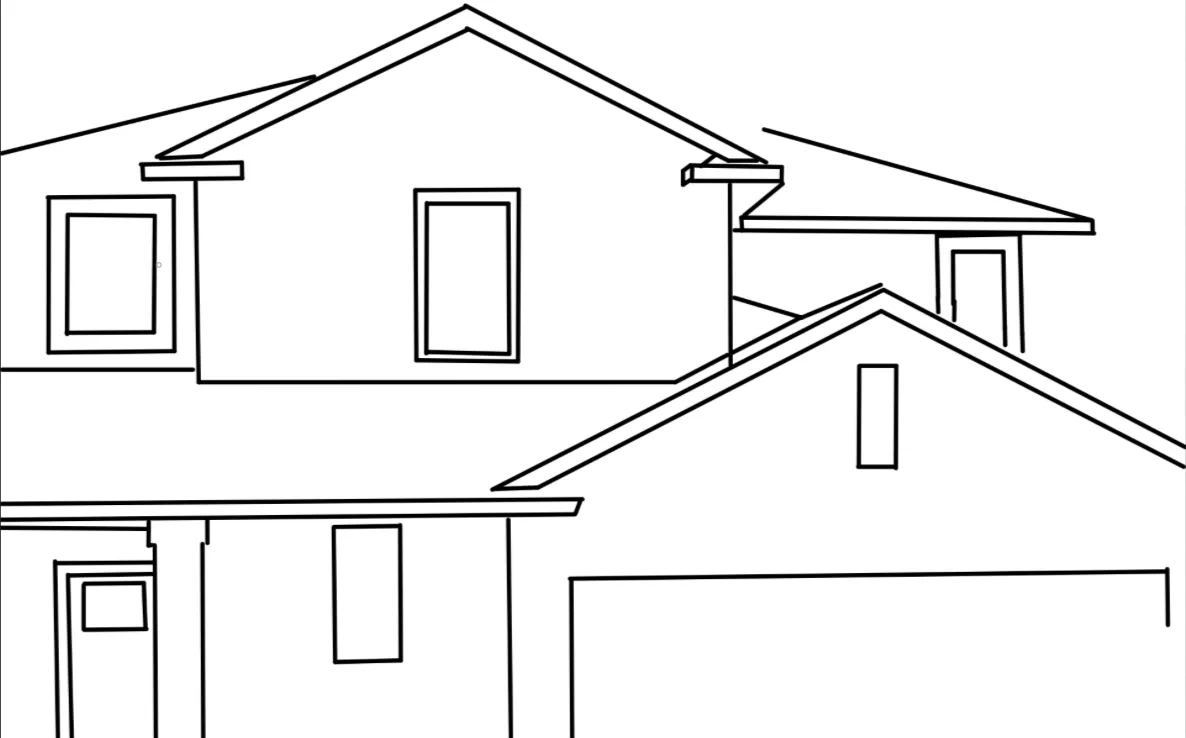
The outline I drew through the projector.
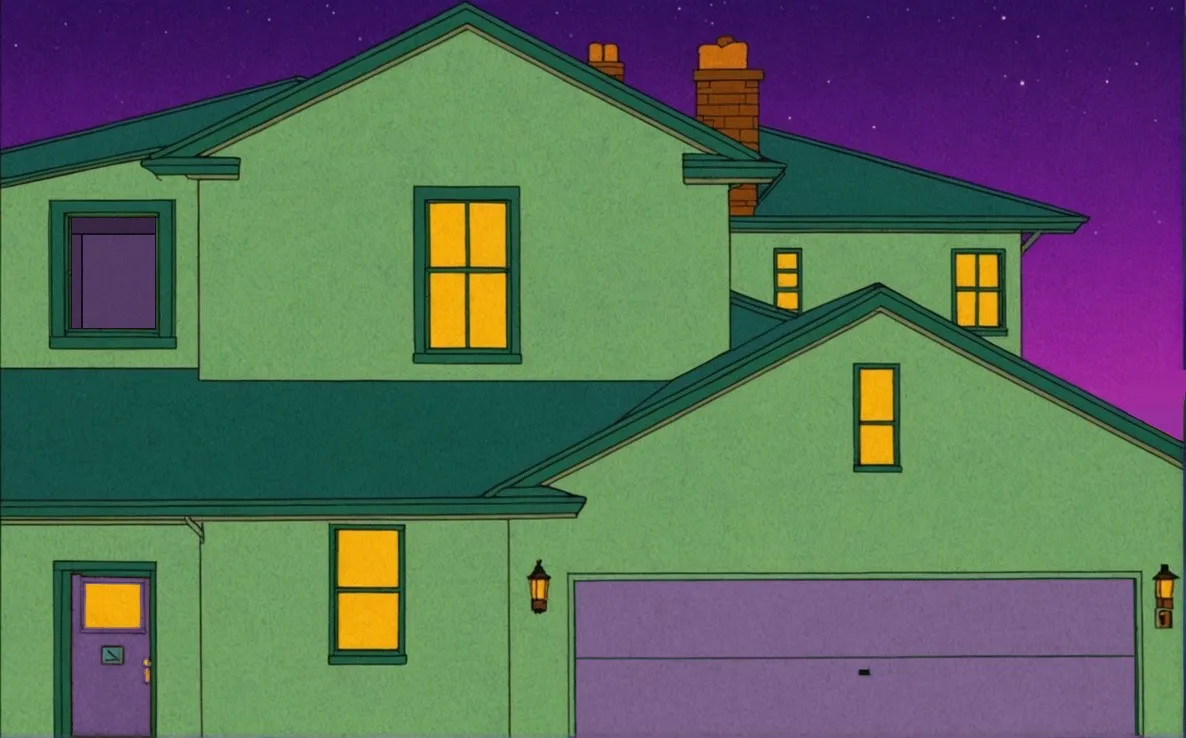
The final plate generated from it, after the last fixes.
Designing One Show Across the Entire House
One of my goals for 2026 was to make the animation feel more intentional. I wanted scenes to connect, characters to recur, and earlier events to influence what happened later.
For example, on the garage, Bart, Lisa, and Maggie open the attic hatch, and Bart’s evil twin, Hugo, tumbles out and escapes down the stairs. On the house, Hugo rises in an upstairs window, grinning and biting into a fish head. A moment later, Bart pops up in the next window, sees him, and ducks back down in fright.
The scenes don’t need to run in a particular order for the callback to work. The two projectors aren’t synchronized (more on that below), and people walk up at any point, so whichever scene someone sees first, the other connects to it.
I didn’t choose the gags alone, either. Family, friends, and the response on social media drove which gags made the show, and some of the setup decisions too.
I also learned that more activity isn’t necessarily better. When several characters appear simultaneously, the audience can struggle to know where to look. Some scenes work best with a single focal point; others benefit from multiple things happening across the facade.
The final show uses a combination of those approaches, with two rules the build script enforces: gags that share part of the house never play at the same time, and the same character never appears in two places at once. If a schedule breaks either rule, the build stops and names the conflict.
The garage provided a second stage. It could display larger scenes without requiring everything to fit within a window or architectural detail.
Because the two projectors weren’t synchronized, each loop drifted against the other, sometimes producing combinations I hadn’t planned. The result was a show that could feel different each time someone watched it.
The Hardware: Two Projectors, Two Different Approaches
Affiliate links: Links to Amazon are affiliate links. As an Amazon Associate I earn from qualifying purchases, at no extra cost to you.
| Main house | Garage | |
|---|---|---|
| Projector | Epson Pro EX9220 | Goiaey GO2 |
| Placement | Outdoors in a custom enclosure | Inside the garage |
| Projection surface | House facade | White fabric garage screen |
| Playback | Raspberry Pi 3 Model B | ASUS EeeBox mini PC |
| Alignment | Projection-mapping workflow | Projector’s four-corner and edge correction |
| Projection direction | Front | Rear |
The Epson is rated at approximately 3,600 lumens and has a native 1920 × 1200 resolution. It was positioned roughly 45 feet from the house. The Goiaey was considerably simpler to install because it didn’t need to survive outdoors.
An Important Caveat About Projector Brightness
Before you buy either projector, keep in mind that I live in a Dark Sky community with very little artificial ambient light. We don’t have streetlights or upward-pointing landscape lighting illuminating the house. That makes my environment unusually favorable for projection mapping.
The same projector that produces good results here might be disappointing in an urban neighborhood with streetlights, bright porch lights, illuminated landscaping, or other nearby light sources.
How bright the picture looks depends on more than the spec sheet:
- The projector’s actual light output in the mode you’re using.
- The size of the projected image.
- The reflectivity and color of the projection surface.
- The distance and optical configuration.
- Ambient illumination falling on the surface.
- How much contrast you expect from the artwork.
On Halloween 2026, my projection was faint around 6:45–7:00 PM, clearly visible around 7:15 PM, and looked good around 7:30 PM. My Tempest weather station reported approximately 35 lux at 7:00 PM and 0 lux at 7:30 PM. The second reading almost certainly reflects the sensor’s limited resolution rather than literally zero illumination.
These weren’t controlled measurements at the facade, so I wouldn’t use them to establish universal thresholds. But they show how much the picture changes during twilight.
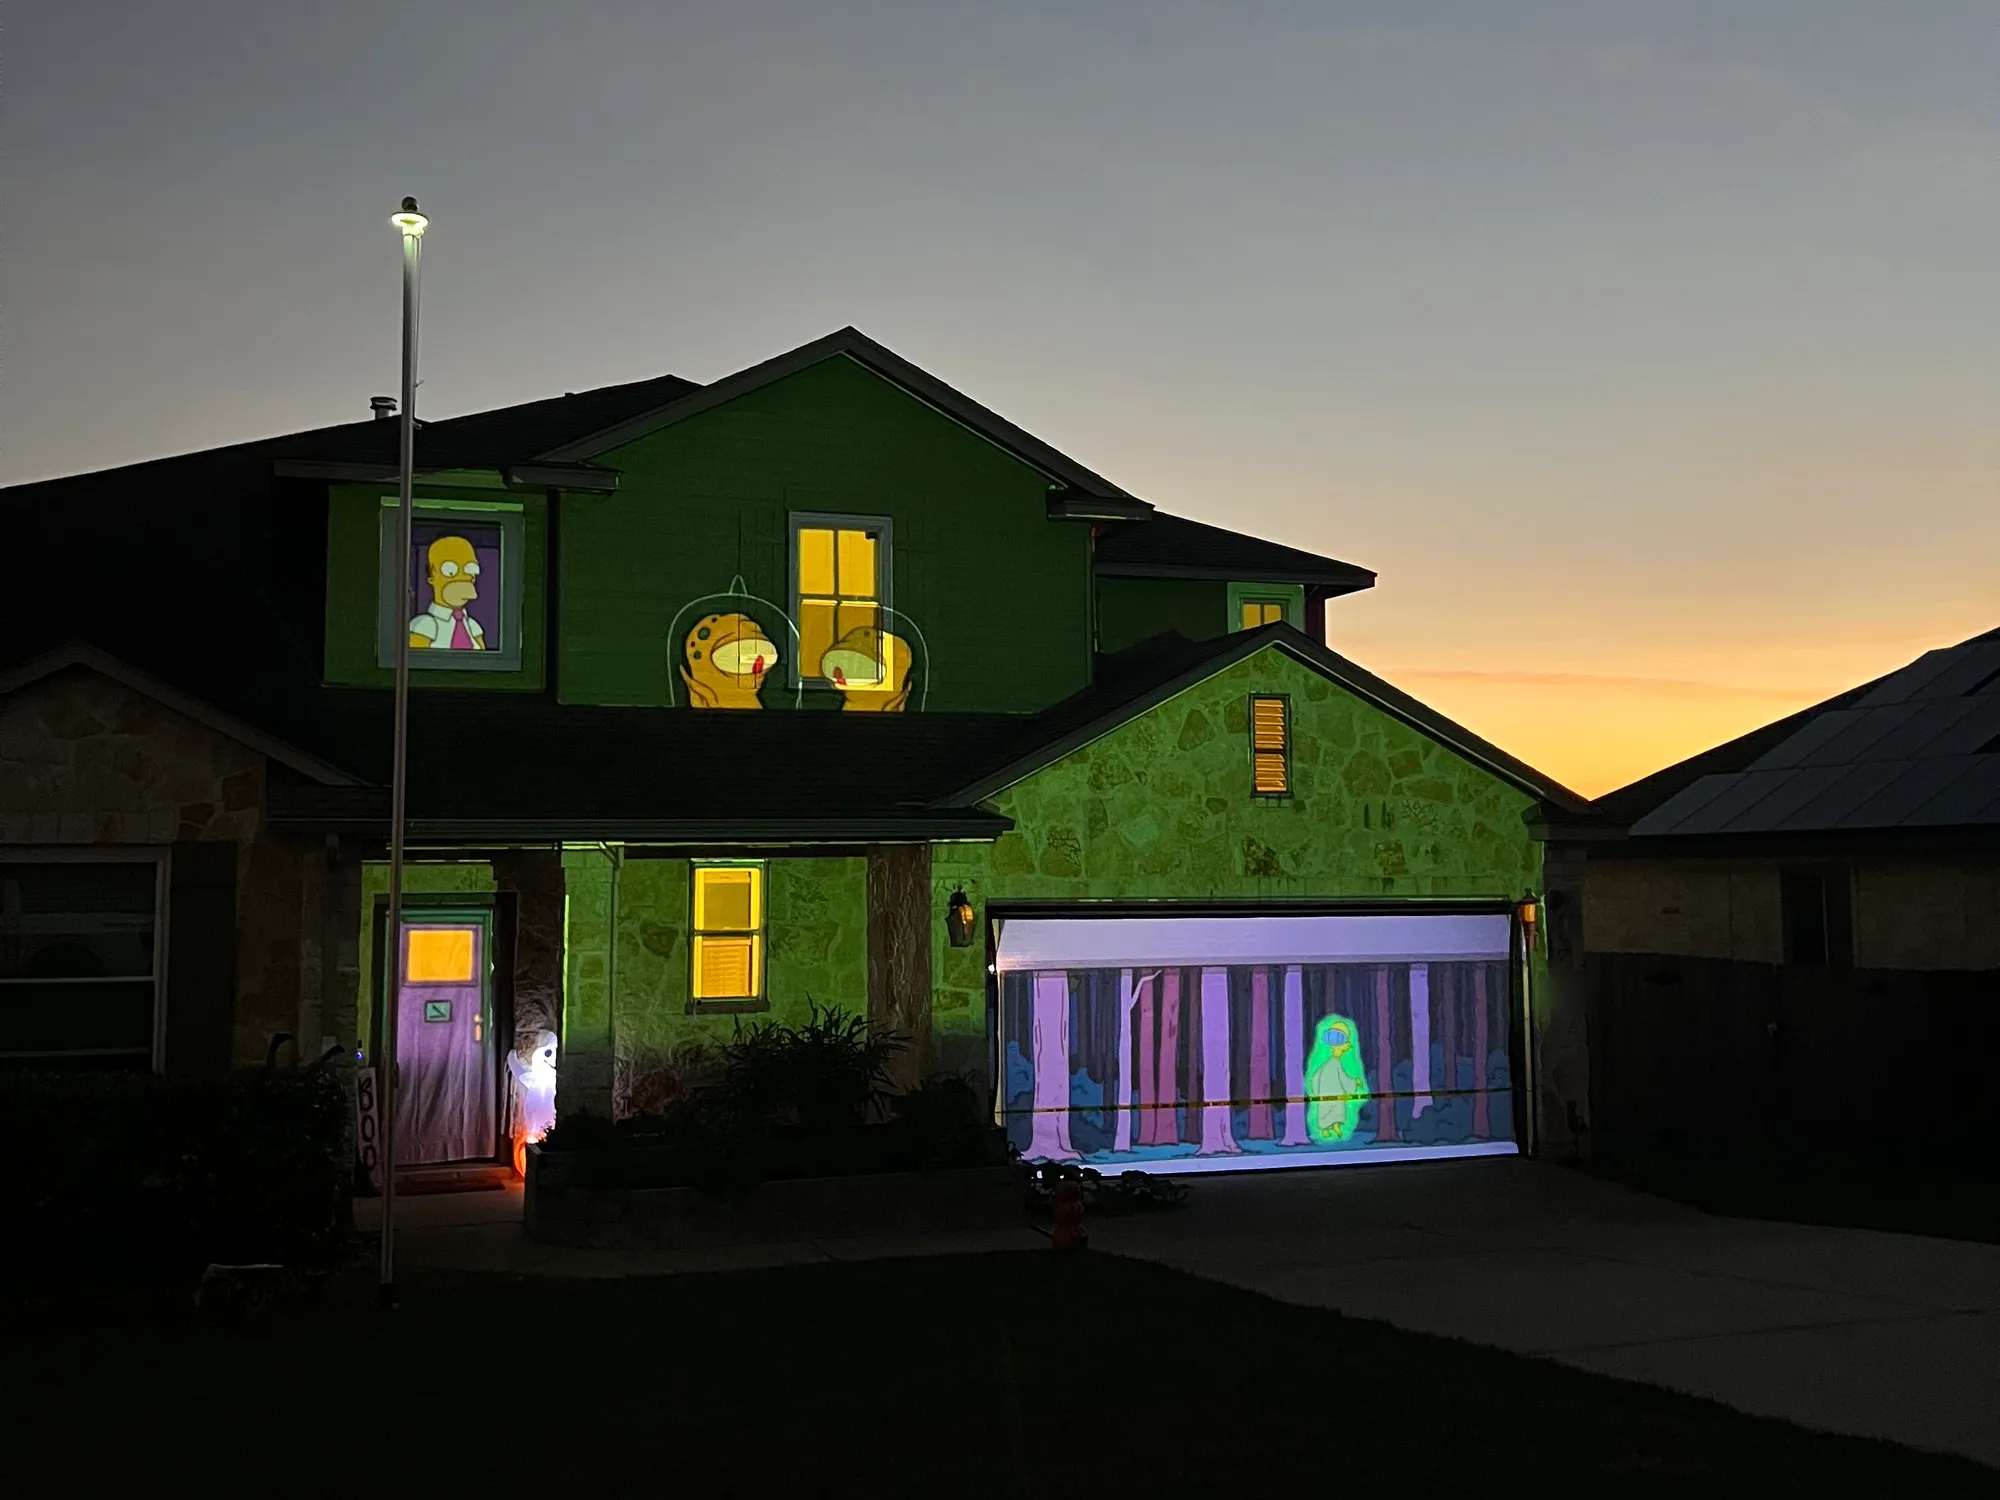
7:14 PM: clearly visible, with light still in the sky.
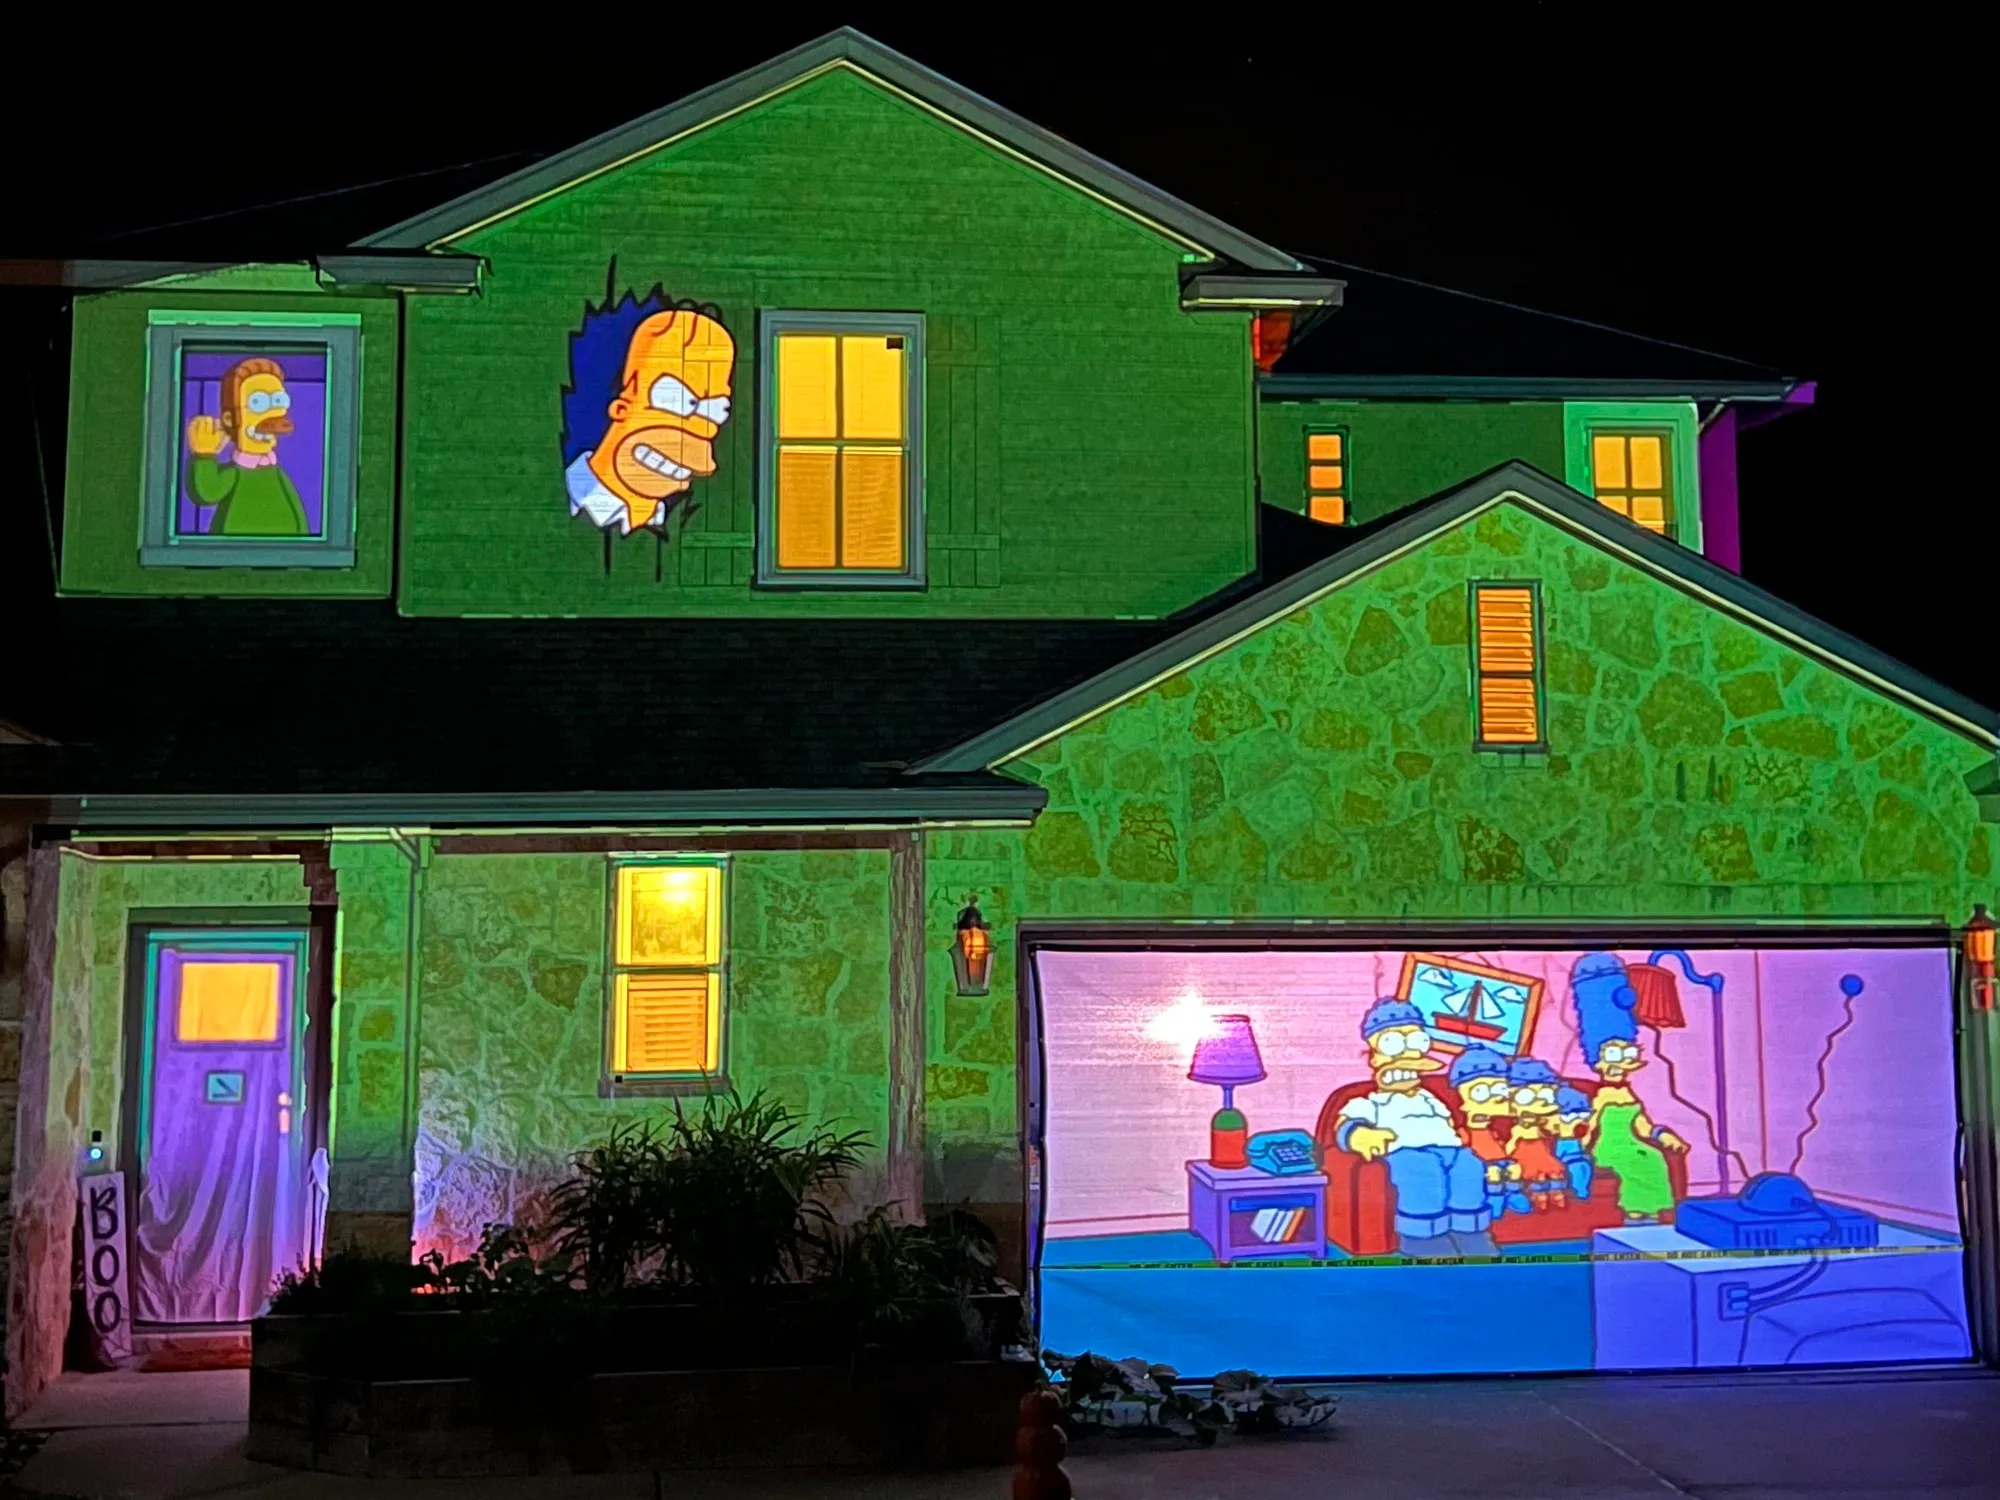
7:52 PM: full dark, from a different spot.
I’m interested in developing a projector brightness calculator that accounts for screen size, projector output, twilight, and ambient lighting. That will be a separate project, because a useful calculator needs measurements from more than one environment.
For now, don’t assume a projector that works for me will be bright enough for your house.
Building a Repeatable Outdoor Projector Mount
My first outdoor projection experiments involved placing a projector on whatever I could find, including improvised supports. The biggest problem with that approach was repeatability.
Projection mapping requires the projected image to align with physical features. Moving a projector even slightly can introduce visible errors. Eventually, I built a more permanent mounting location.
The Concrete Footing
I poured the footing in a 12-inch Sonotube form with fast-setting concrete, and set a length of 2-inch Schedule 40 PVC pipe vertically near its center. The PVC pipe is a sleeve for a removable galvanized chain-link fence post: an 8-foot, 1⅝-inch, 16-gauge post.
The post drops two feet into the ground inside the sleeve. This lets me remove the post between seasons while leaving the concrete footing in place.
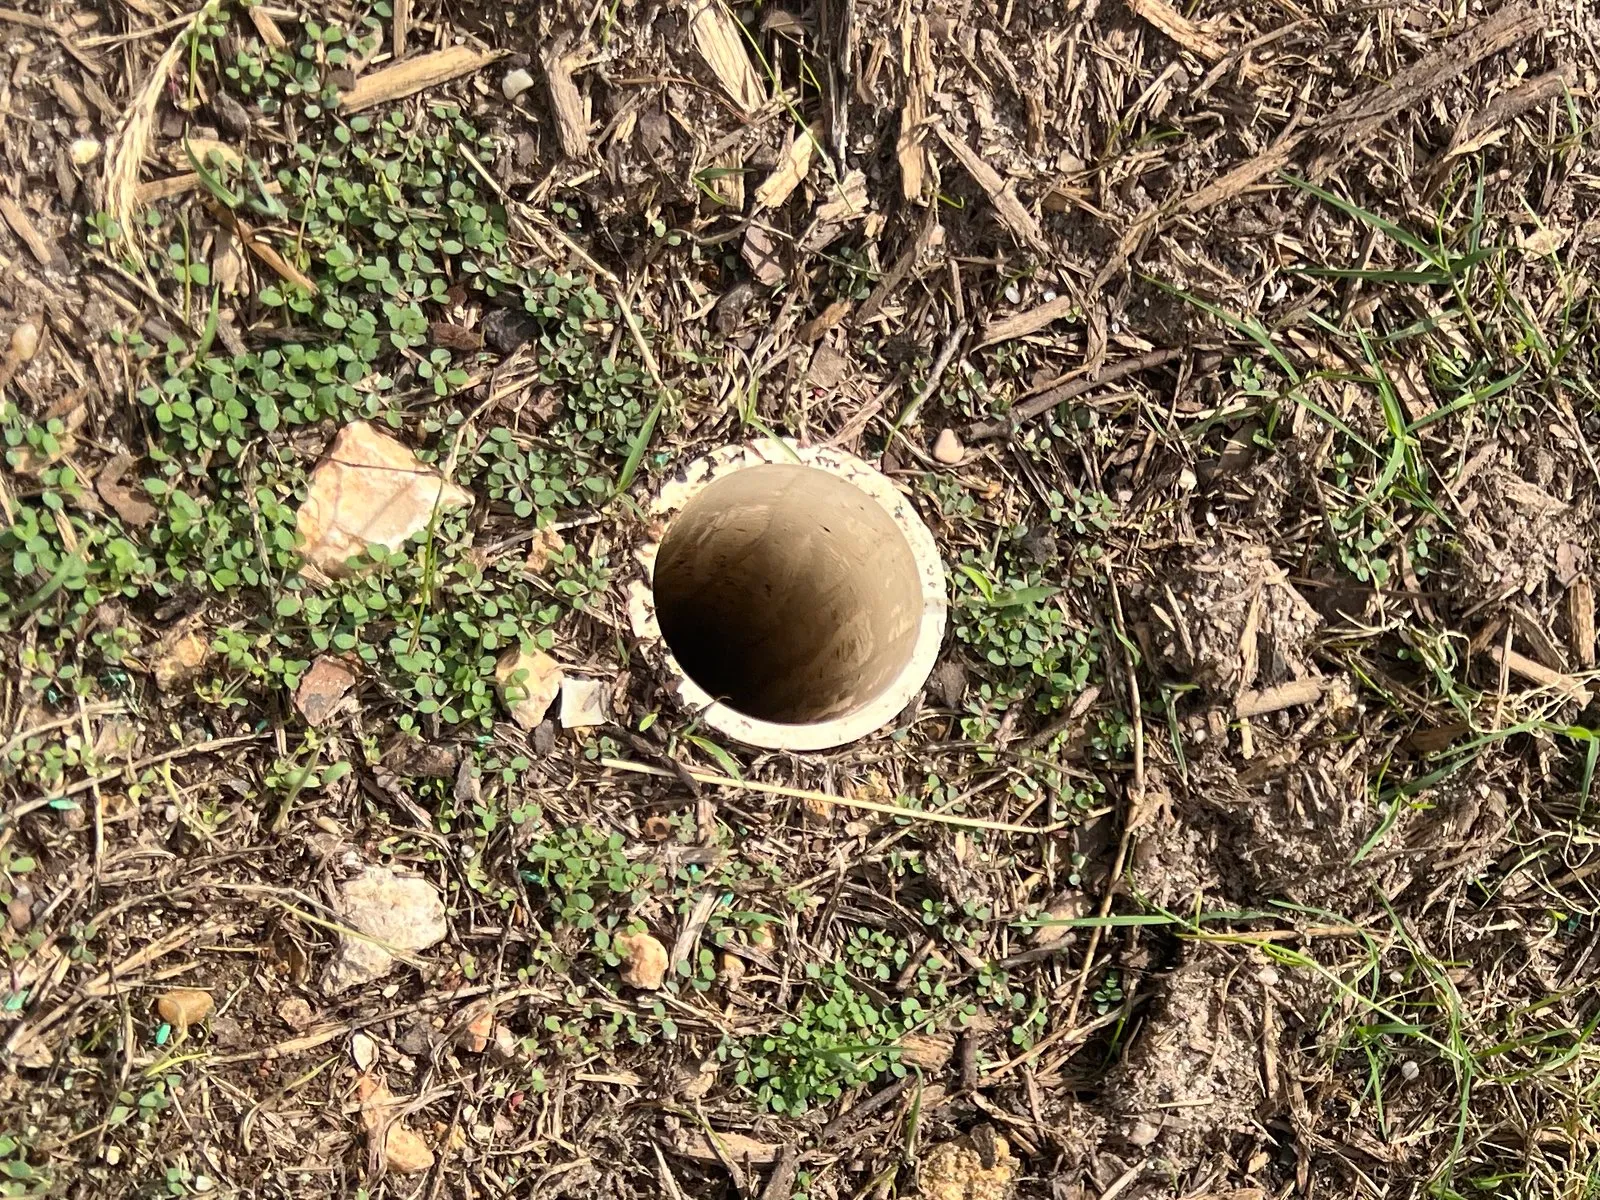
The sleeve with the post removed. The concrete footing around it is hidden under the soil.
Custom 3D-Printed Bushings
The fence post is narrower than the sleeve: 42.26 mm across, inside a 51.15 mm opening. Left alone, that gap lets the wind rock the post, and any movement shifts the projection mapping.
So I designed two PETG parts to center it:
- A flanged bushing at the top of the sleeve. The flange rests on the PVC rim, and a 50 mm collar below it fills the gap.
- A cap on the bottom end of the post. It centers the foot of the post in the sleeve, and a drain hole keeps rain from pooling on the steel.
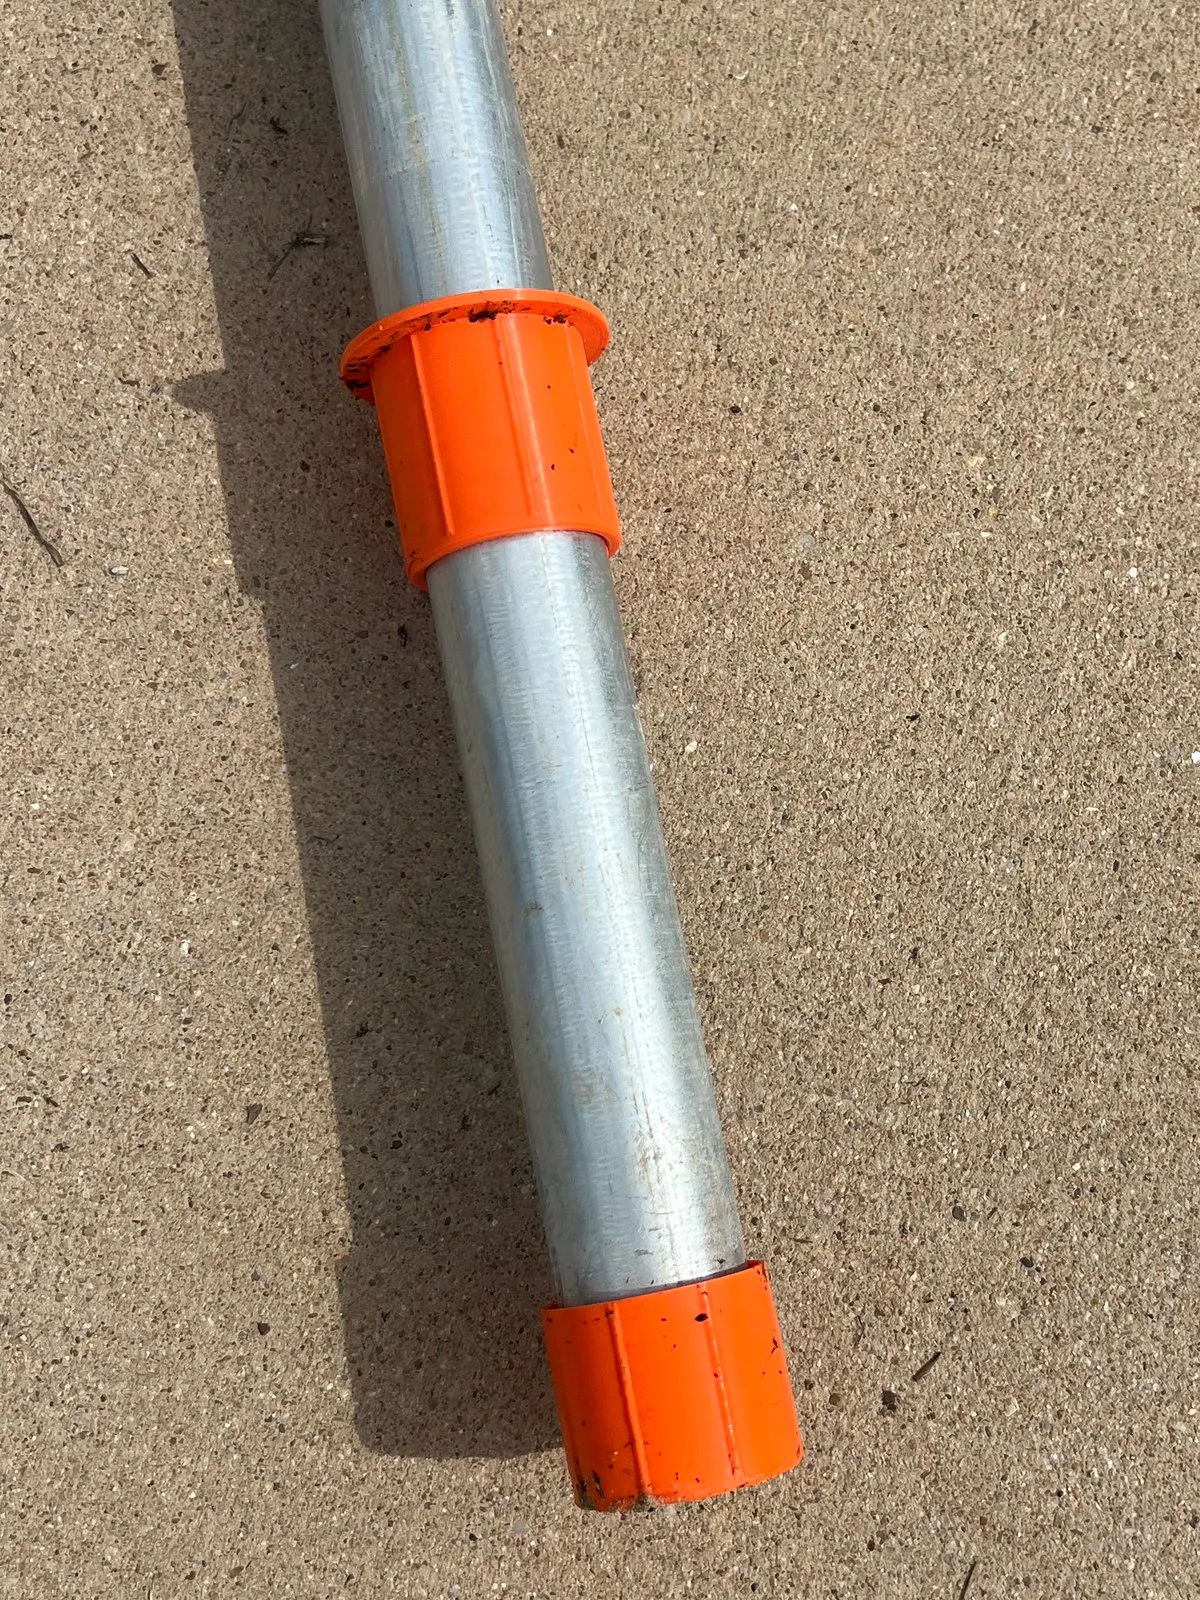
The bushing and cap on the post. When the post is installed, the bushing’s flange rests on the sleeve’s rim and the cap centers the post’s foot.
With one contact point at the top of the sleeve and another at the bottom of the post, the pole stays upright inside it. The bushing’s length matters most: the post pivots about it, so doubling its length halves the tilt for the same amount of slop.
Both parts have small vertical crush ribs on their inner and outer faces. The ribs deform the first time the part goes in, taking up any error in my measurements and any out-of-roundness in the PVC, while the wall between them stays rigid. I printed a short test ring before the full bushing. The first one left a little play in the PVC, so I made the outer ribs slightly larger; the next fit snugly with no trimming, and so did the full bushing.
Claude Code wrote the OpenSCAD models. For the off-season, I also designed a cover that plugs the empty sleeve.
Mounting the Projector Enclosure
At the top of the pole, I repurposed a chain-link fence-post ground flange. It’s normally intended to secure the bottom of a post, but I used it at the top instead.
I attached the flange to a scrap piece of wood, which was connected to a universal adjustable projector mount. The projector mount, originally designed to bolt directly to a projector, instead supports my entire wooden enclosure.
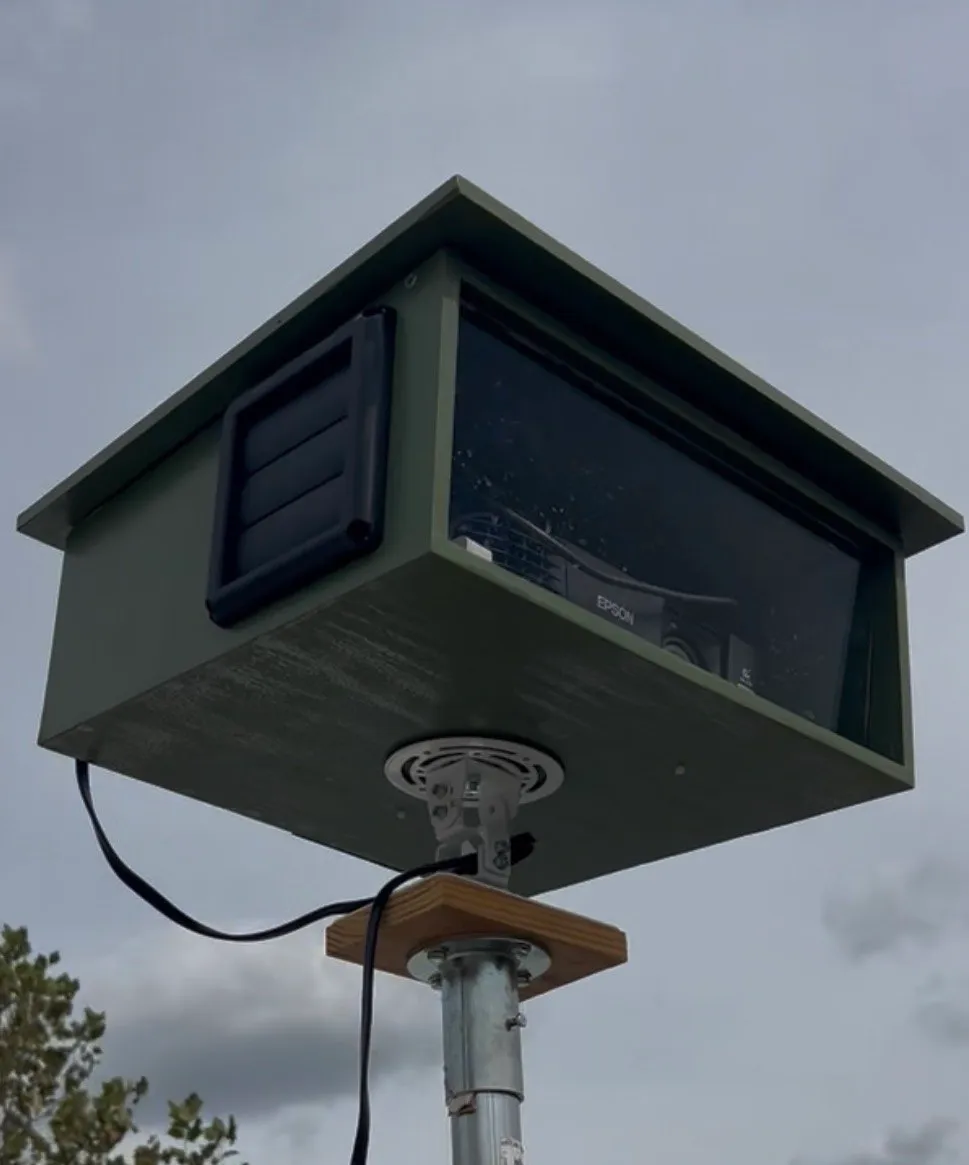
The flange, the wooden plate, and the projector mount under the finished enclosure.
The flange has a set screw that tightens against the pole to prevent rotation. The projector mount provides the fine adjustments needed for aiming and aligning the image. This arrangement has worked, although reinstalling the post still requires manual alignment.
One improvement I’m considering is adding permanent reference marks to the PVC sleeve, fence post, and mounting flange. A shallow dimple for the set screw could also help restore the flange to a repeatable position. That wouldn’t eliminate every alignment adjustment, but it could make seasonal setup significantly faster.
Building the Weather-Resistant Projector Enclosure
Commercial outdoor projector enclosures can be expensive, so I built my own.
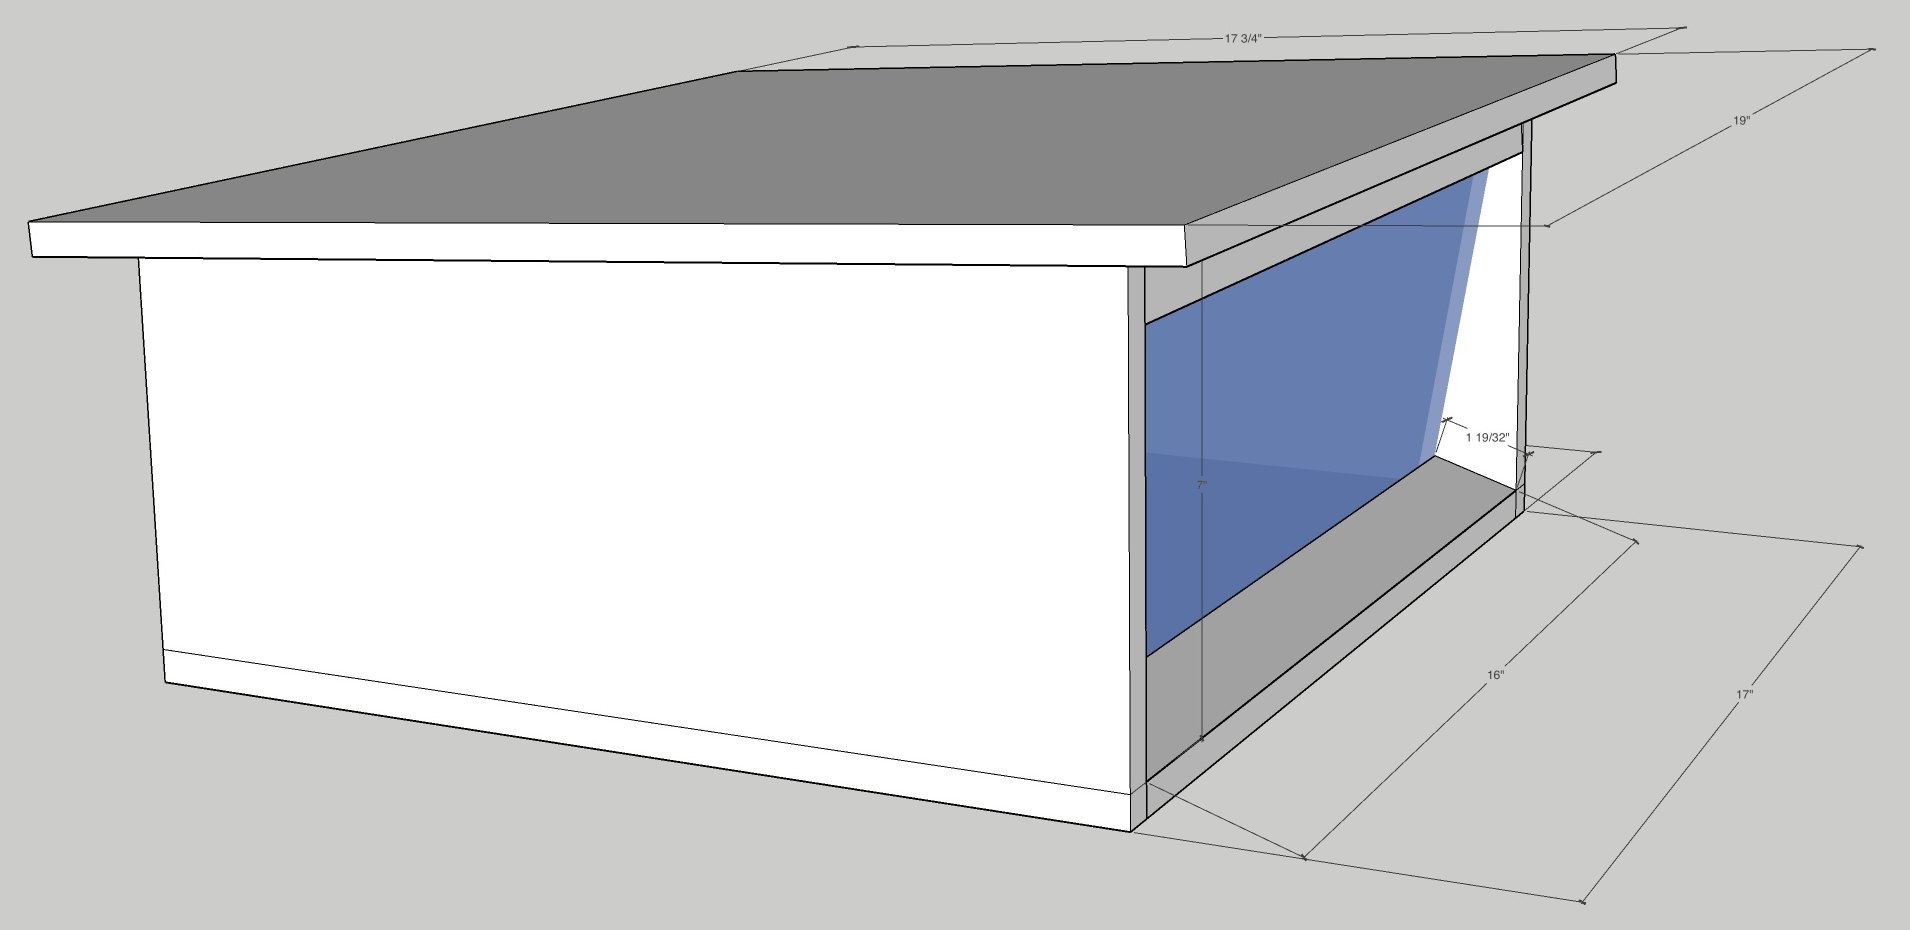
My SketchUp model of the enclosure. In the build, the glass sits a little farther back from the front than drawn, and I left out the wedge under it (more on that below).
Open the enclosure design at full size
The enclosure uses ½-inch plywood. I chose thinner material primarily to limit weight, since the entire assembly would be mounted on a fence post. I painted it green to blend into the surrounding shrubs and trees, then applied two coats of boat epoxy over the paint. The enclosure includes a hinged lid, ventilation openings, a sealed projection window, and a cable gland for power.
The Projection Window
One of the more important components is the glass in front of the projector lens. I ordered custom-cut 6 mm OptiClear anti-reflective glass from HomeTheaterGlass.com.
I cut a rabbet into the wood using a table saw, making two passes to create a recess for the glass. After fitting the glass into the opening, I used caulk to seal its perimeter.
My design also had a small wedge below the glass to shed water away from it. I left it out, because the whole enclosure tilts slightly forward and does the same job.
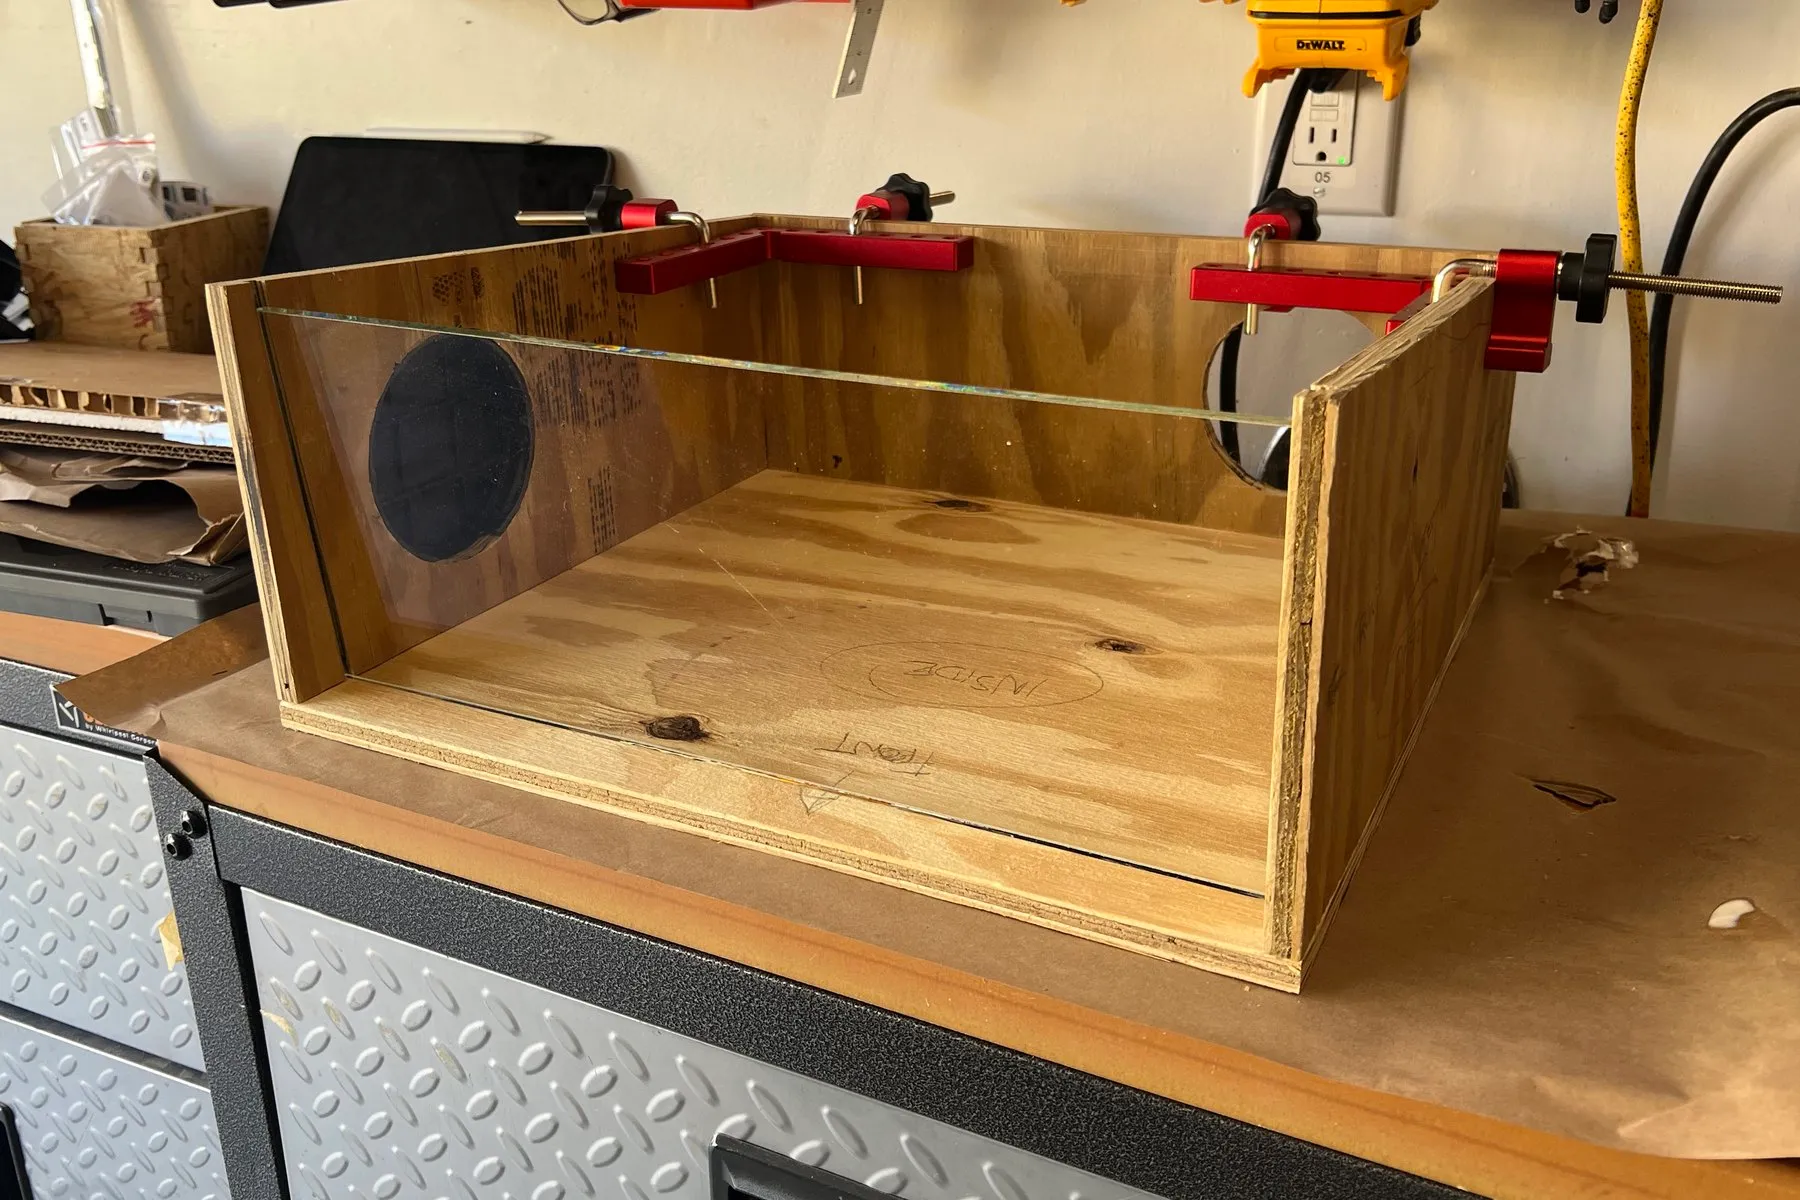
The glass fitted in its rabbet during construction, before paint and epoxy.
The glass is tilted 5 degrees relative to the enclosure’s front.
The tilt is there because even anti-reflective glass reflects some light. If the glass is perfectly perpendicular to the projector’s optical axis, reflected light can travel back toward the lens and cause internal reflections or other artifacts. Tilting the glass redirects those reflections away from the lens.
If you’re reproducing the design, the exact angle isn’t critical. Anything from 5 to 10 degrees is reasonable, as long as reflections don’t go straight back into the projector and distortion stays low.
Sealing the Hinged Lid
I wanted the lid to be removable for adjustments without creating an obvious entry point for rain. Rather than buying dedicated enclosure gasket material, I used leftover adhesive weatherstripping. It was sticky on both sides, so I applied it to the upper lip of the enclosure’s base and covered the exposed upper adhesive with electrical tape.
An adjustable latch pulls the lid down against the weatherstripping, compressing the seal. The latch also accepts an optional padlock.
It wasn’t an elegant solution, but it reused materials I already had, and I haven’t observed water intrusion. That doesn’t mean the enclosure is waterproof or suitable for unattended operation in every weather condition. Weather-resistant is a more accurate description.
Power and Cabling
The enclosure has an internal power strip. Its power cord passes through a cable gland at the back, leaving a short three-prong plug outside. I connect that to an outdoor-rated extension cord plugged into a GFCI-protected outlet. Landscape fabric staples hold the extension cord in place along the ground.
This is a temporary seasonal installation, not permanent electrical wiring. The connections need to be protected from moisture, and the cord must be kept clear of traffic and damage. I don’t operate the projector during rain or leave it running overnight.
Ventilation: The Part I Underestimated
Projectors produce a substantial amount of heat, and enclosing one in a wooden box creates an immediate cooling challenge. I designed the ventilation around my Epson’s specific airflow arrangement.
The enclosure uses two fans: one bringing air in and another exhausting it. They’re positioned to support the direction of airflow through the projector rather than opposing it. This isn’t a universal design. Another projector may have its intake and exhaust in completely different locations.
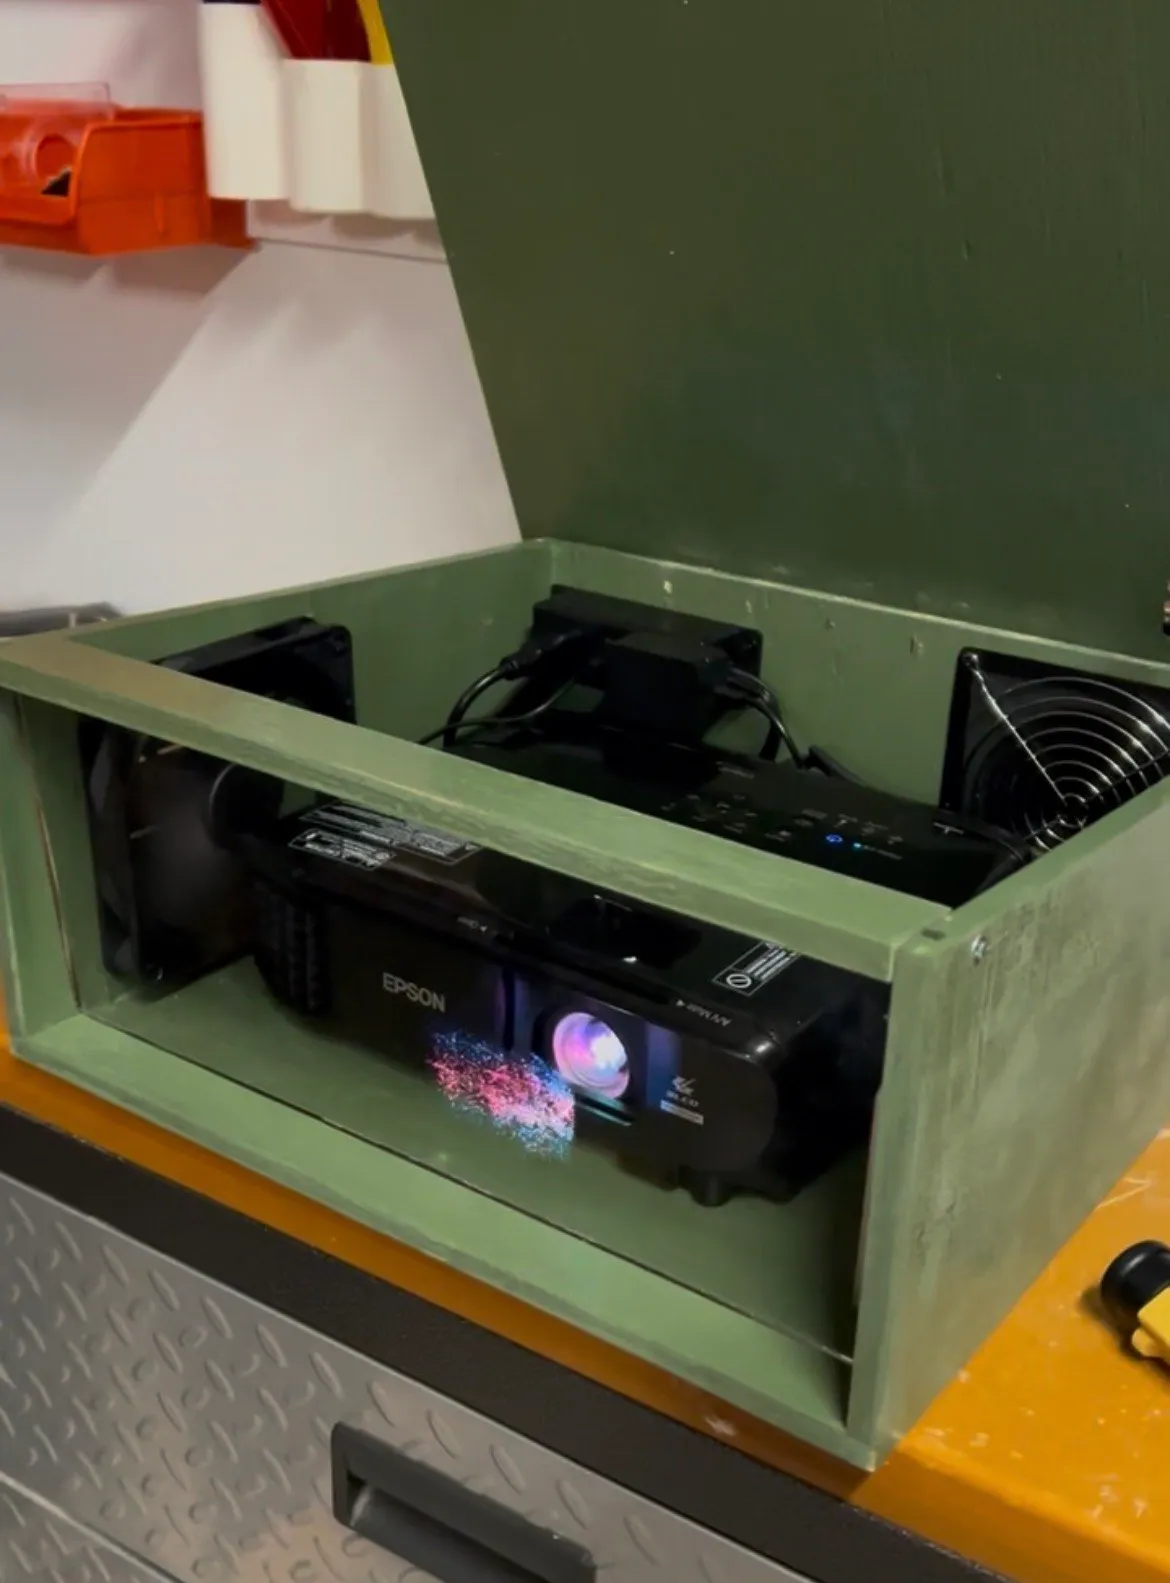
Inside the enclosure. The intake fan is on the back wall, and the exhaust fan is on the side wall.
The Louver Problem
I installed louvered dampers on the ventilation openings to help keep out weather and debris when the fans aren’t running. Unfortunately, the fan airflow wasn’t sufficient to open the louvers fully. I also installed a dust filter, which may have increased airflow resistance.
That didn’t show up right away. I first used the enclosure at Christmas, when the outdoor air was around 40°F, and the cold air kept the projector cool enough anyway. When I set it up in October, with temperatures near 80°F, the projector started overheating right away.
My immediate workaround was to prop the louvers open with a small piece of cardboard. After that, the projector stopped overheating. I considered adding another exhaust fan, but it ultimately wasn’t necessary.
This taught me that a fan’s advertised airflow rating doesn’t tell you how much air will actually move through a restricted enclosure. Filters, duct geometry, louvers, and other restrictions all create pressure losses. A fan rated for a certain CFM under ideal conditions may deliver considerably less airflow once installed.
Measuring Temperatures
I monitored the projector’s intake with a Home Assistant-connected temperature/humidity sensor. A separate standalone sensor measured exhaust temperature. During an extended test with the louvers propped open, I measured:
| Measurement | Reading |
|---|---|
| Ambient temperature (garage, door open) | Approximately 74°F |
| Air at projector intake | 77.7°F |
| Exhaust air | Approximately 86°F |
The projector ran for several hours without overheating warnings. Earlier tests produced substantially higher readings, including exhaust measurements around 117°F and localized surface temperatures above 130°F. However, the sensors weren’t always positioned identically, and the ambient conditions changed, so these numbers aren’t a controlled before-and-after comparison.
I wouldn’t recommend cardboard as a permanent ventilation solution. A better long-term approach would be lower-resistance louvers or dampers that reliably open under the available fan pressure. The main lesson is to test airflow with the actual projector installed, rather than assuming that adding fans guarantees adequate cooling.
The Garage: Rear Projection on a Budget
The garage portion of the display was much simpler. My garage door is about 16½ feet wide by 7 feet tall.
Rather than buying an expensive commercial screen or painting the garage door, I purchased a large piece of white sunshade fabric. It doesn’t come in half-foot sizes, so the 7 × 16 ft piece I bought is a little narrower than the opening. The screen is suspended in front of the door, leaving enough clearance for the garage door to open and close without touching the material.
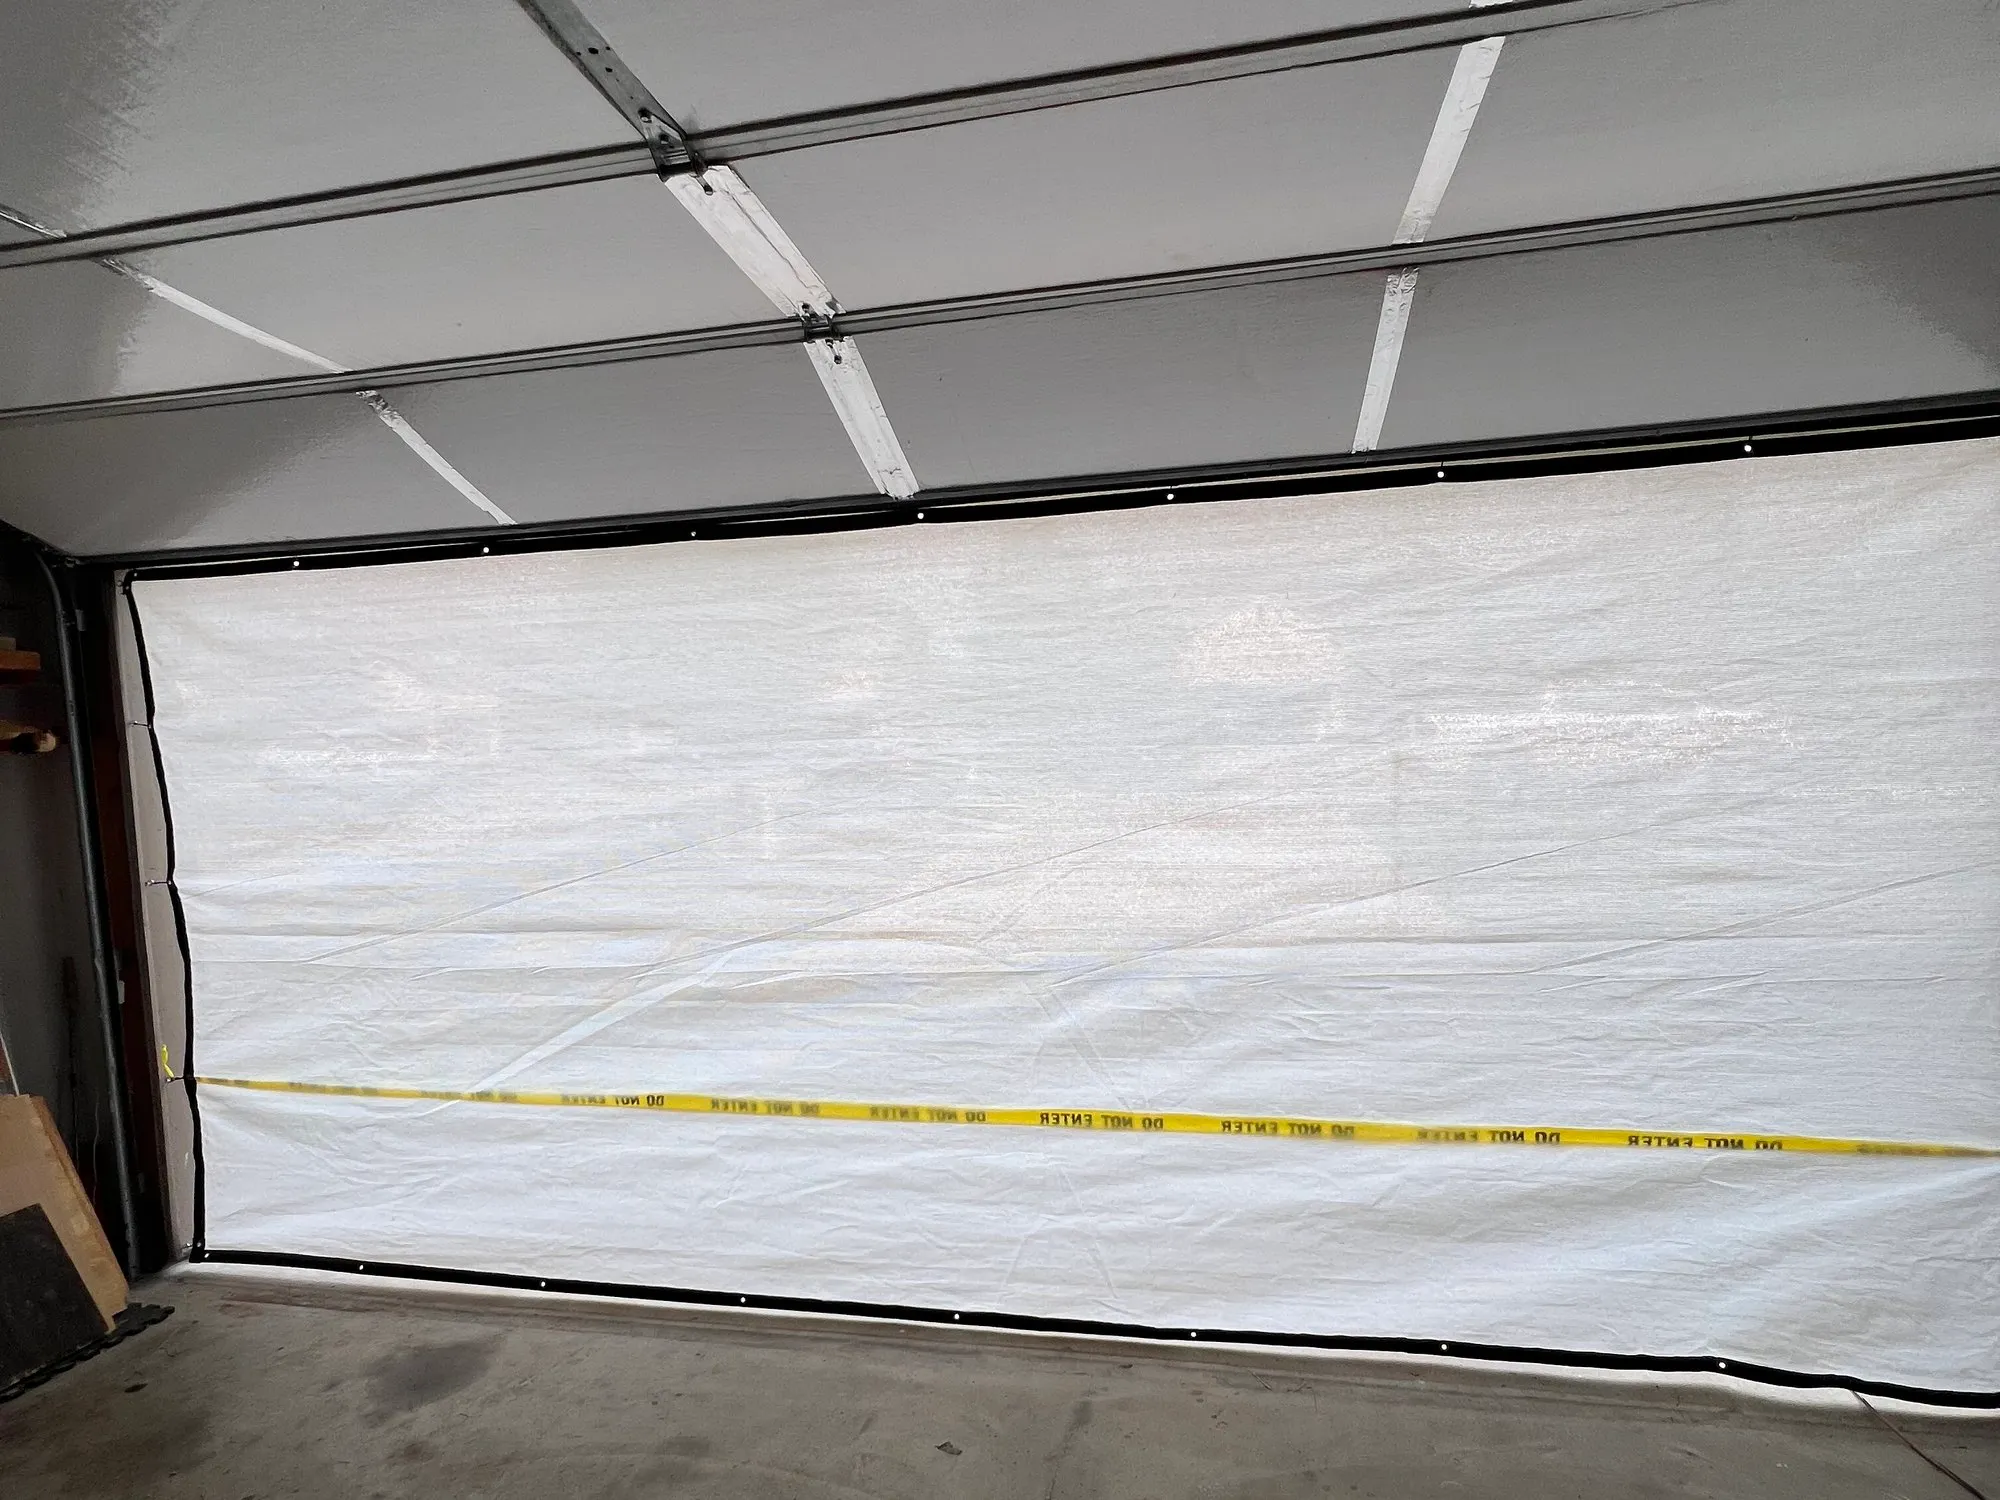
The screen from inside the garage, with the door raised above it.
Mounting the Fabric
I installed eye screws around the garage opening and connected them to the screen’s grommets using zip ties. I used Velcro on one side so I could detach it when necessary to access the garage. This approach has been successful enough that I don’t currently plan to replace it.
The screen stayed reasonably taut, and wind didn’t cause significant movement during testing. Wrinkles were more difficult to eliminate.
I experimented with gently heating the fabric using a heat gun to relax the material. That helped somewhat, but I also melted a small section by holding the heat gun too close. I don’t recommend that as a first approach.
For a similar installation, I’d start with proper mechanical tensioning. Adding some weight along the lower edge might also help, although I haven’t tested that modification.
Why Rear Projection?
I positioned the Goiaey GO2 projector near the back of the garage, sitting on top of a chest freezer. It projects onto the back of the white screen, while the audience watches from outside. This kept the projector indoors, eliminated the need for a second weatherproof enclosure, and made it easier to manage power.
Rear projection also adds a bit of mystery. People wonder where the picture is coming from, and most assume it’s projected onto the garage door itself. So when they walk up and don’t see their own silhouette in the picture, it adds to the magic.
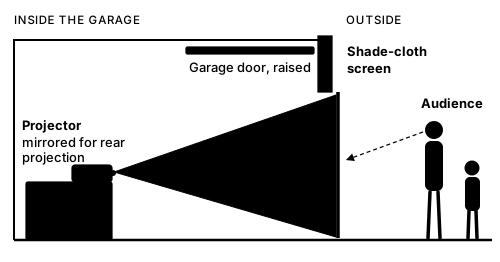
The garage setup from the side. The projector lights the back of the screen; the audience sees the front.
The projector has a rear-projection setting that mirrors the image horizontally. I also used its built-in edge and four-corner keystone adjustment to fit the image to the rectangular screen.
That’s different from my approach with the main house projector, where I deliberately avoided projector-side keystone correction. The garage is a simple rectangle, so using the projector’s built-in correction was convenient.
One downside to rear projection is that I’m standing on the opposite side of the screen when adjusting the picture. The projector’s IR remote is inside the garage, so it isn’t accessible in the same way when viewing from outside. In the future, I may mirror the final video in software instead or add remote IR control.
Creating the AI-Generated Animations
The physical installation made the projection possible, but the animation pipeline was where most of the technical experimentation happened.
ChatGPT helped with the early planning. Claude Code did the heavy lifting on the software: it wrote the AWS infrastructure and the compositing scripts, ran the generation batches, and gave every take a first-pass review. I set the creative direction, gathered the reference frames, made the keep-or-reject calls, and tested everything on the house.
My 2025 workflow used a combination of Stable Diffusion, Google Gemini-assisted prompt development, Veo 3 experiments, and manual compositing in CapCut. I covered it step by step in Projection Mapping With AI: My End-to-End Workflow (2025). The biggest limitation was camera drift.
Why Camera Drift Is a Problem
Imagine projecting an animation of a character looking out of an upstairs window. The first frame is perfectly aligned with the real window. Then the AI video model introduces a subtle camera pan, zoom, or perspective shift. The animated window frame moves a few pixels while the real window remains stationary.
On a computer screen, the effect might barely register. Projected onto an actual building, it’s obvious immediately, and the illusion breaks.
My 2026 goal was to solve that problem while reducing the cost of generating video.
Choosing MiniMax H3
I evaluated approaches using commercial video-generation services, including Seedance through Runway. Ultimately, I used the open-weight MiniMax H3 model, running through ComfyUI on GPU instances I managed in AWS.
The model was self-hosted in the sense that I controlled the infrastructure and execution, but the GPU hardware was rented in the cloud. I wasn’t generating these clips on a workstation in my house.
The workflow used two variants:
- Image-to-video generation for scenes that could be described primarily through text prompts.
- Reference-to-video generation for scenes requiring recognizable characters and closer visual consistency with specific episodes.
The second approach was especially important for characters with distinctive features. Reference images helped substantially, although the results still required review and sometimes multiple generations.
The Trick That Made the Camera Stay Still
The most important discovery was surprisingly simple: I supplied the same still image as both the first and last frame of each generated clip.
Instead of relying exclusively on a prompt telling the model not to move the camera, I gave it visual constraints at both ends.
In testing, the measured translational camera shift was at most approximately 0.26 pixels at the clip’s generated resolution. That measurement doesn’t guarantee there were no localized distortions or perspective changes, but it was a major improvement over the earlier experiments.
It also meant animations could begin and end on the same empty frame. A character could appear, perform an action, and disappear, leaving the original scene unchanged. That made the clips easier to sequence and loop.
Generate Only the Part That Moves
Another important optimization was to avoid generating the entire house for every animation. If Bart was appearing in one window, there was no reason to ask a video model to regenerate the roof, garage, landscaping, and every other window.
Instead, I generated a crop of the specific area where the animation would occur. For example, a small window region could be generated at 768 × 960 pixels, then scaled down and inserted into its corresponding location on the full facade.
That gave the model more pixels to work with for the character while keeping the generation cost manageable. It also prevented most of the building from changing. The static house image remained untouched except for the specific regions being animated.
The simplest way to explain the technique is: never let the AI redraw the house when all you need it to do is animate a window.
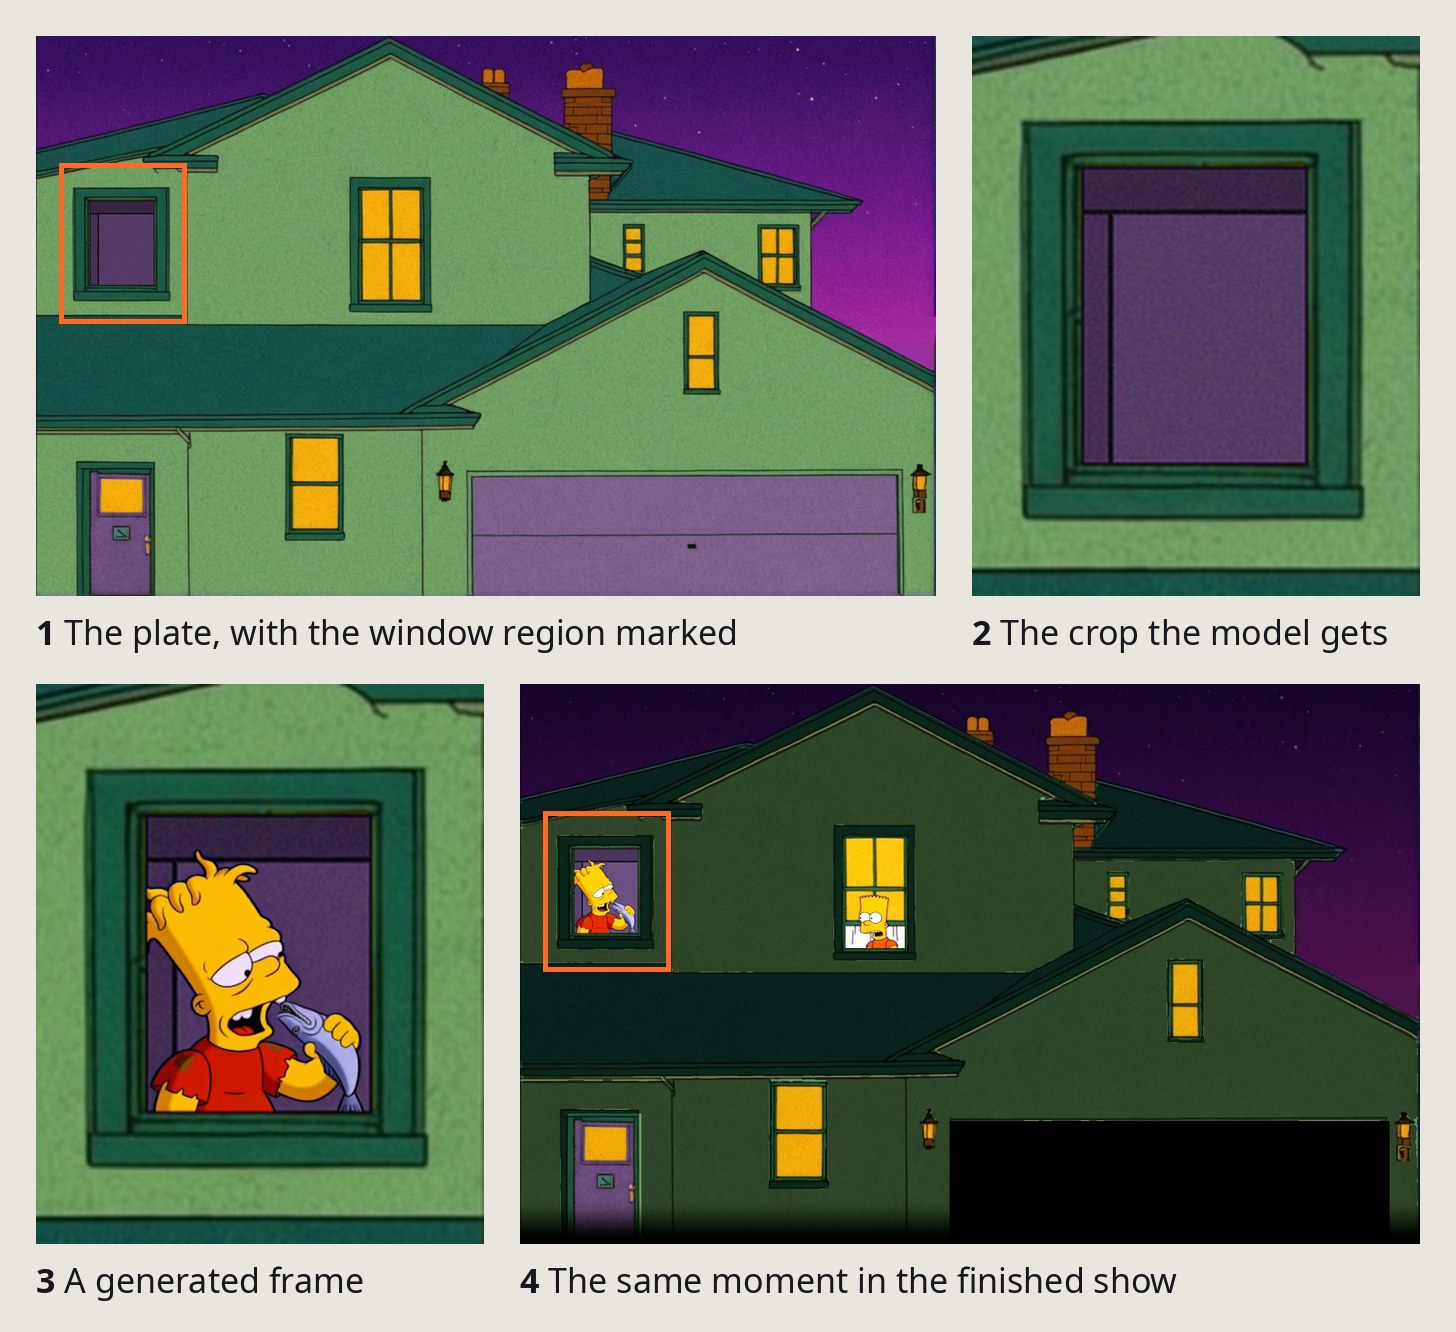
Hugo’s window gag, from the plate to the finished show. In the final frame, the walls are dimmed for projection, the garage is black because the second projector covers it, and Bart is already rising in the next window.
Open the generation steps at full size
Prompting for Controlled Animation
Most prompts followed the same structure:
- Static shot. Explicitly prohibit camera motion, zooming, panning, tilting, and cuts.
- Static architecture. Identify the physical objects that must remain unchanged: the wall, window frame, sill, surrounding architecture, and perspective.
- Permitted movement. Describe exactly what the character is allowed to do and how the scene should end.
For instance, a Bart animation might describe him appearing from below a window, wearing a monster mask, frightening the viewer, removing the mask, and disappearing again. The prompt specifies that the window and surrounding wall never move.
That separation between static architecture and permitted animation made the results more predictable, though not foolproof: the model occasionally invented architectural details, distorted characters, introduced extra limbs, or generated gibberish text.
Reference images and carefully constrained crops were far more effective than simply adding increasingly aggressive instructions to a prompt.
Short Clips Work Better
I also discovered that longer generations were less reliable. At 15 seconds, every clip cut from the wide shot to a close-up within the first 3 seconds, even when the prompt explicitly prohibited it. Clips of five to ten seconds held the shot.
Instead of trying to generate a long continuous scene, I created shorter clips and connected them during compositing. Some longer performances were built by chaining clips that shared a common ending and starting frame. This was faster to iterate on and much less expensive when something went wrong.
Running Generative Video on AWS
I wanted to experiment with open-weight video models, but I didn’t have a local GPU workstation powerful enough for the workflow. Renting a GPU made more sense than immediately purchasing expensive hardware.
The concern was cost control. A powerful cloud GPU can become expensive quickly if an instance is left running overnight. So before deploying the video model, I built infrastructure intended to minimize the risk of runaway spending.
Automated Cost Controls
The infrastructure was managed with Terraform and AWS services, including Lambda, DynamoDB, S3, and AWS Budgets. The system included several layers of protection:
- A start gate checked the remaining spending allowance before launching a GPU session.
- A watchdog recorded usage in a DynamoDB ledger.
- Instance-side systemd timers enforced session limits.
- An idle-shutdown mechanism stopped the worker after approximately 20 minutes without work.
- AWS Budgets provided an additional spending safeguard.
I initially tested these controls using a very inexpensive t3.micro instance before deploying GPU hardware. The monthly application-level cap started at $50 and was increased to $100 later in October.
These protections reduced the risk of an expensive mistake, although cloud billing isn’t instantaneous, so they can’t guarantee against overruns.
GPU Hardware
I initially planned to use AWS g6e.2xlarge instances, which provide an NVIDIA L40S GPU with 48 GB of VRAM. Capacity availability became a problem.
After difficulty obtaining the instance type, I moved to g7e.2xlarge, using an NVIDIA RTX PRO 6000 Blackwell GPU with 96 GB of VRAM. The newer GPU was more expensive per hour but substantially faster.
For one comparable eight-second image-to-video workload, measured generation times were approximately:
| GPU | Generation time |
|---|---|
| L40S, 48 GB | ~170 seconds |
| RTX PRO 6000 Blackwell, 96 GB | ~96 seconds |
In that workload, the faster hardware made the effective cost per generated clip comparable. These are measurements from my specific workflow, not universal GPU benchmarks. Model resolution, clip duration, sampling steps, reference images, and memory management all affect performance.
Reducing Startup Overhead
The model files totaled roughly 76 GB across the variants used. I mirrored them in S3 and copied them onto the GPU instance’s local NVMe storage during startup. On the Blackwell instance, that copy took approximately 34–51 seconds.
Keeping the weights close to the GPU avoided unnecessary downloads and helped reduce the cost of starting and stopping short-lived instances. This mattered because my system was designed to shut down between batches rather than run continuously.
Compositing the Final Show Locally
After generating the individual animations, I handled the rest of the video pipeline locally. This was a major change from 2025, when I had relied more heavily on manual compositing in CapCut. For 2026, I used Python, NumPy, OpenCV, and ffmpeg.
The compositing pipeline is designed around a static image of the house, often called the plate. Every frame begins with that same image. Animated regions are then inserted into their assigned positions.
Defining the Regions
A JSON region map identifies the individual areas where animations can appear. Each region describes the source crop, the model’s generation size, and the destination area on the final plate.
Some regions correspond to windows or doors, where only a precisely defined rectangle should be replaced. Other regions cover siding or larger architectural areas, where feathered masks help blend the animation into the surrounding image.
This lets one animation happen in a window without affecting the surrounding wall. It also means the model doesn’t need to understand the entire house.
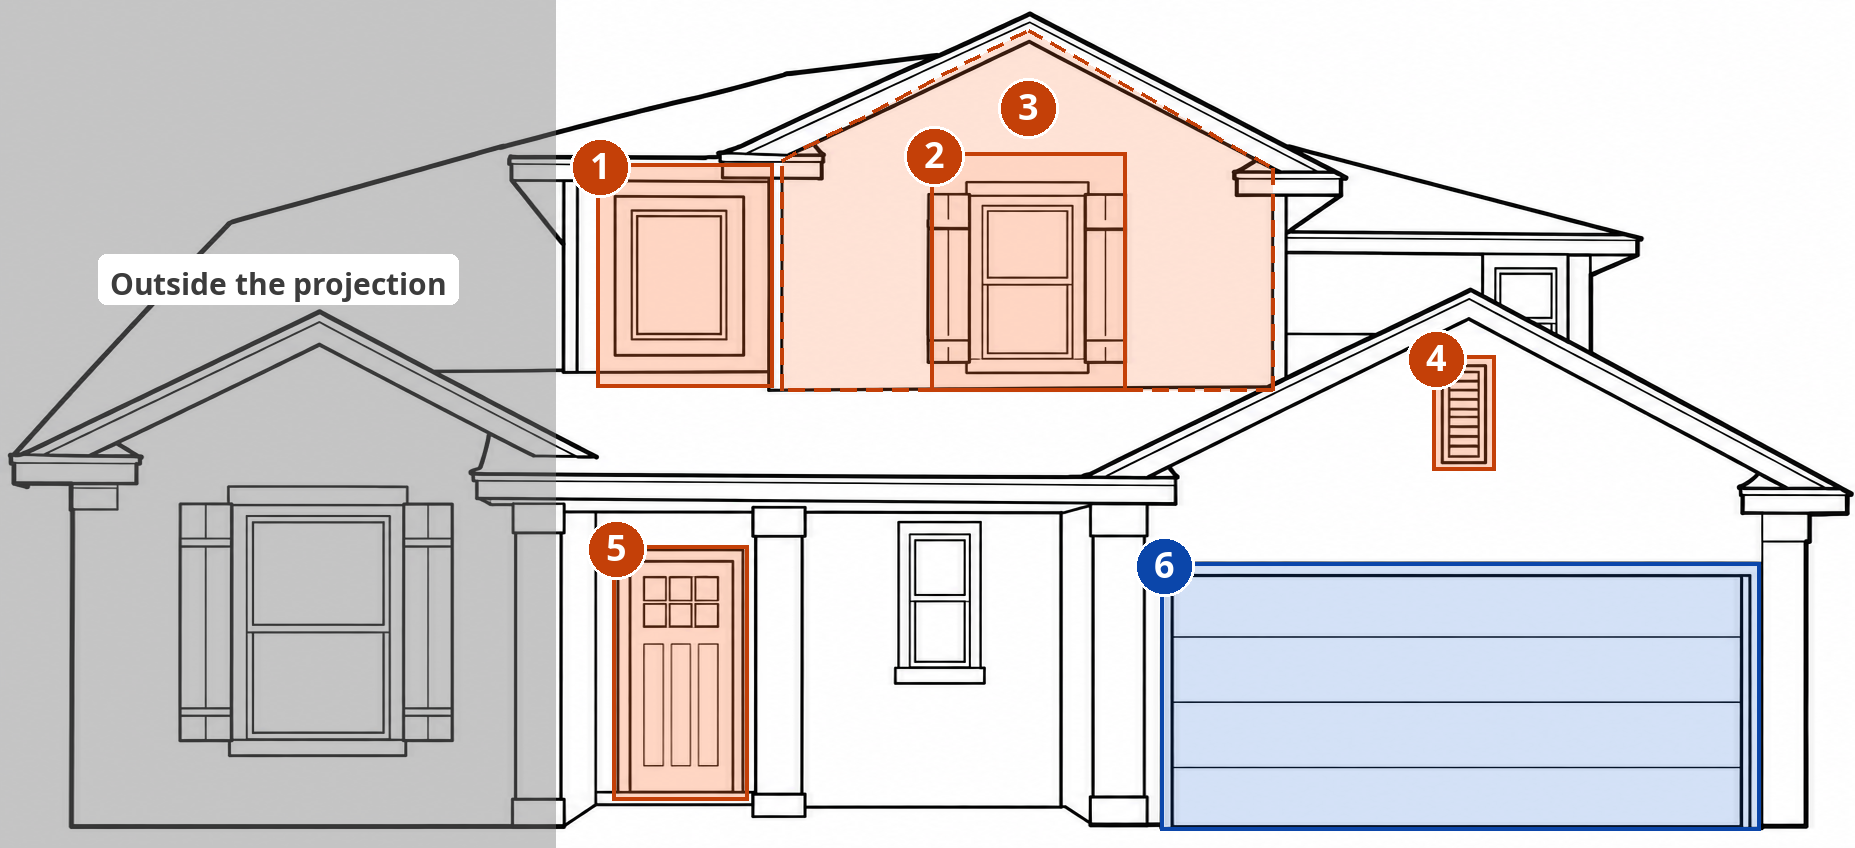
Where the house gags play: 1 the main upstairs window (7 gags), 2 the second window (3), 3 the upstairs wall (8), 4 the gable vent (1), and 5 the front door (2). The solid boxes replace an exact rectangle; the dashed area blends in with a feathered mask. Lightning flashes across the whole facade. The second projector covers 6, the garage screen, and the shaded wing is outside the main projector’s frame.
Open the region map at full size
Building the Timeline
The show configuration describes which animations are used, where they appear, and how they’re scheduled. I could change the order of scenes, adjust brightness, modify masks, or replace a clip without regenerating the animation on a GPU.
The final house loop could be rebuilt locally in roughly 90 seconds. The expensive part of the workflow happens once, during AI generation. Most later changes are inexpensive video-processing operations.
Correcting Problems Without Regenerating Everything
The first real-world projection tests exposed issues I hadn’t noticed on a monitor. Some siding areas were too bright. The front door was too dark. Certain effects needed masking or localized adjustments. Rather than regenerate the entire show, I adjusted the static plate, masks, grading, and timing.
Viewer feedback also helped. For example, viewers suggested a few ways to brighten the dark front door: a white sheet, chalk paint, or peelable paint. I went with the sheet, and that simple physical change made the surface more usable.
Other effects needed localized fixes. One King Homer animation, for example, developed an anatomy problem that required cleanup.
The lesson was to diagnose the specific failure before asking the model to generate another batch.
Playing the Show Without Specialized Hardware
Once the final videos were assembled, playback was relatively straightforward. The main house projector used a Raspberry Pi 3 Model B running Debian 13 and mpv.
The player was configured to launch automatically and loop the video without requiring a desktop environment. The system used direct DRM/KMS video output.
During an 87-minute test, the Raspberry Pi played the house loop at 24 frames per second without recorded dropped, late, or decoder-dropped frames. That was encouraging, because it showed the playback hardware didn’t need to be particularly powerful.
The garage used a different solution: an old ASUS EeeBox PC running Linux and mpv. I used it because I didn’t have another Raspberry Pi available. It automatically launched the garage video and looped it at startup.
What I’d Recommend to Someone Starting Today
A Raspberry Pi or repurposed mini PC is great if you’re comfortable configuring Linux. But for someone who simply wants to play a video continuously through HDMI, a dedicated looping media player may be easier.
The important features to look for are:
- Automatic playback after power is applied.
- Reliable looping without unwanted on-screen controls.
- Support for the required output resolution and codec.
- Suitable behavior after a power interruption.
The MedeaWiz DV-S4 Sprite and the NEUMI Atom 4K look like they should work, but I haven’t tested either one.
The device doesn’t necessarily need to perform live projection mapping. Once the animation has been aligned and exported into a finished video, the player only needs to play it.
Automation Is Still on My List
Although both playback devices could automatically loop their videos, I still powered the projectors on and off manually. I wasn’t particularly consistent about whether I left the playback computers running between evenings.
A future improvement would be to automate projector startup and shutdown. I’m considering IR transmitters connected to the Raspberry Pi, or HDMI-CEC if the projectors support it. I’d like the system to start around sunset, shut down automatically at a configured time, and potentially incorporate environmental conditions such as rain or temperature.
Importantly, the projector should be shut down normally and allowed to complete its cooling cycle before power is removed.
How Much Did It Cost?
The metered GPU compute for the October 2026 generation work came to about $41. That covered 170 generated clips, including experiments, rejected takes, revisions, and final material.
Here’s roughly how it broke down, from my usage ledger:
| Work | Clips | Approximate cost |
|---|---|---|
Infrastructure tests (t3.micro, no GPU) |
— | under $1 |
| Setup and baseline clips | 9 | $6 |
| Doughnut Homer experiments | 13 | $4 |
| First house animation batch | 40 | $4 |
| First garage animation batch | 24 | $3 |
| First reference-mode test | 4 | $1 |
| Reference-mode revisions | 20 | $5 |
| Second-story siding effects | 16 | $5 |
| Second garage batch | 30 | $8 |
| Hugo and Bart window scenes | 6 | $2 |
| Hugo attic revisions | 8 | $3 |
| Total | 170 | about $41 |
Each line is the metered cost of that work’s sessions, rounded to the nearest dollar.
This is not the total cost of producing the show. The GPU total excludes or doesn’t fully capture expenses such as S3 model storage, image-generation API usage, Runway experimentation, and physical materials. I also reused hardware I already owned, which makes the incremental cost very different from what a first-time builder would spend.
The model mirror alone had about $8 a month in storage allowance in the project’s budget. I bought the materials for the enclosure, mount, and garage screen the year before, and prices have changed since, so I’ll just say they came to a few hundred dollars, not counting the projectors.
What Would an API Have Cost?
Hosted APIs are the obvious alternative to running the model myself, so I estimated what the same work would have cost on them. The October work amounted to about 23 minutes of generated video. At list prices in November 2026:
| Method | Price per second | Everything I generated | Only the clips in the show |
|---|---|---|---|
| My AWS GPU setup | metered GPU time | $41 (actual) | about $9 |
| Runway Gen-4 Turbo | $0.05 | about $69 | about $15 |
| MiniMax H3 API, 768P | $0.08 | about $110 | about $24 |
| Runway Gen-4.5 | $0.12 | about $164 | about $36 |
| MiniMax H3 API, 2K | $0.13 | about $178 | about $40 |
The difference comes from iteration. I generated four or five takes for every one that made the show, and on rented hardware, extra takes cost very little. If I’d known in advance which takes would work, any of these APIs would have cost less than I actually spent, and been simpler to run.
These are estimates, not measurements, and they’re generous to the APIs. They assume the same number of takes, but my method pins the same frame at the start and end of every clip, sometimes alongside reference images, and not every API supports that combination. The $9 for my setup is the show clips’ share of the GPU time, so it leaves out the startup and idle time that even a small run would pay for.
Is Buying a Local GPU Worth It?
I’ve considered building a local workstation capable of handling this workflow. There are appealing reasons to do so: no cloud GPU availability issues, more direct control over the hardware, and the ability to queue jobs overnight without hourly instance charges.
But the economics aren’t obvious. When a complete season’s generation costs roughly $41 in GPU compute, it’s difficult to justify spending several thousand dollars on hardware for that purpose alone.
A local workstation makes more sense if I use it regularly for other projects. It would also need sufficient GPU memory. My measured workloads used around 45 GB of VRAM on the 48 GB L40S and approximately 52–55 GB on the 96 GB Blackwell GPU, depending on the workflow.
I haven’t yet benchmarked an RTX A6000 workstation against this exact pipeline. That may become a separate article.
What Worked and What Didn’t
Looking back, a few decisions had an outsized effect on the quality and practicality of the project.
What Worked
- Treating the whole house as one canvas. This was the biggest creative improvement. Connected scenes, recurring characters, and callbacks made the display feel more intentional.
- Animating only what moves. A fixed facade plate with generated crops kept alignment reliable and put the GPU’s work where the animation was.
- Pinning the first and last video frames. This reduced camera drift and made short clips easier to combine.
- Replacing CapCut with scripts. Assembling the clips by region in Python meant the whole export ran from one script. That was a huge improvement over editing by hand in 2025, and a rebuild took about 90 seconds.
- Separating generation from compositing. I could make practical changes after projection tests without paying to regenerate everything.
- Using reference images. They helped preserve recognizable character details without training a custom model.
- Building a removable, repeatable projector mount. The permanent footing made seasonal setup more practical, even though alignment still takes work.
- Testing on the actual house. Many problems weren’t apparent until the image was projected onto real surfaces.
What Didn’t Work as Expected
- Long AI-generated clips. Every 15-second clip cut to a close-up, whatever the prompt said.
- Text generation. Signs and lettering frequently became gibberish.
- Invented architecture. The model sometimes filled unseen spaces with windows, doors, or objects that didn’t belong.
- Too much simultaneous animation. Multiple effects competing for attention could make the show harder to follow.
- Cloud GPU availability. The hardware I initially planned to use wasn’t always available when I needed it.
- Ventilation restrictions. My louvered dampers restricted airflow more than expected, leading to overheating until I propped them open.
- Wrinkles in the garage screen. Heat helped relax the material, but using a heat gun also damaged part of it.
- Manual projector operation. The video players were automated, but starting and stopping the projectors still required physical intervention.
Most of these were the kinds of problems that become visible only after building and operating the complete system.
What I’d Do Differently Next Time
There are several improvements I’d like to make before the next season:
- I’d refine the projector mounting system to make alignment more repeatable.
- I’d improve the enclosure’s ventilation dampers so they open reliably without needing to be propped up.
- I’d automate projector power control.
- I’d find a better way to brighten the front door. The white sheet worked for one night, but it got in the way of opening and closing the door. I’d like to test peelable paint, or something like shelf liner, as long as it doesn’t damage the door’s finish.
- I’d spend more time testing projection materials and brightness. The white fabric garage screen was an inexpensive solution, but there’s room to improve its tension and appearance.
- Longer term, I may replace the main projector with a brighter laser model. That would give me more flexibility during twilight and potentially make the setup more useful in less favorable lighting conditions.
- I’d like to make the whole process easier to reproduce. The workflow contains several custom scripts and infrastructure components. They work together, but there’s still room for a simpler interface that handles scene creation, region definitions, rendering, and deployment.
The Bigger Lesson: Projection Mapping Is Becoming More Accessible
A few years ago, producing a display like this would have required a considerable amount of traditional animation and video compositing work. Generative AI changes that equation.
It doesn’t eliminate the need for creative direction, technical problem-solving, or careful editing. In fact, I probably spent more time deciding what should happen, selecting references, reviewing results, and fixing problems than I did waiting for the model to generate animations.
But it makes experimentation much cheaper. I can try a scene, see whether it works, and revise it without committing days to traditional animation. And by using open-weight models on rented compute, I don’t need to own an expensive workstation to experiment.
My favorite part of this project was seeing the pieces come together: a character escaping from one part of the house, appearing somewhere else later, and creating the illusion that the building itself contained a story.
That’s where I want to take this next: displays that make better use of the environment and give people something worth stopping to watch.
Next steps
The easiest way to get started is LumaMap, which is where I started. When you’re ready to add video, my 2025 workflow covers capturing the house, generating a themed still, aligning it, animating it, and playing it back on a Raspberry Pi, with its files in the projection-mapping repository. Then draw your outline through the projector, as described in Outline or Photo?, and animate a single window before you plan a whole show.
Resources
Watch the Podcast Interview
I discussed the project on Four Finger Discount, a podcast dedicated to The Simpsons. We talked about how the idea evolved, the animation workflow, and some of the challenges involved in creating the display.
Listen to the interview:
The interview is also available through Four Finger Discount on Spreaker.
Hardware and Materials
Here are the main components used in the project. Some were purchased specifically for the installation; others were reused from equipment I already owned. Product availability and prices change, so verify compatibility rather than assuming a linked component is universally suitable.
| Component | What I used |
|---|---|
| Main projector | Epson Pro EX9220 |
| Garage projector | Goiaey GO2 |
| Outdoor mount | Galvanized 1⅝-inch fence post, PVC sleeve, concrete footing |
| Post centering | 3D-printed PETG bushing and cap |
| Projector adjustment | Universal multi-axis projector mount |
| Mount adapter | Fence-post ground flange and scrap wood |
| Enclosure | ½-inch plywood |
| Weather protection | Green paint, two coats of boat epoxy |
| Projection glass | Custom-cut 6 mm OptiClear anti-reflective glass |
| Glass supplier | HomeTheaterGlass.com |
| Ventilation | Intake and exhaust fans, louvered dampers, dust filter |
| Electrical | Internal power strip, cable gland, outdoor extension cord, GFCI outlet |
| Lid seal | Scrap weatherstripping and latch |
| Garage screen | White sunshade fabric |
| Screen mounting | Eye screws, zip ties, Velcro |
| Main video player | Raspberry Pi 3 Model B |
| Garage video player | ASUS EeeBox running Linux |
Parts References
These are the parts I bought for the mount, the enclosure, and the garage screen.
Mount:
Enclosure:
- TotalBoat clear penetrating epoxy
- 12-inch stainless steel piano hinge
- Lid support hinge
- Stainless steel toggle latch
- Power strip with USB-A and USB-C ports (an alternative to the one I used)
Ventilation:
- 4-inch louvered vent cover with backdraft flap
- 4-inch louvered gravity-damper vent cover
- 140 mm USB fan with speed controller
- 140 mm magnetic dust filter (an alternative to the one I used)
Garage screen:
Technical Summary
For readers interested in the implementation, the system includes:
- Terraform-managed AWS GPU infrastructure with spending controls.
- ComfyUI workflows for MiniMax H3 image-to-video and reference-to-video generation.
- Python tools for region mapping, compositing, masking, grading, and timeline assembly.
- ffmpeg-based video processing.
mpvrunning on Linux playback devices.- JSON configuration describing the seasonal show and its animations.
If there’s enough interest, I’ll share more of the technical details. Let me know at card-lysine.3j@icloud.com. If you’d like to hire me for a custom project, the same address works.
A Note About AI Models and Intellectual Property
This was a personal fan project. The Simpsons and Stranger Things belong to their rights holders, and this project isn’t affiliated with or endorsed by them. The show was free to watch.
MiniMax’s community license for H3 excludes a few regions, including the United States, while MiniMax evaluates local AI regulations there, and it invites people in those regions to request a license. I asked MiniMax for that exception, and it granted the request on October 16, 2026. Beyond that, the license’s general terms apply, including a separate authorization for commercial products that earn more than $20 million a year.
That authorization concerns the model’s terms of use; it should not be interpreted as a license to use The Simpsons intellectual property.
If you build something similar, check that you have the rights to do what you’re planning, both under the model’s license and for any characters or other content you use.